
Last Updated on 5th December 2025 by peppe8o
In this tutorial, I’m going to show you how to connect, configure and use a Raspberry PI Pico Ethernet Port with WIZnet Ethernet HAT. We’ll use CircuitPython to connect the interface as, actually, the MicroPython libraries are under development.
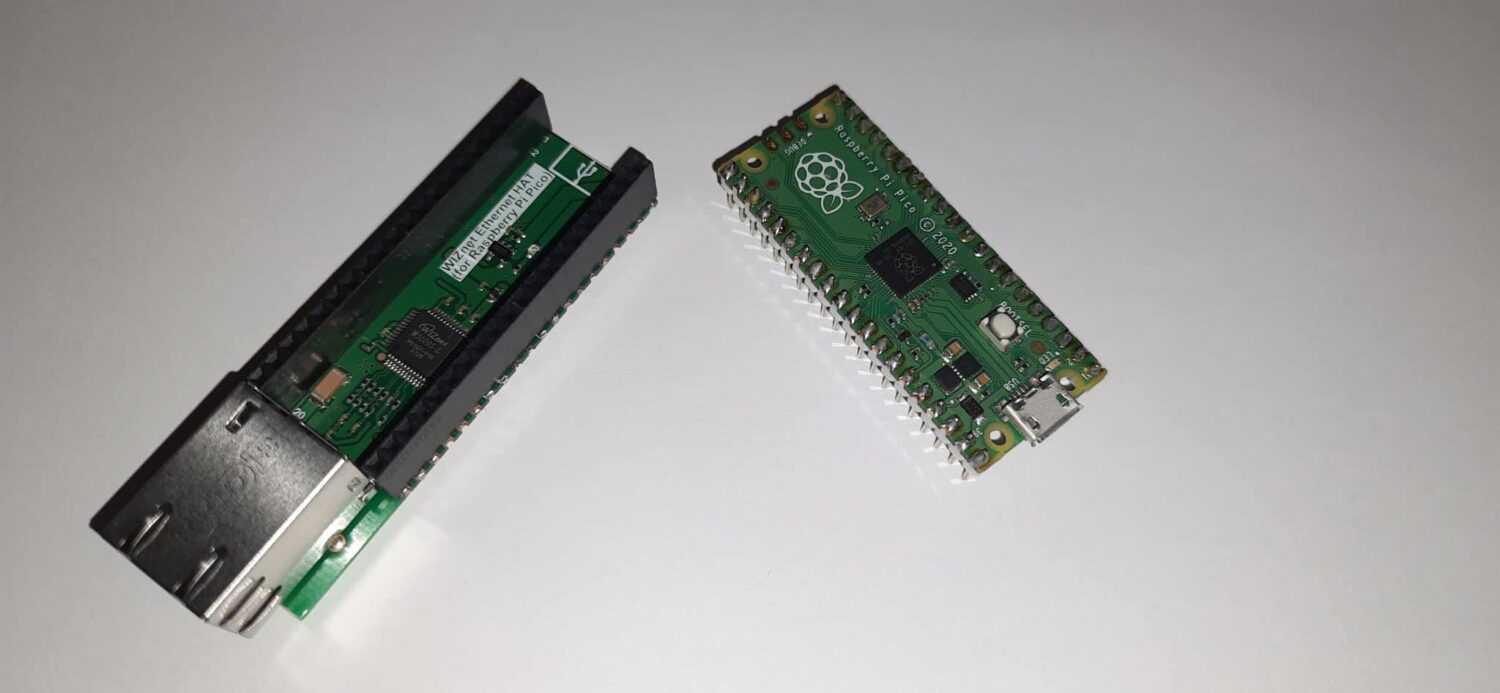
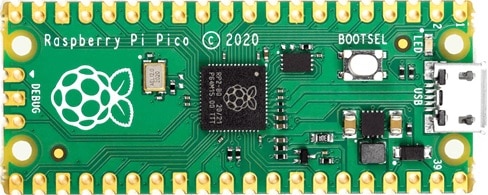
Raspberry PI Pico works greatly to keep sensors measurements, combining/analyzing them and delivering data to external world. Adding an Etherneth port to Raspberry PI Pico with the WIZnet Ethernet HAT (based on W5100S chip) add a networking layer to improve communications
WIZnet Ethernet HAT uses the W5100S chi, adding a HAT compatible to Raspberry PI Pico.
WIZnet W5100S Chip: Technical Specs
The W5100S is an embedded Internet controller, providing ethernet connectivity to devices able to support the SPI (Serial Peripheral Interface) communication or Parallel System BUS.
W5100S integrates the Hardwired TCP/IP stack with 10/100 Ethernet MAC and PHY. Supports the most used communication protocols: TCP, UDP, IPv4, ICMP, ARP, IGMP, and PPPoE. W5100S also supports WOL (Wake on LAN) and a Power Down Mode in order to reduce power consumption.
Main features:
- Support Hardwired Internet Protocols: TCP, UDP, WOL over UDP, ICMP, IGMPv1/v2, IPv4, ARP, PPPoE;
- Support 4 Independent Hardware SOCKETs simultaneously;
- Support SOCKET-less Command: ARP-Request, PING-Request;
- Support Ethernet Power Down Mode & Main Clock gating for power save;
- Support Wake on LAN over UDP;
- Support Serial & Parallel Host Interface: High Speed SPI(MODE 0/3), Parallel System Bus with 2 Address signal & 8bits Data;
- Internal 16 Kbytes Memory for TX/ RX Buffers;
- Not support IP Fragmentation;
- Not Maintain ARP-cache Table;
- 10BaseT/100BaseTX Ethernet PHY Integrated;
- Support Auto Negotiation (Full/Half Duplex, 10/100 Speed);
- Support Auto-MDIX when Auto-Negotiation Mode;
- 3.3V operation with 5V I/O signal tolerance;
- LED outputs (Full/Half Duplex, Link, 10/100 Speed, Active);
- Two types of packages: 48 Pin LQFP & QFN Lead-Free Package (7x7mm, 0.5mm pitch).
More info can be found on WIZnet W5100S specs page.
The WIZnet Ethernet HAT
WIZnet Ethernet HAT is a board compatible with Raspberry Pi Pico, built to match Pico pins one by one, so making it possible to mount them face-by-face.
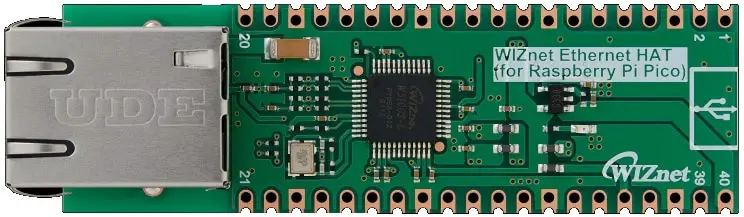
It integrates the WS5100S chip and has an Ethernet port used to connect it to routers, switches and any ethernet-compatible routing/switching hardware.
In this tutorial I’ll show you how to use it and how to configure 2 simple examples: a ping test, to check that everything is working, and a simple HTTP server test, to show Raspberry PI Pico info from a web page and give control to its board LED.
More info is available from the WIZnet Ethernet HAT page.
What We Need
As usual, I suggest adding from now to your favourite e-commerce shopping cart all the needed hardware, so that at the end you will be able to evaluate overall costs and decide if to continue with the project or remove them from the shopping cart. So, hardware will be only:
- A common computer (maybe with Windows, Linux or Mac). It can also be a Raspberry PI Computer board
- Raspberry PI Pico microcontroller (with a common micro USB cable)
- a WIZnet Ethernet HAT (you can check it from Mouser or from Digikey)
Check hardware prices with the following links:
Check hardware prices with the following links:


Step-by-Step Procedure
Wiring Diagrams
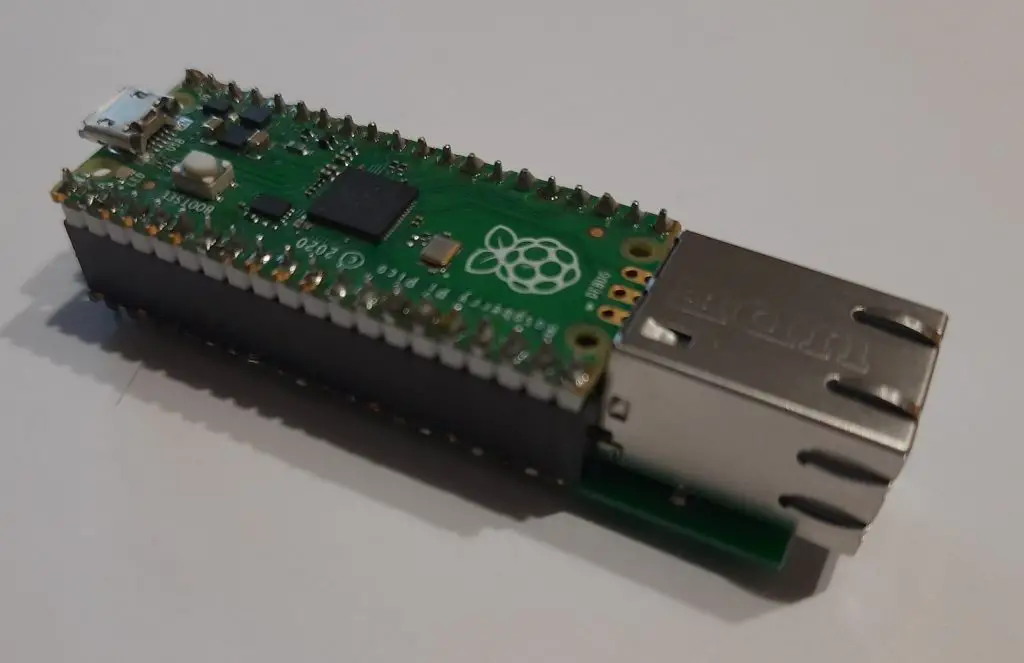
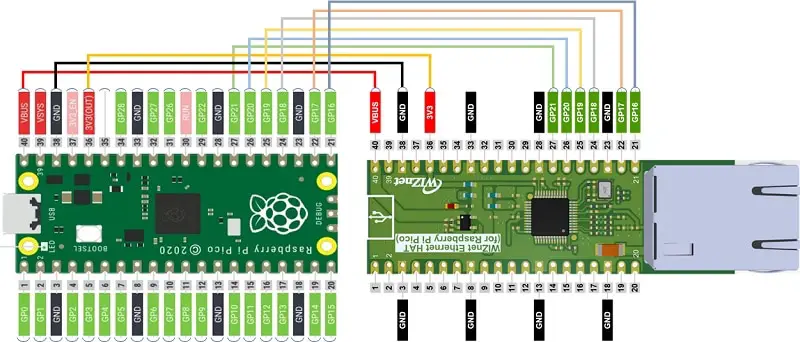
First of all, we need to wire correctly the HAT. We have 2 options: the “Hardware Attached on Top” (HAT) connection or wiring it with Dupont cables.
The first option is the simpler one and allows a direct connection between the 2 boards. It is also the one I used in my tests:

The second option is connecting only required pins with cabling.
In this case, you have to use the following wiring diagram:
Install CircuitPython
Download CircuitPython from https://circuitpython.org/board/raspberry_pi_pico/. From this page, select your favourite language and click “Download .UF2 Now”.
Install it in your RPI Pico: with BOOTSEL key on RPI Pico kept pressed, plug the USB cable in your computer and release the key once a new storage device is found. Copy the “.UF2” file inside the new storage folder. Don’t worry if any other files are already in the storage, just copy the uf2.
Once copied, the storage will be automatically removed and a new storage device will appear. The new storage will be named “CIRCUITPY”. CircuitPython is now installed.
From here you can work with the comfortable Thonny IDE. Download it from Thonny official site and install it on your computer. Once installed, make sure that Thonny shell is visible (or activate it from Thonny menu -> View -> Shell. Same way, you can show files from your connected device by enabling the Thonny menu -> View -> Files
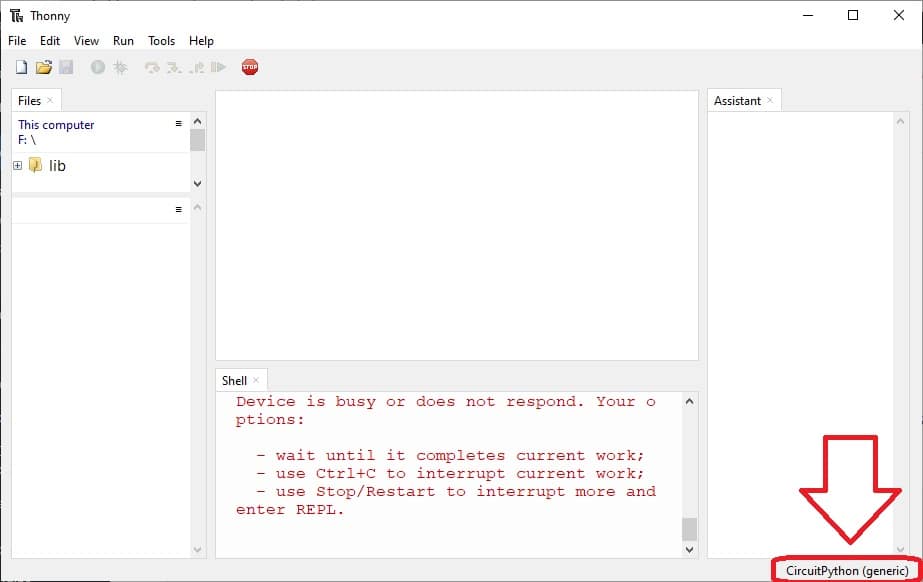
With Raspberry PI Pico connected, select the new interpreter from bottom-right button in Thonny window and change it from “Python3.7.9” (or whatever Python version results from your Thonny IDE) to “CircuitPython (generic)”:
Your shell may indicate that the device (Raspberry PI Pico) is busy or does not respond. To make it active, click in shell area and press CTRL+C. This stops any program from running in Raspberry PI Pico. To run any “code.py” file you will have to click again here and press CTRL+D.
Check CircuitPython is working
Edit the code.py file with Thonny and make it as follows:
import board
import digitalio
import time

led = digitalio.DigitalInOut(board.LED)
led.direction = digitalio.Direction.OUTPUT

while True:
    led.value = not led.value
    time.sleep(0.5)
Save it. Position your cursor into the shell area (clicking there) and press CTRL+D. The Raspberry PI Pico starts blinking. This means that the firmware is working correctly. Good.
So, for every change on code.py you will stop the running code with CTRL+C in the shell area, change and save the code.py and then reload the new code with CTRL+D.
Copy WIZnet libraries
We need now to copy inside the lib folder in our Raspberry PI Pico storage the files from https://github.com/Wiznet/RP2040-HAT-CircuitPython/tree/master/libraries.
For basic tests, we can go only with the following:
- adafruit_wiznet5k (all the folder)
- adafruit_bus_device (all he folder)
- adafruit_requests.mpy (this is a file)
But soon you will need also other libraries as your projects will start growing, so my suggestion is to copy the entire libraries packages and put them in your lib folder. An easy way to get these files and folders is using the downgit.github.io service and here using the https://github.com/Wiznet/RP2040-HAT-CircuitPython/tree/master/libraries path.
The new structure in our Raspberry PI Pico storage will be the following (from a Windows PC, so my CIRCUITPY storage appears as “F:” drive):
F:\
│   .metadata_never_index
│   .Trashes
│   code.py
│   boot_out.txt
├───.fseventsd
│       no_log
└───lib
    │   neopixel.py
    │   adafruit_requests.py
    ├───adafruit_wiznet5k
    │       adafruit_wiznet5k_wsgiserver.py
    │       __init__.py
    │       adafruit_wiznet5k_socket.py
    │       adafruit_wiznet5k_ntp.py
    │       adafruit_wiznet5k_dhcp.py
    │       adafruit_wiznet5k.py
    │       adafruit_wiznet5k_dns.py
    ├───adafruit_minimqtt
    │       adafruit_minimqtt.py
    │       matcher.py
    │       __init__.py
    ├───adafruit_bus_device
    │       i2c_device.py
    │       spi_device.py
    │       __init__.py
    ├───adafruit_io
    │       adafruit_io_errors.py
    │       __init__.py
    │       adafruit_io.py
    └───adafruit_wsgi
            request.py
            wsgi_app.py
Example 1: ping test
The very first test is a simple ping test. We’ll give our Raspberry PI Pico with WIZnet W5100s HAT a static IP address. Then we’ll try pinging it from a remote PC.
Get from my download area the following file:
Rename it to code.py and copy it to your CIRCUITPY storage overwriting the old one.
Please remember to adapt the following parts:
- “SPI0_SCK = board.GP18”, “SPI0_TX = board.GP19”, “SPI0_RX = board.GP16”, “SPI0_CSn = board.GP17” and “W5x00_RSTn = board.GP20”: if you use a different wiring, please remember to update these values according to you cable connections
- “IP_ADDRESS = (192, 168, 1, 5)”: this is an IP address (meaning 192.168.1.5, but with commas separators) compatible with my home one and not already used by any device in my local network. Remember to change it according to your home network settings
- “SUBNET_MASK = (255, 255, 255, 0)”: this is usually the default for all home routers. If you have specific settings, please update here the needed values
- “GATEWAY_ADDRESS = (192, 168, 1, 1)”: this is the router IP Address. Please change it if you have a different IP for your home router
Reload the new code and you will have the following output from Thonny shell (with your set IP address instead of mine 192.168.1.5):
soft reboot

Auto-reload is on. Simply save files over USB to run them or enter REPL to disable.
code.py output:
Wiznet5k Ping Test (no DHCP)
Chip Version: w5100s
MAC Address: ['0x0', '0x1', '0x2', '0x3', '0x4', '0x5']
My IP address is: 192.168.1.5
Done!
This means that everything is working. Now connect the ethernet cable between the WIZnet Ethernet HAT and your router. You can both keep the USB cable plugged into your computer or you can also use it with a common smartphone power supply or a power bank: the code is running and stored on RPI Pico and it doesn’t need to be connected to your computer until you don’t need to edit it.
From a computer on the same network, test your Pico is reachable by issuing the same command both from a terminal (for Linux computers) or cmd (for Windows computers):
ping 192.168.1.5Please remember to change the IP address with the one set for your Raspberry PI Pico, so that you will likely see something like the following:
Pinging 192.168.1.5 with 32 bytes of data:
Reply from 192.168.1.5: bytes=32 time=1ms TTL=127
Reply from 192.168.1.5: bytes=32 time=1ms TTL=127
Reply from 192.168.1.5: bytes=32 time<1ms TTL=127
Reply from 192.168.1.5: bytes=32 time=1ms TTL=127

Ping statistics for 192.168.1.5:
    Packets: Sent = 4, Received = 4, Lost = 0 (0% loss),
Approximate round trip times in milli-seconds:
    Minimum = 0ms, Maximum = 1ms, Average = 0ms
If you don’t receive the reply, please try rebooting the Pico (by unplugging and re-plugging the power cable) and check if any router limitations are active (MAC address filtering, static IP deny, etc).
Example 2: HTTP Server
One more example is using the Raspberry PI Pico with WIZnet Ethernet HAT as a web server, showing sensors state or also controlling them. In the following example, we’ll control the built-in led. Again, get this new code from my download area:
Again, remember to update the following parameters according to your needs:
- “SPI0_SCK = board.GP18”, “SPI0_TX = board.GP19”, “SPI0_RX = board.GP16”, “SPI0_CSn = board.GP17” and “W5x00_RSTn = board.GP20”
- “IP_ADDRESS = (192, 168, 1, 5)”“SUBNET_MASK = (255, 255, 255, 0)”“GATEWAY_ADDRESS = (192, 168, 1, 1)”
You can also customize the HTML code by editing what is included in “html_string” variable. Copy the final code into your code.py on Raspberry PI Pico.
With this new code, you have to attach the ethernet cable before running or it will result in an error. For a very first test, you can also use the PC ethernet port: even if it hardly will work, the WIZnet Ethernet HAT will get electric feedback from port and will run the code. Once attached the ethernet cable, run the code to get the following from Thonny shell:
Wiznet5k HTTP Test (no DHCP)
Chip Version: w5100s
MAC Address: ['0x0', '0x1', '0x2', '0x3', '0x4', '0x5']
My IP address is: 192.168.1.5
w5100s
MAX_SOCK_NUM is 2
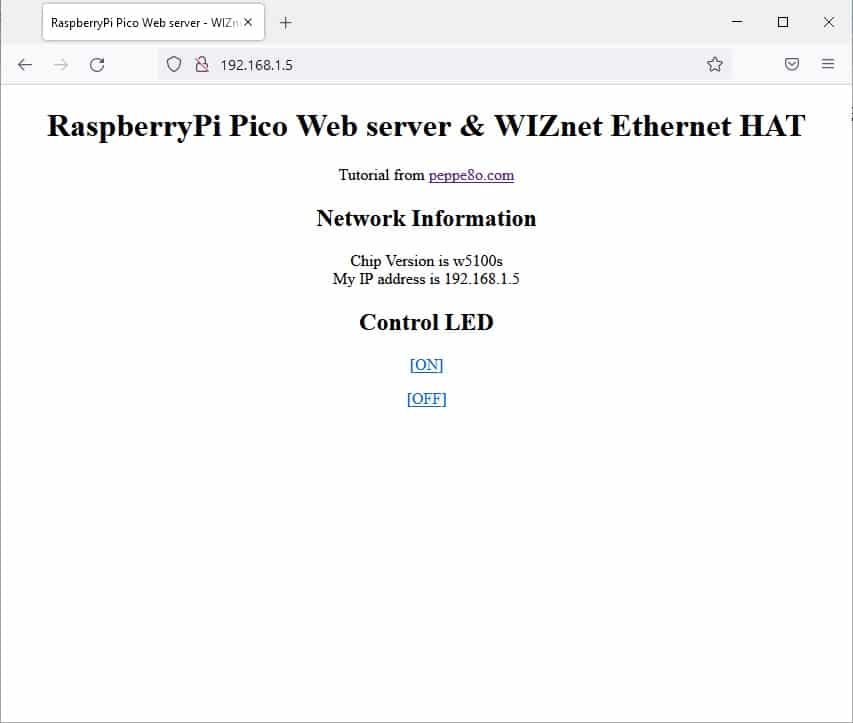
Open this IP in your browser: 192.168.1.5If not already done, you can now attach the ethernet cable to your home router (restarting the Pico if necessary). From your remote PC, with your favourite browser using the Raspberry PI Pico’s IP address as URL and you will get the following:
This time, by clicking the [ON] or [OFF] links you can control the board LED. When you click the [ON] you will be redirected to the following page:
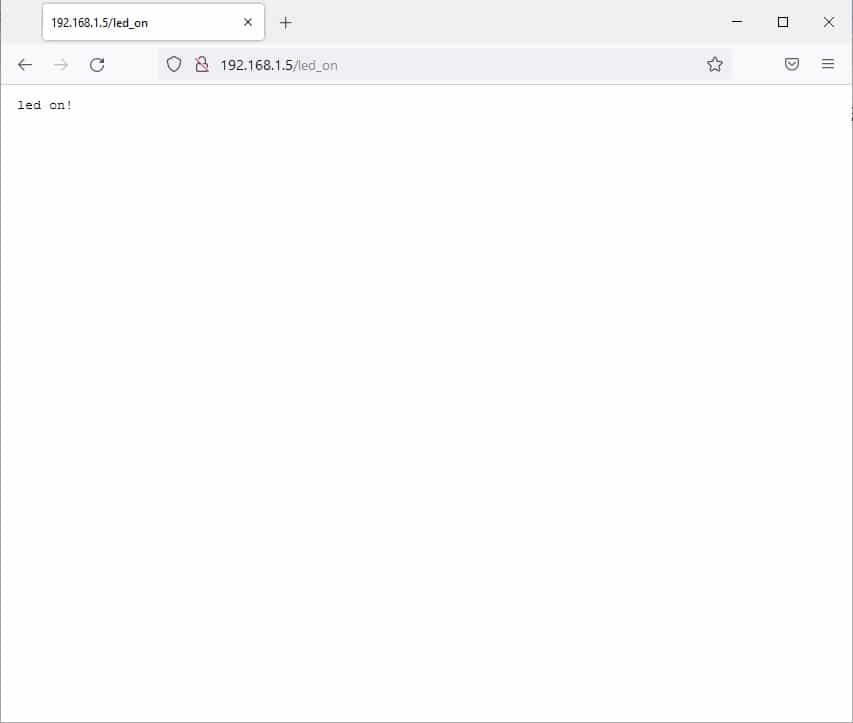
And the board LED will result powered on. From here, use the browser “back” button to go back to the previous page.
Similarly, with the [OFF] link you will get:

And the board LED will be powered off.
What’s Next
Interested to do more with your Raspberry PI Pico? Try to look at my Raspberry PI Pico tutorials for useful and funny projects!
Enjoy your Raspberry PI Pico with Ethernet Port!

Open source and Raspberry PI lover, writes tutorials for beginners since 2019. He's an ICT expert, with a strong experience in supporting medium to big companies and public administrations to manage their ICT infrastructures. He's supporting the Italian public administration in digital transformation projects.
![]()
![]()
![]()
![]()
![]()
![]()
![]()


This is a cool project, thanks. I’m busy using this project as a base, but for some reason, in my noobness, I can’t load an image, use an image map or create endpoints with parameters for the GPIO toggling. Any help would be amazing and really make this article 5*
#HTTP Request handlers with routing params
@web_app.route(“/gpio_toggle///”)
def gpio_toggle(request, gpio, value, isPerm):
Hi Chris, sorry for the late answer. Is that meaning that you found the answer?
Dear Peppe!
Good Post!
I’m a member of WIZnet. Your tutorial is very useful about our users. Thanks a lot for interesting in WIZnet product. Can I introduce your post our wiznet maker site(http://maker.wiznet.io)?
Thanks in advance.
WIZnet have a good news about design contest of WIZnet Ethernet HAT & W5100S-EVB-Pico.
For more detail, You can refer to “https://maker.wiznet.io/wiznet-ethernet-hat-contest/”.
Can you introduce the good news to your homepage? It would be even more appreciated if you directly participate in this contest.
If you want, Feel free contact to me. Thank you so much.
Sure you can! 😀
Thanks a lot.
We will be ready to Micropython WIZnet5K library for RPI-Pico soon. I will notify you to complete micro python library.
Please, good post about the library.
Thank you.
Hello Peppe80,
I’ve been working on a door access control system using the PICO and WIZNET Ethernet hat, I really like both devices. However, I can’t get the Ethernet have to connect at 100Mb/s, ( it’s fine at 10Mb/s ) and this is not a problem for my application using MQTT, but the system is up and running, but the 10Mb/s connection speed is an itch I’d like to scratch. Have you noticed the same behaviour ? Or is it just a problem between my Wiznet and TPLink swich ?
About my project: I have a Pico 2 with a Wiznet hat managing a cheap ( from Amazon ) RFID card reader over the Weigand protocol. The PICO sends MQTT requests when a Card is presented to a back-end system that interfaces with a MySQL db that provides user authorisation, and card validity. Once the credentials are authorised, the Acknowledge is sent back to the card reader, but also to another PICO and WIznet device to manage the electronic door lock. This is because the external card reader is physically distant from the internal door lock.
Next thing, I’d like to try is audio, since the PICO 2 is idle 99% of the time, I think it could handle digitised speech too.
Anyway, interested to hear your feedback on the WIZnet 10/100 Mb/s issue
Hi Paul. I think the speed you achieved is already a good number and it is similar to a test from another user on the Wiznet blog (https://maker.wiznet.io/scarlet/projects/boost-your-w5100s-evb-pico-with-hardwired-tcp-ip/).
On the theory side, the Pico runs at 125MHz (125Mbps), but the SPI clock divides this by 2 (to get a clean signal border) -> now around 60Mbps. On top of this, internal buffers (shared between the CPU sockets) gives you another limitation.
Another limitation comes from the MicroPython framework, which takes a number of cycles to send a bit on the wire. For example, if you would transmit data from a C firmware I think it would give you a some speed improvements, but you would lose the MicroPython simplicity and you wouldn’t get so big speed improvements.
At the end, i think thath reaching 8-10 Mbps is a great result for Raspberry Pi Pico with the WIZnet Ethernet HAT