

Last Updated on 4th July 2026 by peppe8o
This tutorial will show you how to send smartphone notifications with ntfy on Raspberry PI computer boards. The installation provided uses Docker, so that everything will go live with simple configuration files.
If you manage a homelab or run automated scripts on a Raspberry Pi, keeping monitors on your systems is a balancing act. Whether it’s a completed backup, a sudden spike in CPU temperature, or an unauthorized SSH login, waiting around to check log files is an efficiency killer. Ntfy is a great alternative to Alertzy as it allows you to self-host the notification server, so that your privacy will have significant improvements.
About ntfy
ntfy (notify) is a lightweight open-source push notification service, able to run its main server in a self-hosted computer. It allows you to send push notifications to your phone or desktop via simple HTTP requests. You can set up it just for your local home network, but you can also use it with access from the web (if you are away from home and your services encounters a critical error, you want that push notification immediately on your phone via mobile data).
In this guide, I will walk you through deploying a production-ready ntfy instance on your Raspberry Pi that is accessible from the internet using a free No-IP DDNS domain (like my myhomepi.webhop.me). I will also cover essential router port-forwarding rules and secure the instance so unauthorized web bots cannot exploit your server.
What We Need
As usual, I suggest adding from now to your favourite e-commerce shopping cart all the needed hardware, so that at the end you will be able to evaluate overall costs and decide if to continue with the project or remove them from the shopping cart. So, hardware will be only:
- Raspberry PI Computer Board (including proper power supply or using a smartphone micro USB charger with at least 3A)
- high speed micro SD card (at least 16 GB, at least class 10)
Ste-by-Step Procedure
Prerequisites
Before diving into the terminal, if you want to receive notifications also when you are away from home you need to make it reachable from the web. You have different solutions here, as you can use a Public IP + No-IP DDNS Domain or a Public Domain. In this case, you will need access to your home router to set port forwarding rules from the web to your Raspberry PI ports.
Alternatively, you can use a Cloudflare tunnel or Tailscale.
Here are some resources for these different solutions:
- How to configure No-IP DUC in your Raspberry PI with Docker
- Cloudflare Tunnel + Raspberry PI + Docker
- How to Use Tailscale on Raspberry PI with Docker
Step 1. Prepare the Operating System
The first step is to install the Raspberry PI OS Lite to get a fast and lightweight operating system (headless). If you need a desktop environment, you can also use the Raspberry PI OS Desktop, in which case you will work from its terminal app. Please find the differences between the 2 OS versions in my Raspberry PI OS Lite vs Desktop article.
Please make sure that your Operating System is up to date. From your terminal, use the following command:
sudo apt update -y && sudo apt full-upgrade -yYou also need to install Docker on Raspberry PI.
Step 2. Set Up the Directory Structure
Based on best practices for Docker state management, we want to separate our configuration, application cache, and user database. Let’s create a dedicated deployment directory in the current folder:
sudo mkdir -p ntfy/config
sudo mkdir -p ntfy/cache
sudo mkdir -p ntfy/auth
sudo chown -R $USER:$USER ntfy
Finally, please enter in the ntfy folder:
cd ntfyStep 3. Create the ntfy Configuration File
ntfy uses a YAML file for its configuration backend. Because this instance could be exposed to the internet, enforcing authentication is a must.
Create a new file named server.yml inside your config folder:
nano config/server.ymlPaste the following lines. Please change the IP address here highligthed with bold with the local IP address of your Raspberry PI. If you use a public domani, please use it instead of the IP address.
⚙️ Why base-url matters: Setting your domain or IP address in the base-url tells ntfy how to format links, file attachments, and polling interfaces when communicating with mobile devices over public mobile data networks.
# ntfy Server Configuration
base-url: "http://192.168.1.218:8080"
listen-http: ":8080"

# State, Cache, and Attachment Management
cache-file: "/var/cache/ntfy/cache.db"
keepalive-interval: "45s"
attachment-cache-dir: "/var/cache/ntfy/attachments"
attachment-total-size-limit: "5G"
attachment-file-size-limit: "15M"
attachment-expiry-duration: "24h"

# Security & Authentication (Crucial for Public Servers)
auth-file: "/etc/ntfy/user.db"
auth-default-access: "deny-all" # Blocks unauthorized users from reading/writing
Save and exit.
Step 4. Write the Docker Compose File
Create the docker-compose.yml file:
nano /opt/docker/ntfy/docker-compose.ymlAdd the following configuration layout. If you are going to expose this service on the web, I also suggest to use a random port instead of the default 8080. This means, for example, that if you want to expose ntfy on port 10080 on the internet, the related mapping will be - 10080:8080 (this means instructing Docker to expose on host’s port 10080 what the container is showing at its port 8080).
services:
  ntfy:
    image: binwiederhier/ntfy:latest
    container_name: ntfy-server
    command: serve
    environment:
      - TZ=UTC # Change to your local timezone, e.g., America/New_York
    volumes:
      - /opt/docker/ntfy/config/server.yml:/etc/ntfy/server.yml
      - /opt/docker/ntfy/cache:/var/cache/ntfy
      - /opt/docker/ntfy/auth:/etc/ntfy
    ports:
      - 8080:8080
    restart: unless-stopped
Save, exit, and boot up the container:
docker compose up -dStep 5. Configure Users and Access Control
As we secured the connections with the auth-default-access: "deny-all" configuration line, your server will not allow connection from unauthenticated clients (as, for example, internet scanners). Let’s create our private administrative credentials using docker exec directly inside the container wrapper. You can change the my_user value with whatever username you prefer:
docker exec -it ntfy-server ntfy user add --role=admin my_userYou will be prompted to type and confirm a secure password (for this example: my_password). Make it strong, as this account will soon be accessible from the web!
Verify that the user database was successfully written:
docker exec -it ntfy-server ntfy user listYou will get something like the following:
pi@raspberry:~/ntfy $ docker exec -it ntfy-server ntfy user list
user my_user (role: admin, tier: none)
- read-write access to all topics (admin role)
user * (role: anonymous, tier: none)
- no topic-specific permissions
- no access to any (other) topics (server config)
Step 6. Router Port Forwarding Rules
Right now, ntfy is running smoothly inside your house, but your home gateway blocks anyone trying to connect via myhomepi.webhop.me:8080. We need to explicitly tell the router where to send that inbound traffic.
How to configure your Port Forwarding rule:
- Open your web browser and log into your router’s gateway dashboard (usually
192.168.1.1or192.168.0.1). - Navigate to the Port Forwarding, Virtual Server, or NAT settings tab.
- Add a new rule with the following parameters:
| Field | Value to Enter | Description |
| Rule Name | ntfy-server | Any descriptive identifier at your choice |
| Protocol Type | TCP | ntfy runs entirely over standard TCP |
| External Port | 8080 | The port you will target from the web (or whatever random port you decide to use) |
| Internal IP | 192.168.1.218 | The exact static local IP of your Raspberry Pi |
| Internal Port | 8080 | The host port mapped inside your docker-compose.yml(or whatever random port you decide to use) |
Save and apply the settings. Your router will now seamlessly forward web requests targeted at your domain directly to your Raspberry PI.
Step 7. Install and Configure the ntfy App in your Smartphone
The ntfy app is available both on the Google Play Store (for Android) and App Store (for Apple). Please install it as any common app according to your smartphone OS.
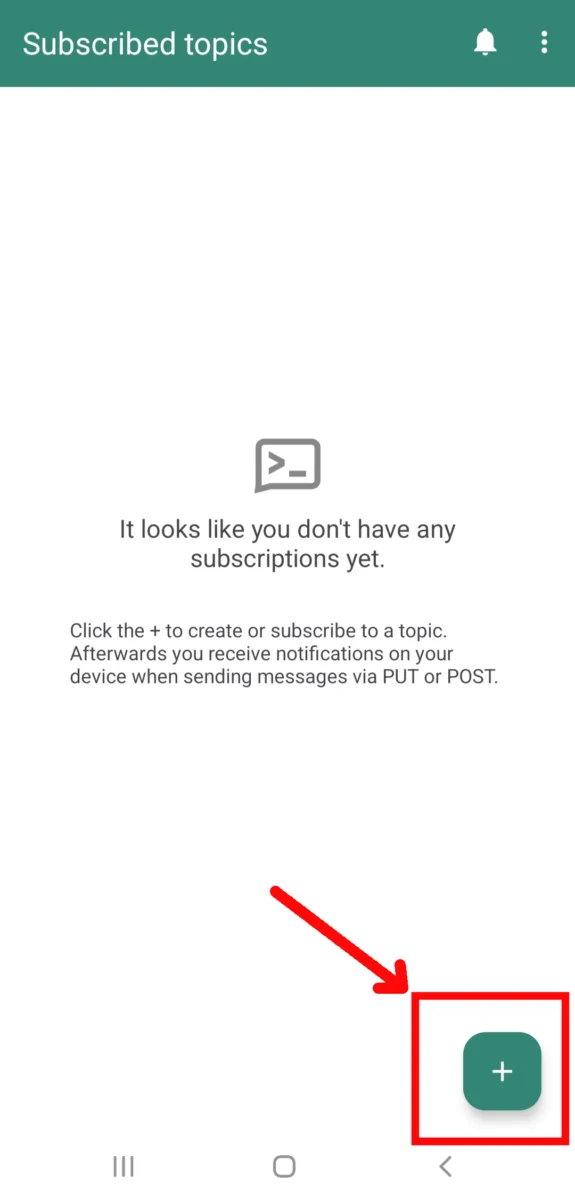
When you open the app, youwill find a button to ad a subscription. Please click it:
Then, please fille the topic name. It can be any string you want. In some cases, when your service is published on the web and it doesn’t include any authentication mechanism, it may be a good idea to use a casual hexadecimal string to use its name like a password.
Please, also activate the “Use another server” option: it enables you to insert the server IP or URL (the same you configured in your Raspberry PI). For this example, I just used a “alert” topic name. If you don’t use this option, the app will start listening at the data published from the official ntfy web server (an online service) instead of your private notifications.
Finally, please click “SUBSCRIBE”:

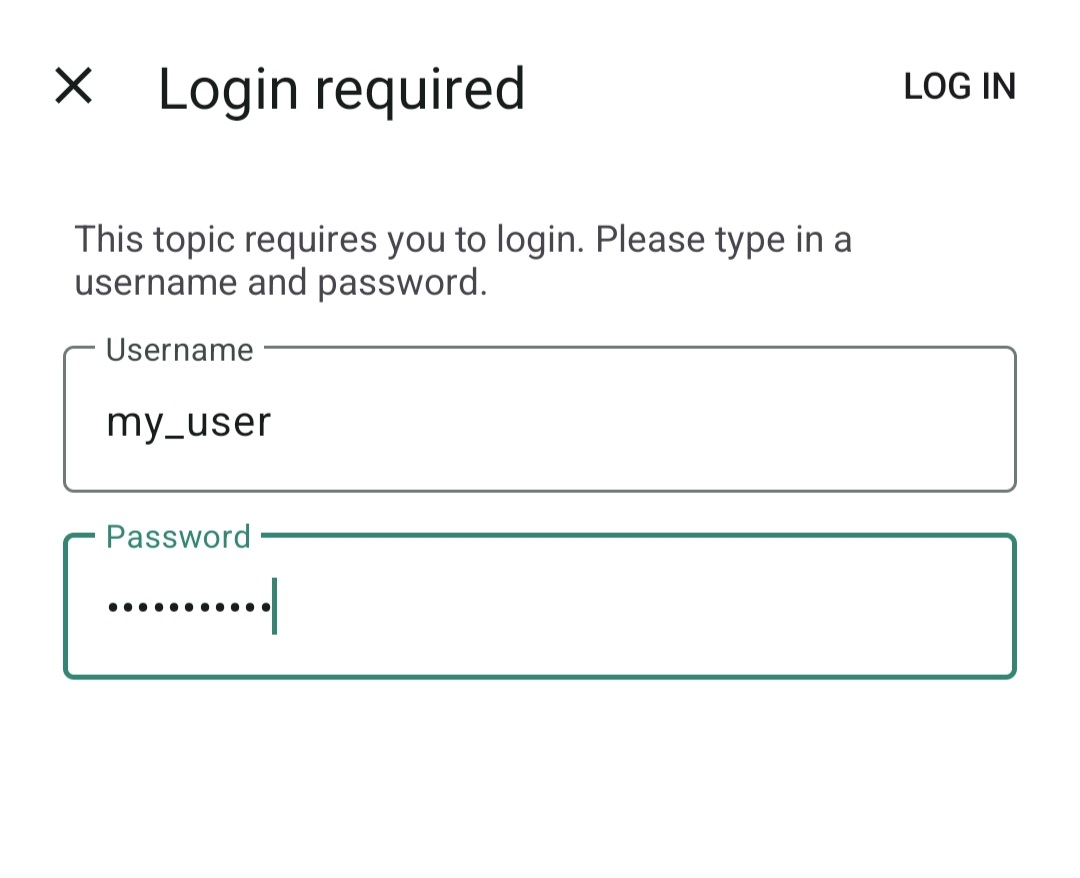
As we used the auth-default-access: "deny-all" in our server.yml configuration, you can listen at any notification only if you have a registered user in your ntfy server on Raspberry PI. Please sill the following for with the user and password you created in the Configure Users and Access Control step. Then click “LOG IN”.
At this point, your app will start listening. It is important to note that you can also send messages from your app to the topic (with the message box at the bottom of the following window). It can become a great and private messaging tool focused on topics if more people use the same topic on the same Raspberry PI server:

Step 8. Testing Examples for ntfy on Raspberry PI
To test the nfty on Raspberry PI, we will execute two matching tasks: sending a basic push notification and attaching a physical file. We will test using both the curl terminal tool and a python script.
Method A: Using the Command Line (curl)
To send a remote message to your topic (alert), use the following command structure. Notice that because we enforced server-wide security, we must provide authentication parameters (-u). Also, please remember to change the IP address with your domain, if you used a
1. Sending a standard text notification:
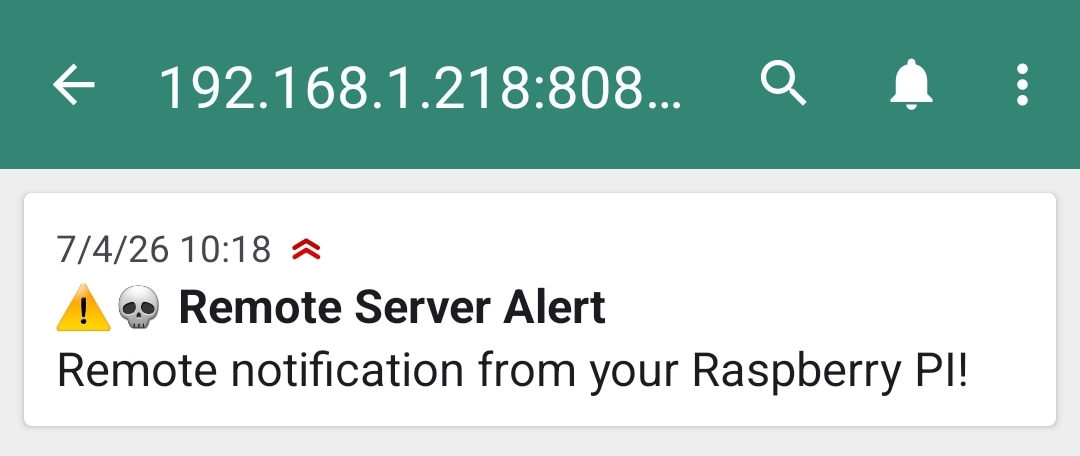
curl -u "my_user:my_password" \
  -H "Title: Remote Server Alert" \
  -H "Priority: high" \
  -H "Tags: warning,skull" \
  -d "Remote notification from your Raspberry PI!" \
  http://192.168.1.218:8080/alert
Here’s the resulting notification in your app:
2. Attaching a file
For this test, the attachment can be anything like a text file or a picture. We’ll test it with a text file.
Please create a new file:
nano test.txtFill the file with any text and save it.
Now, you can send the text attachment with the following curl command. Note that you can add the test.txt file without the complete path only if you run the command in the same folder where the file is stored.
⚠️ Homelab Tip: If you use -T (for upload) and -d (for data) simultaneously, curl will throw a fatal warning. To send both a file attachment and a text payload via curl, pass the text string via the -H and Message header.
curl -u "my_user:my_password" \
  -H "Title: Remote Server Alert" \
  -H "Priority: high" \
  -H "Tags: warning,skull" \
  -H "Message: Remote notification from your Raspberry PI!" \
  -T test.txt \
  http://192.168.1.218:8080/alert
Here’s the result:
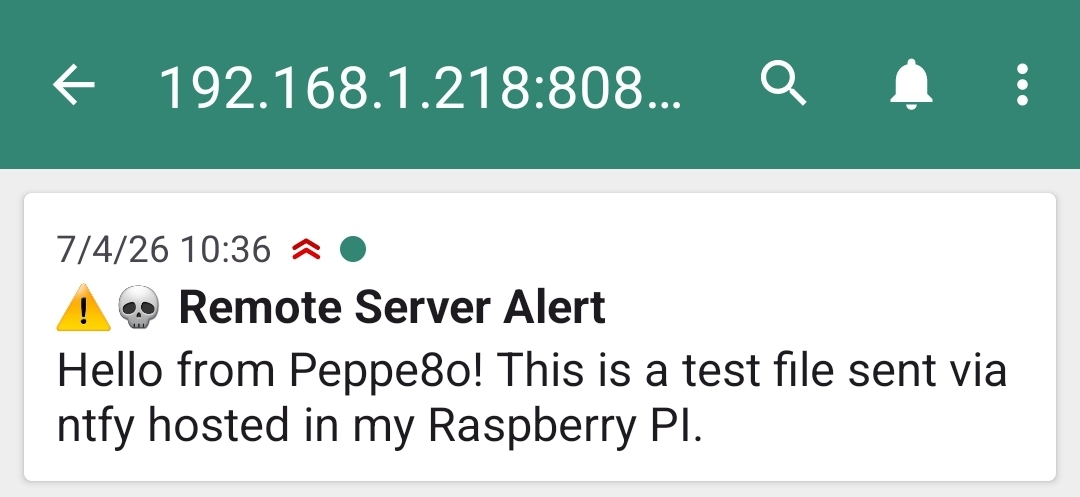
It is important to note that the ntfy app substituted the message body with the content of the text file.
Method B: Using Python (requests)
For cleaner, more scalable code inside automation or monitoring scripts, Python handles data structures gracefully.
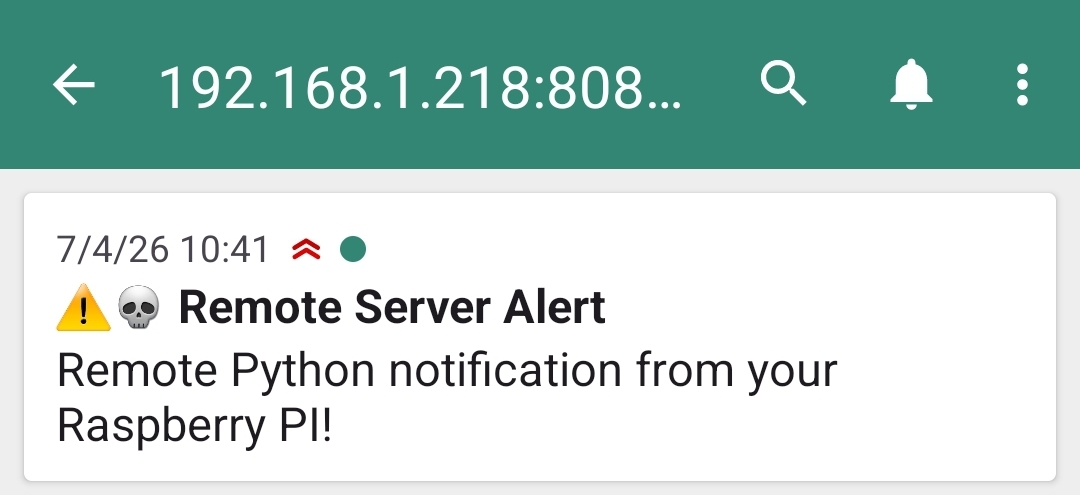
1. Sending a standard text notification:
import requests

requests.post(
    "http://192.168.1.218:8080/alert",
    data="Remote Python notification from your Raspberry PI!",
    auth=("my_user", "my_password"),
    headers={
        "Title": "Remote Server Alert",
        "Priority": "high",
        "Tags": "warning,skull"
    }
)
The result:
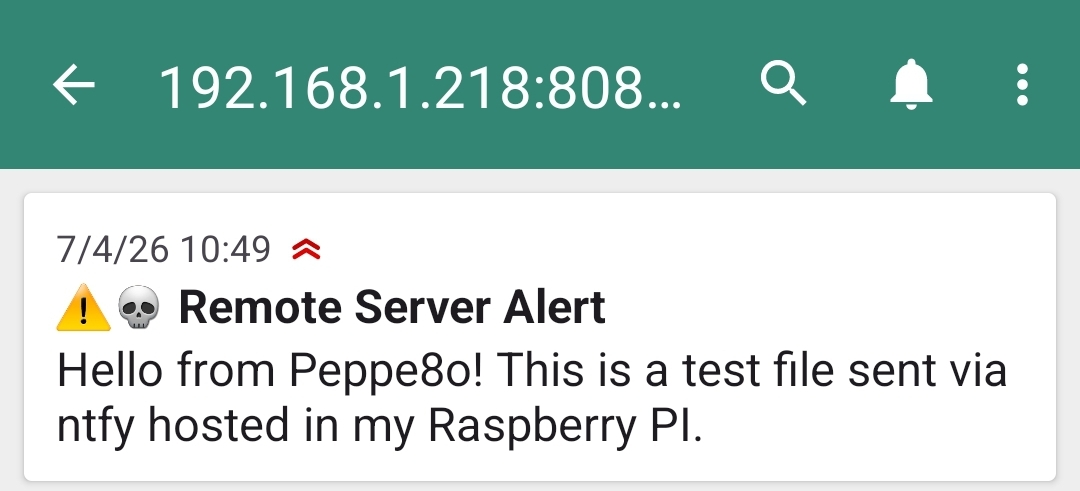
2. Sending a text notification with a file attachment:
import requests

headers = {
    "Title": "Remote Server Alert",
    "Priority": "high",
    "Tags": "warning,skull",
    "Message": "Remote Python notification from your Raspberry PI!"
}

with open("test.txt", "rb") as f:
    requests.post(
        "http://192.168.1.218:8080/alert",
        auth=("my_user", "my_password"),
        headers=headers,
        data=f
    )
The resulting notification:
Troubleshooting & Critical Security Warnings
- The “Double NAT” Trap: If you have port-forwarded correctly but still cannot connect outside your house, check whether your ISP uses CGNAT (Carrier-Grade NAT). If your router’s WAN IP address does not match what a site like
whatsmyip.orgsays, you are behind CGNAT. In this case, standard port forwarding will not work, and you should use a Cloudflare Tunnel or Tailscale instead. - Upgrade to HTTPS (Highly Recommended): Running open over HTTP means your passwords and notifications are sent in plaintext across the web. While this gets you up and running, your absolute next step should be setting up a reverse proxy like Traefik to use a free Let’s Encrypt SSL certificate, so encrypting your domain to HTTPS.
📊 Real-World Performance & Heavy Stress Test Benchmarks
To ensure this notification setup won’t bottleneck a production homelab environment, I didn’t rely on generic documentation. I ran real-time hardware logging on my Raspberry Pi 5 (8GB RAM) using Docker’s native kernel cgroups, intentionally hammering the ntfy API with sudden, heavy traffic bursts.
The empirical data collected reveals just how lightweight and robust the ntfy Go-based engine is.
1. Hardware Resource Utilization Footprint
The table below shows the exact metrics recorded by the Docker daemon before, during, and after parallel automated stress test sequences:
| Server Load State | Simulated Workload Intensity | Peak CPU Utilization | Maximum RAM Footprint |
| Idle (Baseline) | Server running with zero active traffic | 0.03% | 52.39 MiB (0.66%) |
| Rapid Text Notification Burst | 100 simultaneous concurrent HTTP requests | 362.49% (Multi-Core) | 55.03 MiB (0.69%) |
| Heavy File Attachment Upload | 20 parallel image payload uploads | 175.26% (Multi-Core) | 54.44 MiB (0.69%) |
2. Technical Breakdown of the Metrics
- Incredible Memory Efficiency: Under a massive hammering of 100 concurrent HTTP connection threads, the container’s RAM allocation only shifted from 52.39 MiB to 55.03 MiB. An isolated surge of less than 3 megabytes! This proves that ntfy processes message queues beautifully in system buffers without risking memory leaks. With a total footprint of just ~55 MiB on an 8GB Raspberry Pi 5, the server leaves more than 99% of your RAM entirely free.
- Understanding the Multi-Core CPU Spikes: During the 100-text-alert storm, the CPU utilization metric peaked at
362.49%. In Linux and Docker, percentages over 100% represent the aggregated processing load across multiple processor cores. Because the Raspberry Pi 5 features a powerful Broadcom quad-core CPU, its maximum theoretical processing capacity caps at 400%. Reaching 362% means ntfy seamlessly scaled across all available threads to process, authenticate, and push your messages out to client phones almost instantly. The CPU immediately collapsed right back down to0.00%just two seconds after the load stopped. - Disk I/O and Streaming Stability: Pushing 20 physical image attachments simultaneously forced a steady CPU load of
175.26%while keeping the memory ceiling tightly locked down at 54.44 MiB. This confirms that ntfy streams incoming binary files directly into its designated disk cache folder on your Pi instead of hoarding file data inside volatile RAM, protecting your system from out-of-memory crashes.
Next Steps
Interested in more projects with your RPI? Try to look at my Raspberry PI computer tutorial pages.
Enjoy!

Open source and Raspberry PI lover, writes tutorials for beginners since 2019. He's an ICT expert, with a strong experience in supporting medium to big companies and public administrations to manage their ICT infrastructures. He's supporting the Italian public administration in digital transformation projects.
![]()
![]()
![]()
![]()
![]()
![]()
![]()


