
Last Updated on 12th December 2024 by peppe8o
In this tutorial, I’m going to show you how to wire, calibrate (X / Y axes) and use an HMC5883L device, also known as a magnetometer, with Raspberry PI Pico using MicroPython.
Many projects (like robotic ones) need to get info about spacial position and direction. In this sense, one of the most useful devices for projects involving Raspberry PI Pico is an HMC5883L magnetometer compass
If you want to deep on compasses, like the one we are going to setup, you can look at Outdoorsgenerations.com guide on how to use a compass: that’s a great guide explaining how to use this tool, also explaining some concepts like Magnetic Declination with the difference between True North & Magnetic North that we’re going to manage with HMC5883OL.
HMC5883L Main Features
This module is not new to the market and is one of the most used. Before digging into details, please note that the market is also full of the QMC5883L module. From what I know, this should make the same job but has a different hardware logic, so requiring a different code (and the code within this guide hardly will work for QMC5883L).
The HMC5883L is a multi-chip module able to measure magnetic sensing. It can communicate with an I2C digital interface with other devices in order to let creating applications such as low-cost compass, being used in many electronic fields like mobile phones, netbooks, consumer electronics, auto navigation systems, and personal navigation devices.
The module works with a low voltage supply (from 2.16 to 3.6V) and also has a low power consumption (100 μA).
HMC5883L has a 1° to 2° degrees heading accuracy, which is enough for a wide number of applications. It also allows setting its internal gain to increase resolution with a 3-bit gain control register. But increasing gain also increases noise effects.
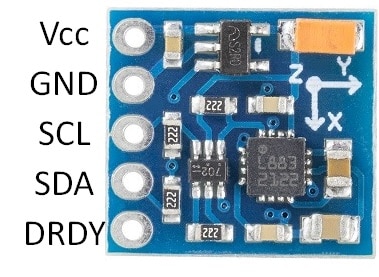
The HMC5883L pinout has 5 PINs:
- Vcc -> common positive PIN for power supply, goes to the 3,3V PIN from Raspberry PI Pico
- GND -> common ground pin, goes to one of GND PINs from Raspberry PI Pico
- SCL -> Serial clock pin for I2C communication
- SDA -> Seria data pin for I2C communication
- DRDY -> Data Ready, Interrupt Pin. It is a PIN warning the master device when data are ready in registers to be read. It is optional and communication, as well as readings, work also without using this PIN.
More details on the HMC5883L chip are available from HMC5883L_3-Axis_Digital_Compass_IC datasheet pdf file available from Adafruit pages.
Finally, GY-271 HMC5883L module requires calibration in order to get the right values for application use. This tutorial also includes a code to calibrate your compass and get it simpler.
Please, be aware that this tutorial is intended for the Raspberry PI Pico microcontroller board, as the other Raspberry PI boards are computers (which require different coding).
What We Need
As usual, I suggest adding from now to your favourite e-commerce shopping cart all the needed hardware, so that at the end you will be able to evaluate overall costs and decide if to continue with the project or remove them from the shopping cart. So, hardware will be only:
- A common computer (maybe with Windows, Linux or Mac). It can also be a Raspberry PI Computer board
- Raspberry PI Pico microcontroller (with a common micro USB cable)
- GY-271 HMC5883L module
- breadboard
- dupont wirings
Check hardware prices with the following links:


Step-by-Step Procedure
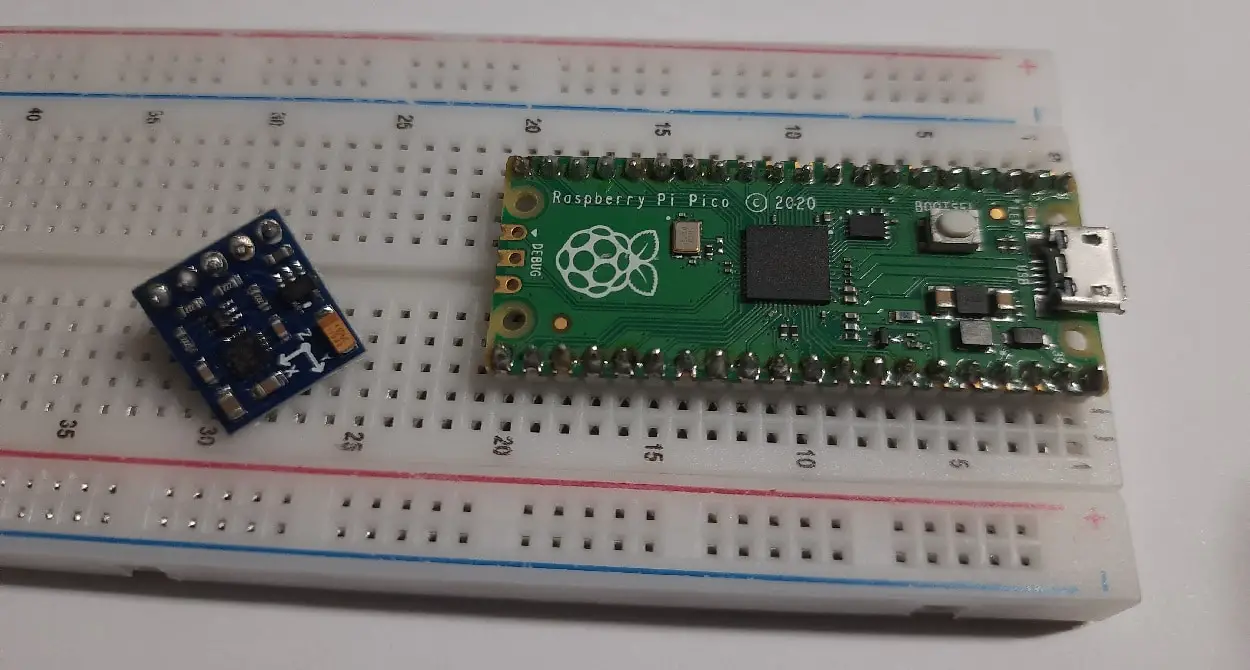
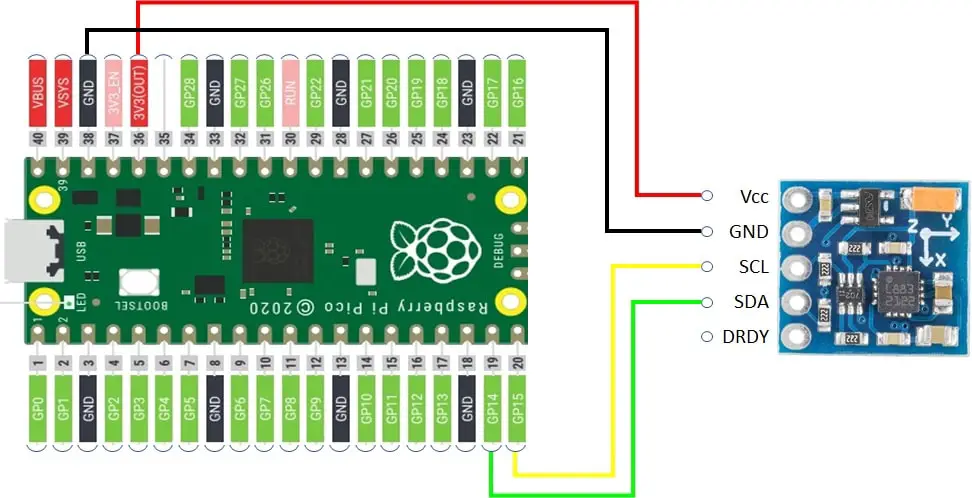
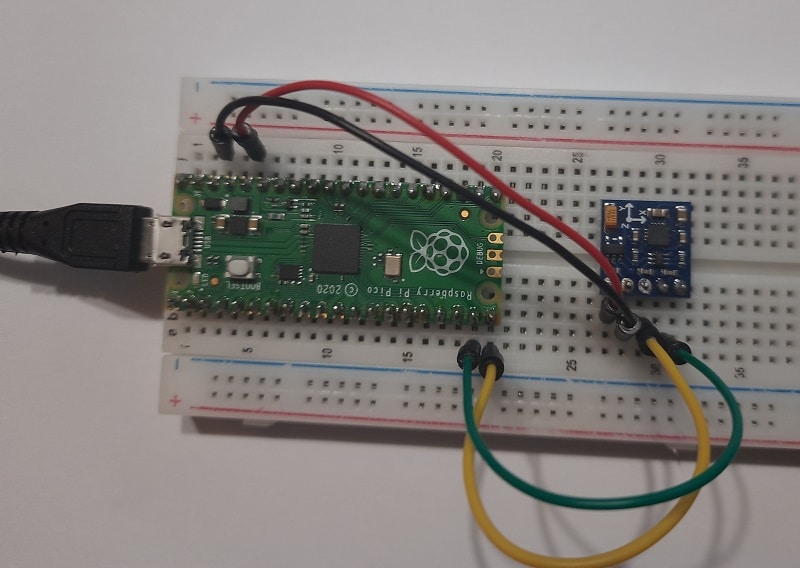
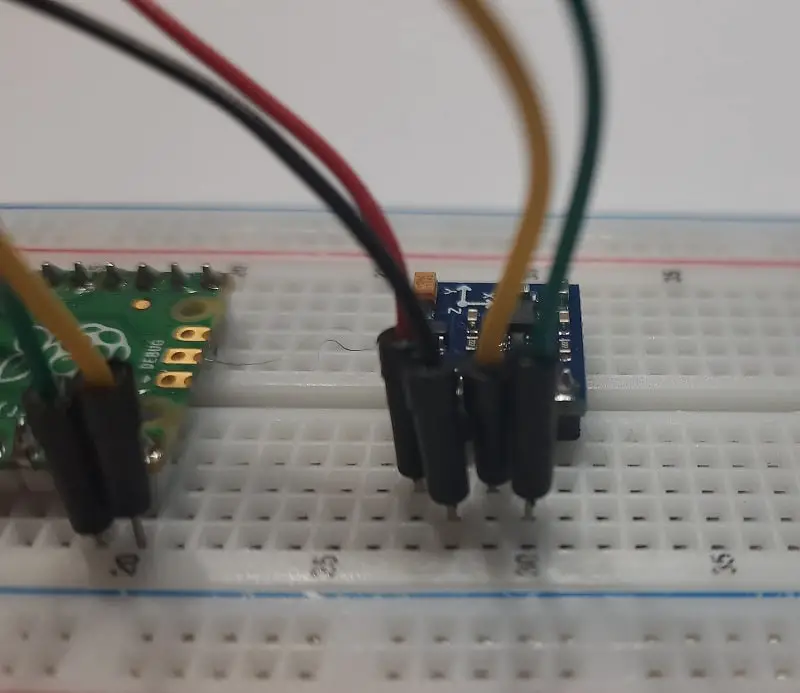
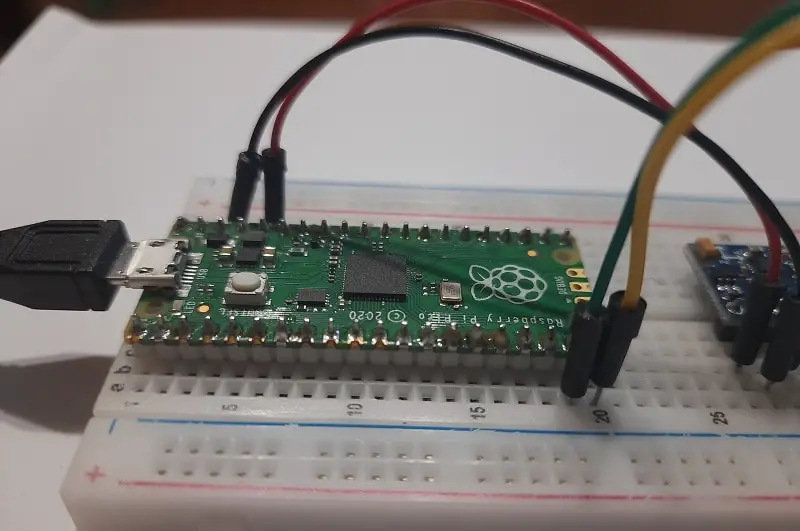
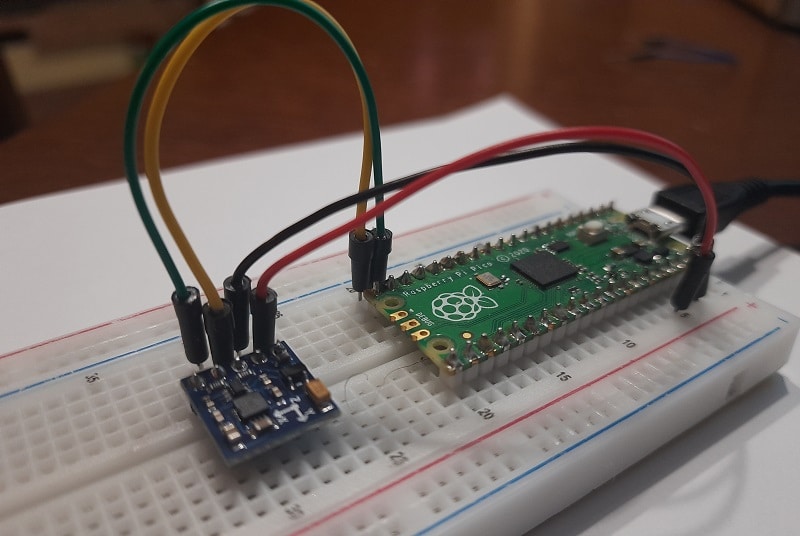
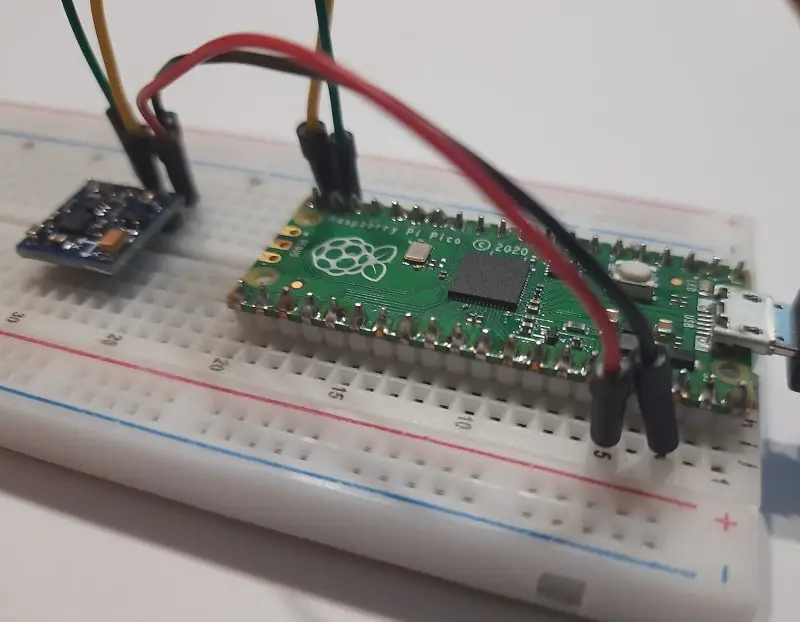
Prepare Wiring
Please arrange cabling according to the following diagram, according to Raspberry PI Pico pinout:
Also, please find below some pictures from my small lab:
Getting MicroPython Codes
Start preparing your Raspberry PI Pico firmware according to my First steps with Raspberry PI Pico for Beginners tutorial.
To get HMC5883L working with MicroPython, you will need a copy of the following library:
This is the main library, forked from Gvalkov esp8266 MicroPython library for hmc5883l.
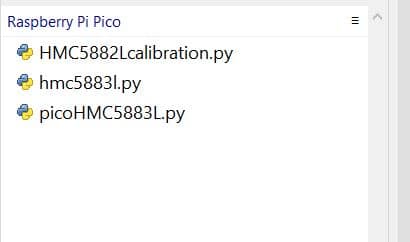
Moreover, you will need the following 2 MicroPython codes:
Copy all the 3 files to your Raspberry PI Pico root folder, so having the following files:
Set Your Location Declination
Before starting, we need to keep track in our library about the Declination.
Magnetic declination, or magnetic variation, is the angle on the horizontal plane between magnetic north (the direction the north end of a magnetized compass needle points, corresponding to the direction of the Earth’s magnetic field lines) and true north (the direction along a meridian towards the geographic North Pole). This angle varies depending on position on the Earth’s surface and changes over time.
ref. https://en.wikipedia.org/wiki/Magnetic_declination
So, to keep our compass pointing to the Geographic north we need to add a correction that manages the difference between the 2 Norths and depends on our location. To get this, which is composed of 2 values (declination and inclination), please use the free online service available at https://www.magnetic-declination.com/, point it in your position and keep their degrees. The following picture shows what are mine results for my position (Rome):
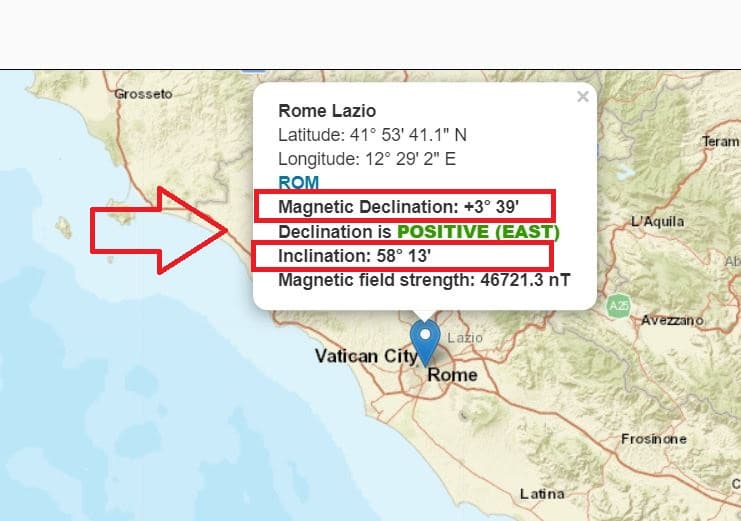
Put only the integer part of those values (which are 3 and 58 in my case). Open the hmc5883l.py file and identify the following part of the code:
def __init__(self, scl=15, sda=14, address=0x1e, gauss='1.9', declination=(0, 0)):change declination so that it keeps your position delta. In my case, this becomes:
def __init__(self, scl=15, sda=14, address=0x1e, gauss='1.9', declination=(3, 58)):Save these changes
Calibrate the HMC5883L module
A very important phase of using our module with Raspberry PI Pico is calibration. Without calibration, you will get useless values and your applications will simply point in the wrong direction. The calibration has to be done only the first time, then the offset will work for the following usages.
There is to say that it calibrates only X and Y values, so getting correct results when the compass will rotate only on a horizontal plane. If someone is wishing to help in improving these calibration maths, please let me know so that I can improve the code also including the Z axis.
Back to us, I wrote a simple script which is registering the X and Y axes values for the scope, keeping their min and max values which will define offset corrections to be applied on hmc5883l.py.
To run the calibration, please put your HMC5883L module on a horizontal, plane surface so that you will be able to easily rotate it by 360 degrees.
So, from Thonny run the HMC5882Lcalibration.py code. During the execution, you will start seeing magnetic measures from HMC5883L module, with min and max values for X and Y axes. Rotate slowly the HMC5883L with its breadboard, to perform at least one complete 360 degrees round. The more rounds you do, the better results you will. Moreover, try to move slowly, especially at points near the X and Y min and max values. Once done, click on the Thonny shell area and press CTRL+C.
Differently from the Thonny “Stop” button, the CTRL+C will generate an interrupt signal that will trigger final calculations on the script, by getting an output like the following:
...
...
X: 437.9800, Y: -453.8400, Z: -581.9400, Heading: 317° 57′
Xmin=8.54; Xmax=462.38; Ymin=-572.18; Ymax=-148.84
X: 434.3200, Y: -456.2800, Z: -577.0600, Heading: 317° 33′
Xmin=8.54; Xmax=462.38; Ymin=-572.18; Ymax=-148.84
X: 434.3200, Y: -452.6200, Z: -583.1600, Heading: 317° 47′
Xmin=8.54; Xmax=462.38; Ymin=-572.18; Ymax=-148.84
X: 434.3200, Y: -451.4000, Z: -584.3800, Heading: 317° 52′
Xmin=8.54; Xmax=462.38; Ymin=-572.18; Ymax=-148.84

Got ctrl-c
Calibration corrections:
xs=1
xb=-235.46
ys=1.072046
yb=360.51
In my case, I get the following parameters at the end:
- xs = 1
- xb = -235.46
- ys = 1.072046
- yb = 360.51
Re-open the hmc5883l.py file and, this time, identify the following part of code:
# Correction to be set after calibration
xs=1
ys=1
xb=0
yb=0
Change also these parameters with the number you get in the calibration test. In my case, these become:
# Correction to be set after calibration
xs=1
ys=1.072046
xb=-235.46
yb=360.51
Run the picoHMC5883L.py Code
At this point, you can discard the calibration script and use the picoHMC5883L.py code together with hmc5883l.py library.
You have just to run it from Thonny and you will get an output similar to the following:
MicroPython v1.17 on 2021-09-02; Raspberry Pi Pico with RP2040

Type "help()" for more information.
>>> %Run -c $EDITOR_CONTENT
X: 218.3800, Y: -25.3194, Z: -639.2800, Heading: 357° 21′
X: 220.8200, Y: -26.6273, Z: -638.0600, Heading: 357° 5′
X: 217.1600, Y: -27.9351, Z: -638.0600, Heading: 356° 38′
X: 209.8400, Y: -50.1694, Z: -639.2800, Heading: 350° 31′
X: 209.8400, Y: -42.3220, Z: -640.5000, Heading: 352° 34′
X: 211.0600, Y: -48.8615, Z: -634.4000, Heading: 350° 56′
X: 209.8400, Y: -46.2457, Z: -636.8400, Heading: 351° 32′
X: 218.3800, Y: -50.1694, Z: -638.0600, Heading: 351° 2′
X: 213.5000, Y: -47.5536, Z: -638.0600, Heading: 351° 25′
X: 215.9400, Y: -46.2457, Z: -639.2800, Heading: 351° 53′
X: 218.3800, Y: -58.0168, Z: -638.0600, Heading: 349° 5′
X: 220.8200, Y: -59.3246, Z: -639.2800, Heading: 348° 56′
X: 220.8200, Y: -61.9405, Z: -638.0600, Heading: 348° 18′
X: 218.3800, Y: -58.0168, Z: -639.2800, Heading: 349° 5′
X: 215.9400, Y: -50.1694, Z: -638.0600, Heading: 350° 53′
The Heading value will show the degrees to refer to the North. As you spin the module around the same horizontal plane, you will get the angle value.
Final Thoughts
As said in this tutorial, the calibration process involves only the X and Y axes. So any help on how to mathematically involve also the Z axis is really welcome and I will update the code. Anyway, for horizontal plane measurements, it will work giving you a reliable angle.
What’s Next
Wishing to test new devices with your Raspberry PI Pico board? Try looking at my Raspberry PI Pico tutorials for useful and funny projects!
Enjoy!

Open source and Raspberry PI lover, writes tutorials for beginners since 2019. He's an ICT expert, with a strong experience in supporting medium to big companies and public administrations to manage their ICT infrastructures. He's supporting the Italian public administration in digital transformation projects.
![]()
![]()
![]()
![]()
![]()
![]()
![]()


Hi, thanks for the work you have put into this. I have performed the calibration routine but when I rotate the compass afterwards, I only get a reported swing of 15 degrees despite rotating it 360 degrees. Have done the calibration a couple of times and values reported are similar each time. Any ideas or help would be much appreciated.
Thanks.
Hello Graham. Please can you confirm that your calibration has been performed on a horizontal plan?
Hi, I just purchased the GY-273 (HMC5883L) in a 3-pack from Amazon. None of the devices work with your library. An I2C scan of the device says it is addr 13 (0x0d) whereas your library assumes it is addr 30 (0x1e). I can get the program you provided to run by modifying the module to replace 0x1e with 0x0d, but it outputs nothing but 0’s. Have you run into this before? Any suggestions regarding a solution?
Thanks,
Steve
Hi Steve. Please check if your magnetometer is a QMC5883L instead of an HMC5883L.
Usually, the QMC5883L has I2C address 0x0d, while the HMC5883L has I2C address HMC5883L 0x1e. Tehy appear a lot similar, they are both sold as “GY-273”, but they work differently and hardly the HMC5883L code will work on QMC5883L
I bought the HA5883L whic seems to be a QMC5883, cause it’s i2c address is 0x0D. All data outputis 0.
Please le me kow if you found a solution.
Hi Bent. I’m sorry but I don’t have a QMC5883L for tests and I can’t publish a code without testing it. You can try to search on Google (or whatever search engine you prefer) if there’s something about “QMC5883L micropython” and tests these scripts.
Sorry
I have the exact same issue. Please let me know if you foubd a solution.
Hi Peppo, on further investigation it does look like the device is a QMC5883L even though the shield has HMC5883L and GY-273 printed on it. (The chip has HA 5883 1A31 stamped on it). Confusing. I switched to a QMC5883L library. It seems to “function” in all three axis and temperature but the results are not good at all. I printed out the raw X, Y, Z values from the device and it looks like they tend to be generally pegged at high values, occasionally dropping (in a kind of step input way) when I rotate about the various axis. Any idea what the scaling is per de Could be ambient magnetic noise on my workbench. I’ll try in a different location. I have heard that the header pins being ferrous can cause issues. Did you use non-ferrous pins to mount your board to the BB? Could also be the library isn’t setting something correctly. I’ll look into that further. In the meantime, have you any thoughts that might steer me towards resolution? Regardless, I’ll let you know what I find. Maybe others are having similar issues.
Cheers, Steve
Differently from other tutorials, in mine one I added the code to get the magnetometer calibrated. This step is really important as it can cover some devices defects and give you a quite reliable measure. If I were you, I would try to make the calibration process working with your model, so setting the max and min values that will give you probably better results
Hi Peppe, I will certainly do that. I ended up desoldering the ferrous header pins they sent with the device and replaced with non-ferrous hookup wire. It has made all the difference. Now I will calibrate by the method you provided. I do appreciate all your help. Cheers, steve.
Changed the I2C address from 0X0E to 0X0d because that was the address reported when I scanned the module.
When I run the calibrate program I get the following:
X: 0.0000, y: 0.0000, z: 0.0000, Heading 17º 9′
Rotating the module doesn’t change it. Pressing Ctrl C gives ZeroDivisionError: divide by zero
Any help would be appreciated
Hi Jim,
as in previous commenti, this address means that your sensor is a QMC5883L. It appears a lor similar to the HMC5883L but they don’t work with the same code. I don’t have a QMC5883L for testing and coding, so you should search on google for tutorials on that specific hardware
Well, thats a day I’ll never get back. HaHa
I should have read more carefully. I have a handful of these QMC5883L I bought as HMC5883L. I did find one actual HMC5883L, and using your code and instructions got it working fine. Thankyou vary much for your timely response and your help, much appreciated.
Thank you for your appreciation. Enjoy your Pico 😉
I have the exact same issue, except heading is also 0.00. Please let me know if you found a solution.
I just started trying to get the pico W to work as a compass with HA5883. From comments found it must be a QNC5883, since the I2C address is 0x0D. However, using code examples for the HMC5883 all its data output values are 0. Does anyone know how to solve this.
Thank you for your work on this. I also did not initially distinglish between H and Q versions and didn’t get far. Fortunately I did have an old H and your calibration and test programs worked perfectly. I wish you would consider presenting this again with the Q version as well (I have 1 H and 10 Q’s).
Thank you for your feedback, Phil. You’re right, many people are confusing the 2 models and I will add the Q model tutorial as soon as I will get one of these