

Last Updated on 2nd September 2023 by peppe8o
In this tutorial, I’m going to show you how to connect and configure a Raspberry PI with an RFID RC522 module, using Python.
RFID systems are common in our lives as they are widely used to secure access, monitor objects’ positions (IoT) and a lot of other applications. Their technology is so mature that they are today reliable components and easy to use. The RC522 module with Raspberry PI can bring to your hands this technology with a few steps and a cheap budget
The RFID Systems
An RFID system is composed of three elements: an antenna, a transceiver and a tag (transponder).
The RC522 module combines antenna and transceiver into a single element, referred to as an “RFID reader”.

It uses radio waves to transmit signals that activate the tag. Once activated, the tag sends a wave back to the antenna, where it is translated into data.
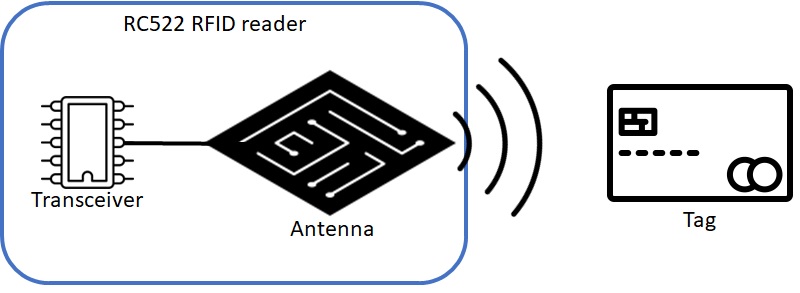
The tags integrate a circuit, an antenna and a substrate. The part of an RFID tag that stores the user data is called “RFID inlay”.
There are two types of RFID tags:
Active RFID: has its own power source, often a battery. It can give a higher distance range for reading
Passive RFID: receives its power from the reading antenna, whose electromagnetic wave induces a current in the RFID tag’s antenna. It can be read at shorter distances, but they are cheaper compared to the active ones
A good description of how RFID systems work is available from Techtarget.com RFID description.
The Tag Memory
The tag memory plays an important role in every RFID system.
RFID tags typically hold less than 2 KB of data, including a unique identifier. Tags can be read-only or read-write, where data can be added by the reader or existing data overwritten.
The classic, low-cost tags available from e-commerce stores have the factor form of a key chain or a credit card. They have 1KB storage that can be modified by the RFID reader and their memory has a specific map that is important to understand.
The classic 1KB tag memory is divided into 16 sectors, each one composed of 4 blocks with 16 bytes as shown in the following picture. As you can count here:
16 (sectors) x 4 (blocks) x 16 (bytes) = 1024 bytes = 1KB
Sector 0, block 0 is a special block, reserved for manufacturer info. This includes, for example, the Unique IDentifier (UID).
All the sectors have the last block used for securing the data access and managing access permissions for the sector data. These blocks are named “Trailers”.
Every sector trailer includes 2 keys: key A and key B. These keys are required to encrypt the sector data and make their access forbidden to anyone who doesn’t have at least one of the 2 keys.
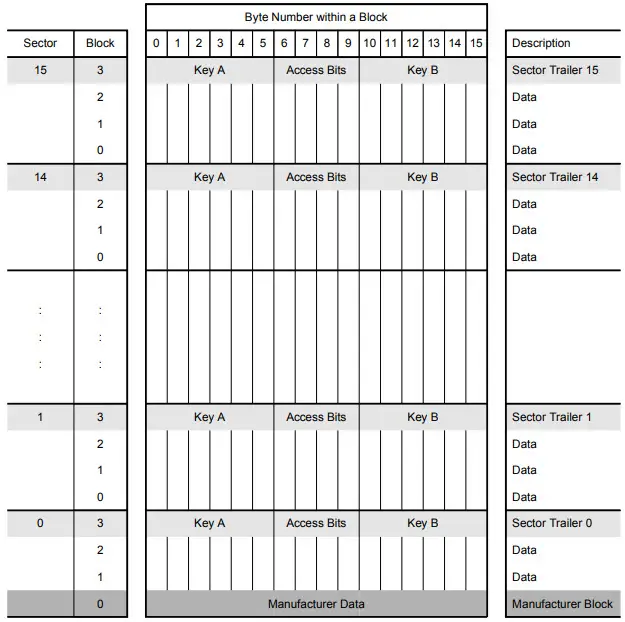
By default, only UID and the authentication keys (A and B) are available for reading without authentication.
Moreover by default, in new tags, the manufacturer set both keys for all the sectors with the hex value “[0xFF, 0xFF, 0xFF, 0xFF, 0xFF, 0xFF]”.
RC522 Common Parameters
Operating current: 13-26mA/DC 3.3V
Idle current: 10-13mA/DC 3.3V
Sleep current: <80uA
Peak current: <30mA
Operating Frequency: 13.56MHz
Size: 40mm×60mm
The RC522 Pinout
The RC522 RFID module communicates with Raspberry PI (and, generally, with any computer/microcontroller) by using the SPI protocol. Usually, the manufacturer sells this module without the header PINs soldered (even if the headers are provided in the kit). This means that you will probably need to make the soldering and a good guide to this job is exposed at MagPI how to solder gpio tutorial.
The RC522 module pinout is composed of the following PINs:
| RC522 PIN Name | Description |
| SDA | Serial Data Signal |
| SCK | Serial Clock |
| MOSI | Master Out Slave In |
| MISO | Master In Slave Out |
| IRQ | Interrupt Request |
| GND | Ground Power |
| RST | Reset-Circuit |
| 3.3v | 3.3v Power In |
What We Need
As usual, I suggest adding from now to your favourite e-commerce shopping cart all the needed hardware, so that at the end you will be able to evaluate overall costs and decide if to continue with the project or remove them from the shopping cart. So, hardware will be only:

- Raspberry PI Computer board (including proper power supply or using a smartphone micro USB charger with at least 3A)
- high speed micro SD card (at least 16 GB, at least class 10)
- RC522 kit (including reader and tags)
- breadboard (optional)
- dupont wirings
Step-by-Step Procedure
Wiring Diagram
Please prepare the wiring according to the following picture:

As of the complexity of this wiring, please find below a summary table:
| RC522 PIN | RPI PIN |
| SDA | Pin 24 |
| SCK | Pin 23 |
| MOSI | Pin 19 |
| MISO | Pin 21 |
| IRQ | not connected |
| GND | Pin 6 (or any ground) |
| RST | Pin 22 |
| 3.3v | Pin 1 |
Prepare OS
Please install (if not already done) your Raspberry PI Operating System. You can use both Raspberry PI OS Lite (for a fast, headless OS) or Raspberry PI OS Desktop (with a complete desktop environment, in this case working from its terminal). If you need help on choose, you can refer to my Raspberry PI OS Lite vs Desktop: comparison between the 2 distributions tutorial.
Make your OS up to date. From terminal:
sudo apt update -y && sudo apt upgrade -yWe need to install also the packages that help our Raspberry PI to manage the RC522 module by adding useful libraries. From terminal, please use the following 2 commands:
sudo apt install python3-pip -y
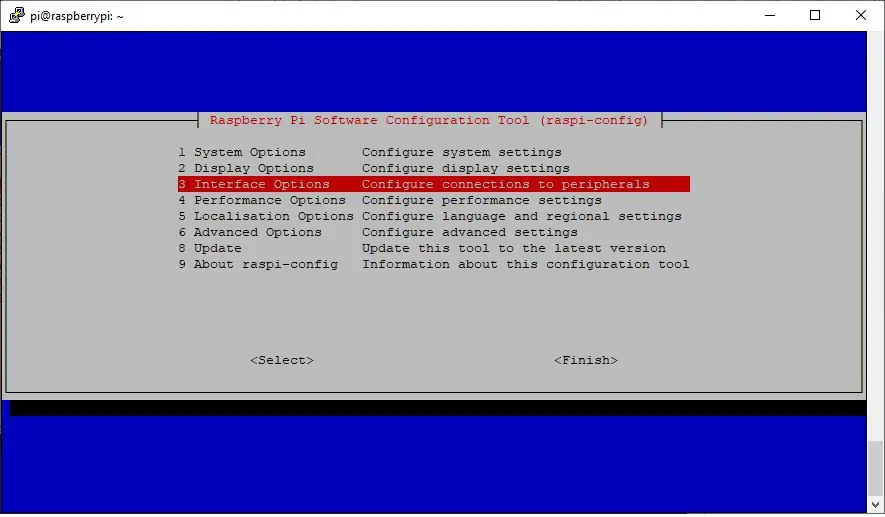
pip3 install pi-rc522We also need to enable SPI, which is disabled by default in Raspberry PI OS. From terminal:
sudo raspi-configFrom the raspi-config screen, please select option 3 (Interface Options) and press return:
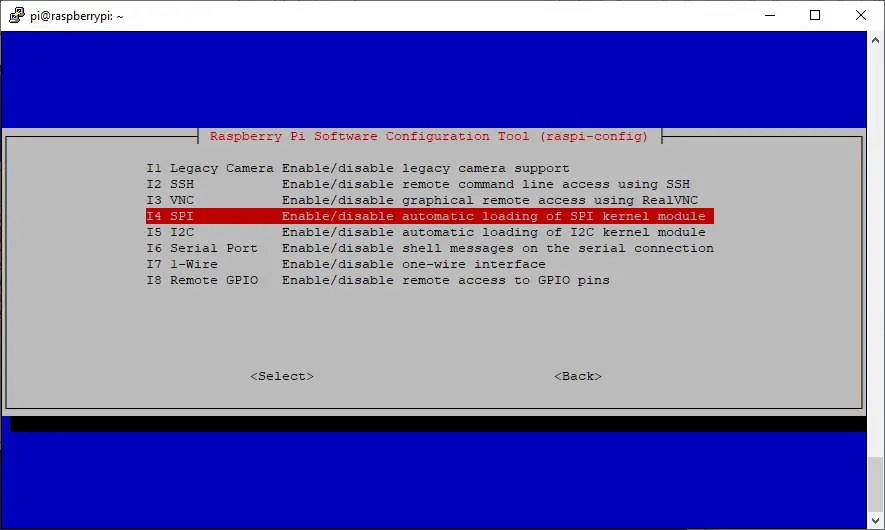
From the following page, please select “I4 SPI” and press return:
In the following screen, please move the selection to “Yes” and press return:

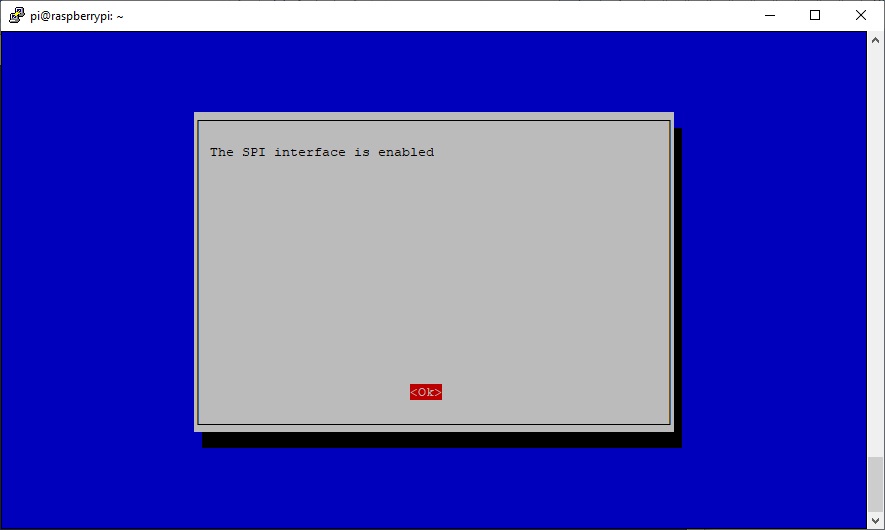
The following page will confirm that SPI interface is set to enabled. Press return to confirm:
Back to raspi-config home, select finish. You will need a reboot to get the SPI really enabled and working:
sudo rebootAfter the reboot finishes, you can check that SPI is enabled with the following command:
lsmod | grep spiThat should list the “spi_bcm2835”.
Before Starting…
In this chapter, I’ll describe a few common operations to perform every time we want to have our RFID and Raspberry PI working. They manage the importing of required libraries, RFID initialization, and authentication. These lines will be analyzed only in this paragraph, even if used also in the following ones.
In the beginning, we’ll import the required libraries. I’ve added also the RPi.GPIO to clean up the Raspberry PI GPIO status at every script run:
import time
from pirc522 import RFID
import RPi.GPIO as GPIO
Then, we initialize the reader (rdr) object and its util() by using the pirc522 library:
rdr = RFID()
util = rdr.util()
In the following scripts, I’ve also left the util.debug line in order to be able at any time to un-comment this line to check the RFID debug form shell in case of problems:
# util.debug = TrueThe main loop (try: -> while True:) starts with the python script waiting for a tag to be in proximity:
try:
  while True:
    rdr.wait_for_tag()
Once a tag is detected, the script checks if errors happen in reading it. If the tag is ok, a “Detected” notice is printed on the shell:
    (error, data) = rdr.request()
    if not error:
        print("\nDetected")
        (error, uid) = rdr.anticoll()
The first lines (in case of no error) will check for the Tag Unique IDentifier (UID) and print it:
        if not error:
            print("Card read UID: " + str(uid))
            # Set tag as used in util. This will call RFID.select_tag(uid)
In order to be able to use the rdr.util() functions, we need to set the tag UID and save the authentication key:
            util.set_tag(uid)
            util.auth(rdr.auth_a, [0xFF, 0xFF, 0xFF, 0xFF, 0xFF, 0xFF])
For these examples, we’re going to use the Key A authentication. Using the Key B will result just in changing on the last line the “rdr.auth_a” with “rdr.auth_b”.
Please note that the util.auth() doesn’t perform the authentication. This just saves the authentication key into a variable that will be called when needed.
Also, note that authentication is required to read and write every single block from your RFID Tag.
After completing our operations, we de-authenticate the tag and add a sleep time of 1 second in order to let enough time to move away the tag from RFID reader:
            util.deauth()
            time.sleep(1)
Before the end of our Python script, the except KeyboardInterrupt: will intercept the script interrupt (CTRL+C from your keyboard) by cleaning the GPIO status:
except KeyboardInterrupt:
  print('interrupted!')
  GPIO.cleanup()
Reading All RC522 Memory (Dump)
The first example makes a full print of the RFID Tag memory.
The Python script can be get from my download area, directly in your Raspberry PI, with the following command:
wget https://peppe8o.com/download/python/rfid/rfid-dump.pyTo run it, please issue the following terminal command:
python3 rfid-dump.pyThe following part of this chapter explains the code lines.
Besides the common jobs already explained in the previous chapter, we perform the dump of tag memory with the following line:
util.dump()The dump() statement reads all the card data with one command and will show block by block the raw content (in hex). Every block is identified at the start of the line with the notation S(+sector number).0B(+block number). A brand new tag will appear similar to the following:
Detected
Card read UID: [140, 104, 238, 55, 61]
setting uid
autenticating
S0.0B0: [140, 104, 238, 55, 61, 8, 4, 0, 98, 99, 100, 101, 102, 103, 104, 105]
S0.0B1: [0, 0, 0, 0, 0, 0, 0, 0, 0, 0, 0, 0, 0, 0, 0, 0]
S0.0B2: [0, 0, 0, 0, 0, 0, 0, 0, 0, 0, 0, 0, 0, 0, 0, 0]
S0.0B3: [0, 0, 0, 0, 0, 0, 255, 7, 128, 105, 255, 255, 255, 255, 255, 255]
S1.0B0: [0, 0, 0, 0, 0, 0, 0, 0, 0, 0, 0, 0, 0, 0, 0, 0]
S1.0B1: [0, 0, 0, 0, 0, 0, 0, 0, 0, 0, 0, 0, 0, 0, 0, 0]
S1.0B2: [0, 0, 0, 0, 0, 0, 0, 0, 0, 0, 0, 0, 0, 0, 0, 0]
S1.0B3: [0, 0, 0, 0, 0, 0, 255, 7, 128, 105, 255, 255, 255, 255, 255, 255]
S2.0B0: [0, 0, 0, 0, 0, 0, 0, 0, 0, 0, 0, 0, 0, 0, 0, 0]
S2.0B1: [0, 0, 0, 0, 0, 0, 0, 0, 0, 0, 0, 0, 0, 0, 0, 0]
S2.0B2: [0, 0, 0, 0, 0, 0, 0, 0, 0, 0, 0, 0, 0, 0, 0, 0]
S2.0B3: [0, 0, 0, 0, 0, 0, 255, 7, 128, 105, 255, 255, 255, 255, 255, 255]
S3.0B0: [0, 0, 0, 0, 0, 0, 0, 0, 0, 0, 0, 0, 0, 0, 0, 0]
S3.0B1: [0, 0, 0, 0, 0, 0, 0, 0, 0, 0, 0, 0, 0, 0, 0, 0]
S3.0B2: [0, 0, 0, 0, 0, 0, 0, 0, 0, 0, 0, 0, 0, 0, 0, 0]
S3.0B3: [0, 0, 0, 0, 0, 0, 255, 7, 128, 105, 255, 255, 255, 255, 255, 255]
S4.0B0: [0, 0, 0, 0, 0, 0, 0, 0, 0, 0, 0, 0, 0, 0, 0, 0]
S4.0B1: [0, 0, 0, 0, 0, 0, 0, 0, 0, 0, 0, 0, 0, 0, 0, 0]
S4.0B2: [0, 0, 0, 0, 0, 0, 0, 0, 0, 0, 0, 0, 0, 0, 0, 0]
S4.0B3: [0, 0, 0, 0, 0, 0, 255, 7, 128, 105, 255, 255, 255, 255, 255, 255]
S5.0B0: [0, 0, 0, 0, 0, 0, 0, 0, 0, 0, 0, 0, 0, 0, 0, 0]
S5.0B1: [0, 0, 0, 0, 0, 0, 0, 0, 0, 0, 0, 0, 0, 0, 0, 0]
S5.0B2: [0, 0, 0, 0, 0, 0, 0, 0, 0, 0, 0, 0, 0, 0, 0, 0]
S5.0B3: [0, 0, 0, 0, 0, 0, 255, 7, 128, 105, 255, 255, 255, 255, 255, 255]
S6.0B0: [0, 0, 0, 0, 0, 0, 0, 0, 0, 0, 0, 0, 0, 0, 0, 0]
S6.0B1: [0, 0, 0, 0, 0, 0, 0, 0, 0, 0, 0, 0, 0, 0, 0, 0]
S6.0B2: [0, 0, 0, 0, 0, 0, 0, 0, 0, 0, 0, 0, 0, 0, 0, 0]
S6.0B3: [0, 0, 0, 0, 0, 0, 255, 7, 128, 105, 255, 255, 255, 255, 255, 255]
S7.0B0: [0, 0, 0, 0, 0, 0, 0, 0, 0, 0, 0, 0, 0, 0, 0, 0]
S7.0B1: [0, 0, 0, 0, 0, 0, 0, 0, 0, 0, 0, 0, 0, 0, 0, 0]
S7.0B2: [0, 0, 0, 0, 0, 0, 0, 0, 0, 0, 0, 0, 0, 0, 0, 0]
S7.0B3: [0, 0, 0, 0, 0, 0, 255, 7, 128, 105, 255, 255, 255, 255, 255, 255]
S8.0B0: [0, 0, 0, 0, 0, 0, 0, 0, 0, 0, 0, 0, 0, 0, 0, 0]
S8.0B1: [0, 0, 0, 0, 0, 0, 0, 0, 0, 0, 0, 0, 0, 0, 0, 0]
S8.0B2: [0, 0, 0, 0, 0, 0, 0, 0, 0, 0, 0, 0, 0, 0, 0, 0]
S8.0B3: [0, 0, 0, 0, 0, 0, 255, 7, 128, 105, 255, 255, 255, 255, 255, 255]
S9.0B0: [0, 0, 0, 0, 0, 0, 0, 0, 0, 0, 0, 0, 0, 0, 0, 0]
S9.0B1: [0, 0, 0, 0, 0, 0, 0, 0, 0, 0, 0, 0, 0, 0, 0, 0]
S9.0B2: [0, 0, 0, 0, 0, 0, 0, 0, 0, 0, 0, 0, 0, 0, 0, 0]
S9.0B3: [0, 0, 0, 0, 0, 0, 255, 7, 128, 105, 255, 255, 255, 255, 255, 255]
S10.0B0: [0, 0, 0, 0, 0, 0, 0, 0, 0, 0, 0, 0, 0, 0, 0, 0]
S10.0B1: [0, 0, 0, 0, 0, 0, 0, 0, 0, 0, 0, 0, 0, 0, 0, 0]
S10.0B2: [0, 0, 0, 0, 0, 0, 0, 0, 0, 0, 0, 0, 0, 0, 0, 0]
S10.0B3: [0, 0, 0, 0, 0, 0, 255, 7, 128, 105, 255, 255, 255, 255, 255, 255]
S11.0B0: [0, 0, 0, 0, 0, 0, 0, 0, 0, 0, 0, 0, 0, 0, 0, 0]
S11.0B1: [0, 0, 0, 0, 0, 0, 0, 0, 0, 0, 0, 0, 0, 0, 0, 0]
S11.0B2: [0, 0, 0, 0, 0, 0, 0, 0, 0, 0, 0, 0, 0, 0, 0, 0]
S11.0B3: [0, 0, 0, 0, 0, 0, 255, 7, 128, 105, 255, 255, 255, 255, 255, 255]
S12.0B0: [0, 0, 0, 0, 0, 0, 0, 0, 0, 0, 0, 0, 0, 0, 0, 0]
S12.0B1: [0, 0, 0, 0, 0, 0, 0, 0, 0, 0, 0, 0, 0, 0, 0, 0]
S12.0B2: [0, 0, 0, 0, 0, 0, 0, 0, 0, 0, 0, 0, 0, 0, 0, 0]
S12.0B3: [0, 0, 0, 0, 0, 0, 255, 7, 128, 105, 255, 255, 255, 255, 255, 255]
S13.0B0: [0, 0, 0, 0, 0, 0, 0, 0, 0, 0, 0, 0, 0, 0, 0, 0]
S13.0B1: [0, 0, 0, 0, 0, 0, 0, 0, 0, 0, 0, 0, 0, 0, 0, 0]
S13.0B2: [0, 0, 0, 0, 0, 0, 0, 0, 0, 0, 0, 0, 0, 0, 0, 0]
S13.0B3: [0, 0, 0, 0, 0, 0, 255, 7, 128, 105, 255, 255, 255, 255, 255, 255]
S14.0B0: [0, 0, 0, 0, 0, 0, 0, 0, 0, 0, 0, 0, 0, 0, 0, 0]
S14.0B1: [0, 0, 0, 0, 0, 0, 0, 0, 0, 0, 0, 0, 0, 0, 0, 0]
S14.0B2: [0, 0, 0, 0, 0, 0, 0, 0, 0, 0, 0, 0, 0, 0, 0, 0]
S14.0B3: [0, 0, 0, 0, 0, 0, 255, 7, 128, 105, 255, 255, 255, 255, 255, 255]
S15.0B0: [0, 0, 0, 0, 0, 0, 0, 0, 0, 0, 0, 0, 0, 0, 0, 0]
S15.0B1: [0, 0, 0, 0, 0, 0, 0, 0, 0, 0, 0, 0, 0, 0, 0, 0]
S15.0B2: [0, 0, 0, 0, 0, 0, 0, 0, 0, 0, 0, 0, 0, 0, 0, 0]
S15.0B3: [0, 0, 0, 0, 0, 0, 255, 7, 128, 105, 255, 255, 255, 255, 255, 255]
Dump completed, waiting 1 sec for next reading
Available to start a new reading
Reading and Writing Strings to RFID Tag
The second example will perform the writing and reading of text strings into our Tag.
You can get the script by:
wget https://peppe8o.com/download/python/rfid/rfid-strings.pyTo run it, please use the following command:
python3 rfid-strings.pyIn this script, I’ve defined 2 custom functions in order to make simpler writing and reading the strings as bytes.
Before starting, please mind that every block is made of 16 bytes, so our writing and reading have to manage byte arrays whose length has to be exactly 16 bytes.
The write function requires as input the block number and the string that you want to write in your Tag.
After performing the authentication (that will use the key saved according to the previous chapter, we create an array of bytes with the Python bytearray() function. This also lets you choose the encoding (utf8 in this example).
Please note that utf-8 converts quite all common characters into 1 byte. But if you need to use special characters (like, for example, the “è”), it will result in incorrect decoding.
In case out text string is shorter than 16 bytes, the “b_array += bytearray((0,)) * (16-len(b_array))” will add trailing zeroes.
Finally, the “rdr.write(block,b_array)” will write the byte array. This function will also skip any byte after the 16th, assuring the maximum length required for our tag capacity.
def rfid_write_str(block,mystring):
        util.do_auth(block)
        b_array=bytearray(mystring,'utf-8')
        b_array += bytearray((0,)) * (16-len(b_array))
        rdr.write(block,b_array)
The read function will perform the opposite operation and has as only input the block number.
The rdr-read() function has a built-in authentication, so it is not necessary to explicitly do it. It reads from the specified block and returns an array of integer numbers, each one being the byte value in integer format. The “chr()” makes it possible to get from an integer the related character, decoding it.
So, after setting to empty the dec_string that will store the reading result, the while loop converts one by one the read bytes and appends it to the dec_string variable, which will return the read string:
def rfid_read_str(block):
        byte_array = rdr.read(9)
        dec_string = ""
        for character in byte_array[1]:
                dec_string = dec_string + chr(character)
        return dec_string
In the loop, besides the common operations already described, we write the text string “Hi peppe8o.com!” into block 9 (which is sector 2, block 1) by using our custom write function:
            text='Hi peppe8o.com!'
            print("Witing new value...")
            rfid_write_str(9,text)
As proof our this job, the script also prints the result on the shell:
            print("Printing results")
            print(rfid_read_str(9))
And that’s what will appear:
Detected
Witing new value...
Printing results
Hi peppe8o.com!
Available to start a new reading
What’s Next
Interested in more cool projects for your Raspberry PI computer board? Take a look at peppe8o Raspberry PI tutorials.
Enjoy!

Open source and Raspberry PI lover, writes tutorials for beginners since 2019. He's an ICT expert, with a strong experience in supporting medium to big companies and public administrations to manage their ICT infrastructures. He's supporting the Italian public administration in digital transformation projects.
![]()
![]()
![]()
![]()
![]()
![]()
![]()


After completing and checking the results of each step above, I get an error:
sudo python3 rfid-dump.pyTraceback (most recent call last):
File "/home/mark/pi-rfid/rfid-dump.py", line 27, in
from pirc522 import RFID
ModuleNotFoundError: No module named 'pirc522'
But the library shows installed:
pip3 install pi-rc522Looking in indexes: https://pypi.org/simple, https://www.piwheels.org/simple
Collecting pi-rc522
Downloading https://www.piwheels.org/simple/pi-rc522/pi_rc522-2.2.1-py3-none-any.whl (6.6 kB)
Requirement already satisfied: RPi.GPIO in /usr/lib/python3/dist-packages (from pi-rc522) (0.7.0)
Requirement already satisfied: spidev in /usr/lib/python3/dist-packages (from pi-rc522) (3.5)
Installing collected packages: pi-rc522
Successfully installed pi-rc522-2.2.1
Hi Brian,
if you use sudo for the python scripts executions, you should use sudo also for the pip3 line. So, there are 2 ways for you that should work:
1. Using sudo both for the pip3 command and Python execution:
sudo pip3 install pi-rc522sudo python3 rfid-dump.pyOR
2.Not use sudo for both commands:
pip3 install pi-rc522python3 rfid-dump.pyI hope this helps you to fix the error