Some links in this post may be affiliate links. We may get paid if you buy something or take an action after clicking one of these, but without addictional costs for you compared to direct buying.
Customized Solar Dashboard with Raspberry PI and Thingsboard
In this tutorial, I will share a DIY project to create a fully customizable solar dashboard with a Raspberry PI computer board and ThingsBoard. The project will use Python to collect data from the servers of my inverter producer (Azzurro ZCS) by using their public APIs. I will also give you the procedure to reach the goal so that you can adapt my scripts to your inverter producer and its APIs.
Photovoltaic Dashboard and Raspberry PI Communication
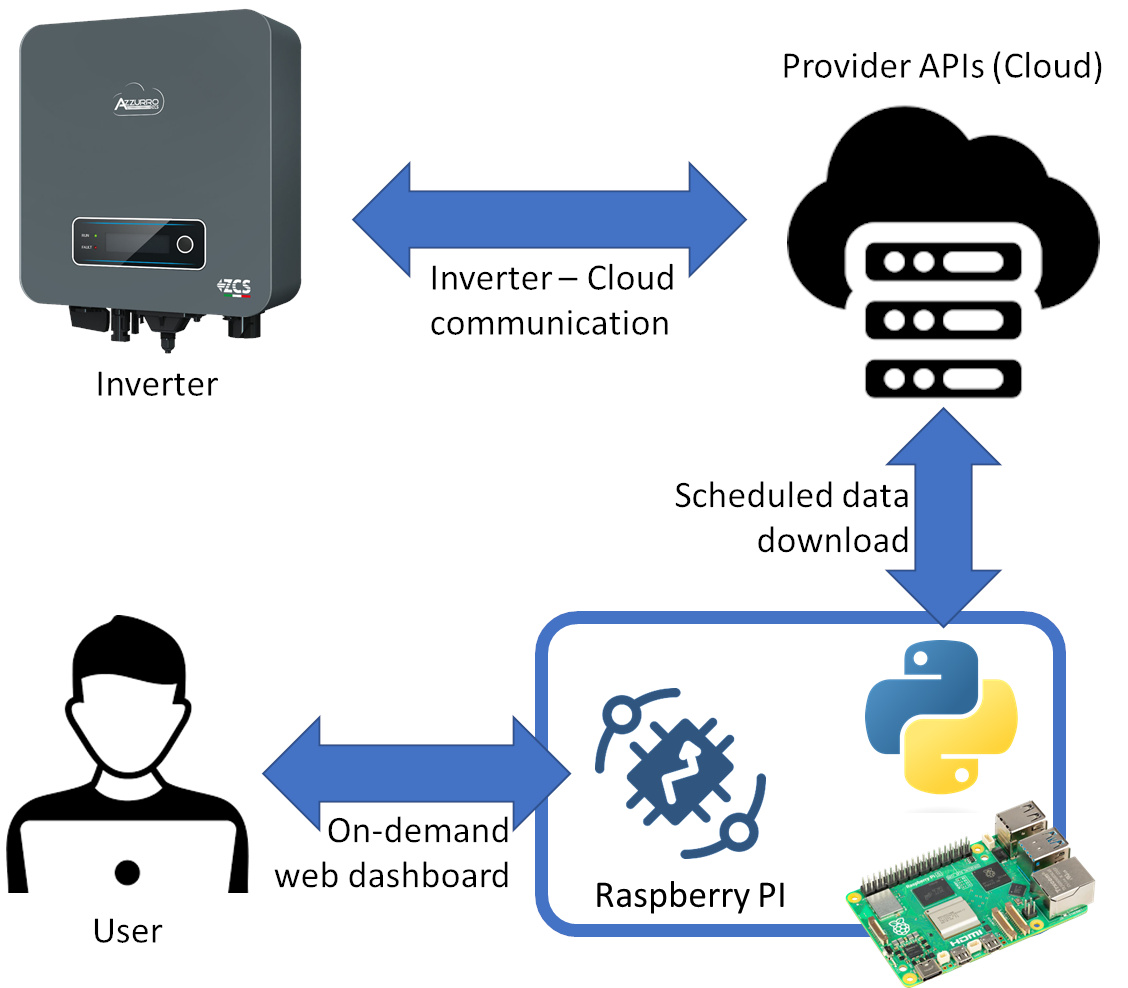
The project aims to get solar data from the Cloud servers of the inverter producer rather than directly from the inverter. The following picture summarizes the communication flows:
This project will show you how to create the scheduled data download and the on-demand dashboard. It doesn’t aim to dig into the communication between the solar inverter and the Cloud servers, as this part is usually already implemented by the inverter producer (that’s how the producer gets data for monitoring in your smartphone app).
The main PRO of this solution is that you don’t have to fight to create complex interfaces between the Raspberry PI and the inverter, usually accessible with serial ports requiring a lot of development time. The main CON of this approach is that you will not have “really real-time” data, as you may get delays of around 10-15 minutes (depending on your inverter producer process).
What We Need
As usual, I suggest adding from now to your favourite e-commerce shopping cart all the needed hardware, so that at the end you will be able to evaluate overall costs and decide if to continue with the project or remove them from the shopping cart. So, hardware will be only:
a solar system/kit, with the inverter producer capable of giving you access to data APIs
Step-by-Step Procedure
Get the API from your Solar Inverter Producer
This part depends on the producer of your solar kit. Many may give you public documentation about using their API, while others may require you to explicitly ask for it. If there’s no documentation from their web pages, try to reach their customer support to get their availability and their development manuals.
In my case, with the Azzurro ZCS, I simply emailed their customer support and they were available to share their API guides, including the authentication procedure and API usage. I will base this tutorial on this inverter producer so that in this case you can just use my scripts. With other inverters, you may anyway adapt my scripts to your needs.
The Azzurro ZCS API
The API I will use enables you to get data from multiple solar kits. There are 4 different data:
historicData: to get daily data from history and every device
realtimeData: to get the latest data from every device
deviceHistoricAlarm: to get daily alarms from history and every device
deviceAlarm: to get the latest alarms from every device
Every API request (POST) has a single URL as the destination: https://third.zcsazzurroportal.com:19003/. All the requests must include an authentication header with the following parameters:
“auth key” and “client“: provided by the Azzurro ZCS support
“thing key“: the serial number of the inverter (or inverters)
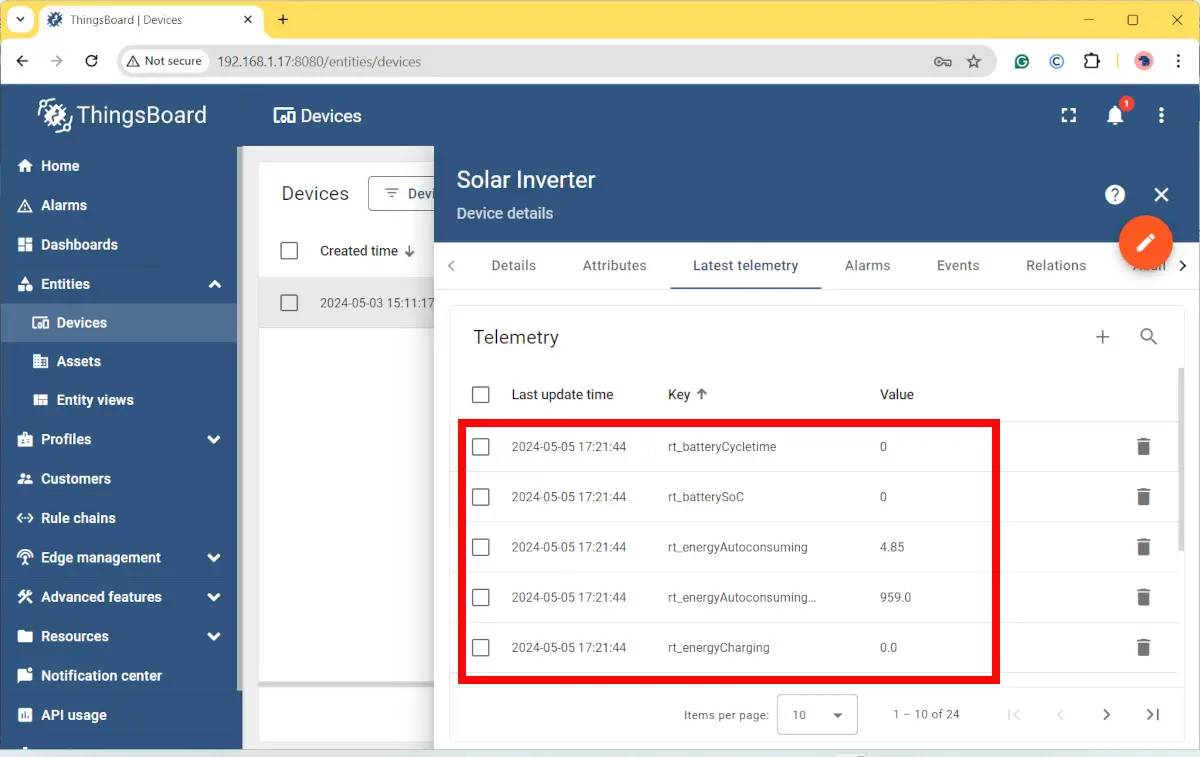
Every request will return a number of measures from your inverter (more precisely, from those stored in the cloud from your inverter). You can filter them with the “requiredValues” key or use a “*” wildcard to get all the parameters. I suggest getting all the datasets so that you can decide from your ThingsBoard which values to show.
You can request data for a single device (inverter) or multiple devices. According to your needs, your “thingKey” variable must be set to your single serial number (like, for example, “ZA1AA222B3C444”) or multiple serial numbers (like, for example, “ZA1AA222B3C444, ZB5AA666B7C888, ZC9AA000B1C222”).
historicData requests must include the following POST JSON payload:
We’ll see in the following chapters how to deal with these requests.
The Goal of our Data Manipulation
Data collected from the API can’t be sent directly to ThingsBoard as they have different formats. In my case, I get real-time data from Azzurro ZCS in the following format:
On the other hand, ThingBoard requires data to be transmitted with a “ts” key (which is the TimeStamp) and values into a JSON, with the following format:
The Python scripts in the following chapters will do this job for Azzurro ZCS systems. If you use a different Solar Inverter with a different API, you’ll need to find your root path and adapt my scripts to your cases, ensuring that the output is similar to the last example. In this case, it will be helpful to run the script into a Python IDE (like Thonny) and test the different paths until you find the correct one for your API.
Prepare the Operating System
Please start installing your favourite Operating System for Raspberry PI (it must be Debian-based, I suggest a 64-bit version). I also recommend using Raspberry PI OS Lite, as it provides a headless, faster environment for low-capabilities Raspberry PI computer boards. But you can also use Raspberry PI OS Desktop, in this case working from its internal terminal. You can check the difference between the two OS from my Raspberry PI OS Lite vs Desktop: comparison between the 2 distributions.
Make your OS up-to-date. From the terminal, please use the following command:
sudo apt update -y && sudo apt upgrade -y
We also need pip3, which we’ll use to install the ThingsBoard MQTT package for Python:
sudo apt install python3-pip -y
Prepare ThingsBoard Device in Raspberry PI
For this task, please start from my tutorials already available at the following links to install Docker and ThingsBoard:
At the end of the previous tutorial, you should have your ThingsBoard running and your user logged in with the profile of the System Administrator.
The following steps are creating a ThingsBoard Tenant (with related tenant admin) and a Device.
You can create the Tenant with your preferred name (for example, I will name it “Solar Dashboard”). On the other hand, you can also name the Device as you prefer, but I will name it “Solar Inverter” because it makes more familiar with the object producing data and because you can create different Devices even if their data come from a single board (like our Raspberry PI).
The following paragraphs will explain my script line by line.
In the beginning we import the required modules:
import requests
import json
import pandas as pd
from tb_device_mqtt import TBDeviceMqttClient, TBPublishInfo
from datetime import datetime, timedelta
from dateutil import tz
As Azzurro ZCS exports the timestamp with the GMT timestamp, I also needed to convert GMT data into my TimeZone. For this reason, the script initializes the UTC and localtz variables which we’ll use in the date_conversion() custom function defined later.
utc = tz.gettz('UTC')
localtz = tz.tzlocal()
Then, we initialize the ThingsBoard variables. Please insert the Device token you got from ThingsBoard when creating your device. If ThingsBoard is installed into the same Raspberry PI computer board, you can use the “0.0.0.0” host (which means localhost). If you use a different computer to host ThingsBoard, you must set the related IP address there:
The API variables follow. Here I set the required variables for authentication with Azzurro ZCS API. Of course, you should use the values coming from the Azzurro customer service for your (or those coming from your Inverter provider):
In the same way, we store the URL where to send our request, authentication head and request payload to variables, so that we can manage in a clear way when sending the API request. Please note that we’ll require all the available values, as we’ll be able to filter them later in our dashboard:
As anticipated before, the date_conversion() custom function will keep a given datetime string having the format similar to “2022-01-10T09:44:11Z” into a Python datetime object, finally returning it in your local timezone:
In my script I will store the values and the TimeStamp into 2 different dataframes.
The dev_values will store all the columns, excluding the “lastUpdate” column. Moreover, I will add a “rt_” prefix in the value keys, so that I will be able to distinguish real-time data from historical data in my ThingsBoard:
This script uses the same approach. of course, it is different because it needs to set the start and end date for the required data. Before running the script, you will need to set the following variables with your Device token and your authentication strings:
With the historical data, the Azzurro ZCS API stores the timestamps into the JOSN key named “ts”. Anyway, we’ll use again 2 dataframes to store timestamps separately from the values. Please note that here I don’t add any prefixes to historical data:
With historical data, we’ll have multiple timestamps to push to ThingsBoard (we’re collecting the latest 12 hours). For this reason, a “for” loop will scan all the stored data and publish them to ThingsBoard with the related values:
for i in range(0, len(dev_ts)):
    my_time = data_conversion(dev_ts.loc[i])
    telemetry = {'ts': my_time, 'values': json.loads(dev_values.loc[i].to_json())}
    result = client.send_telemetry(telemetry)
    success = result.get() == TBPublishInfo.TB_ERR_SUCCESS
Before testing Again, you can run it from your terminal console with the following command:
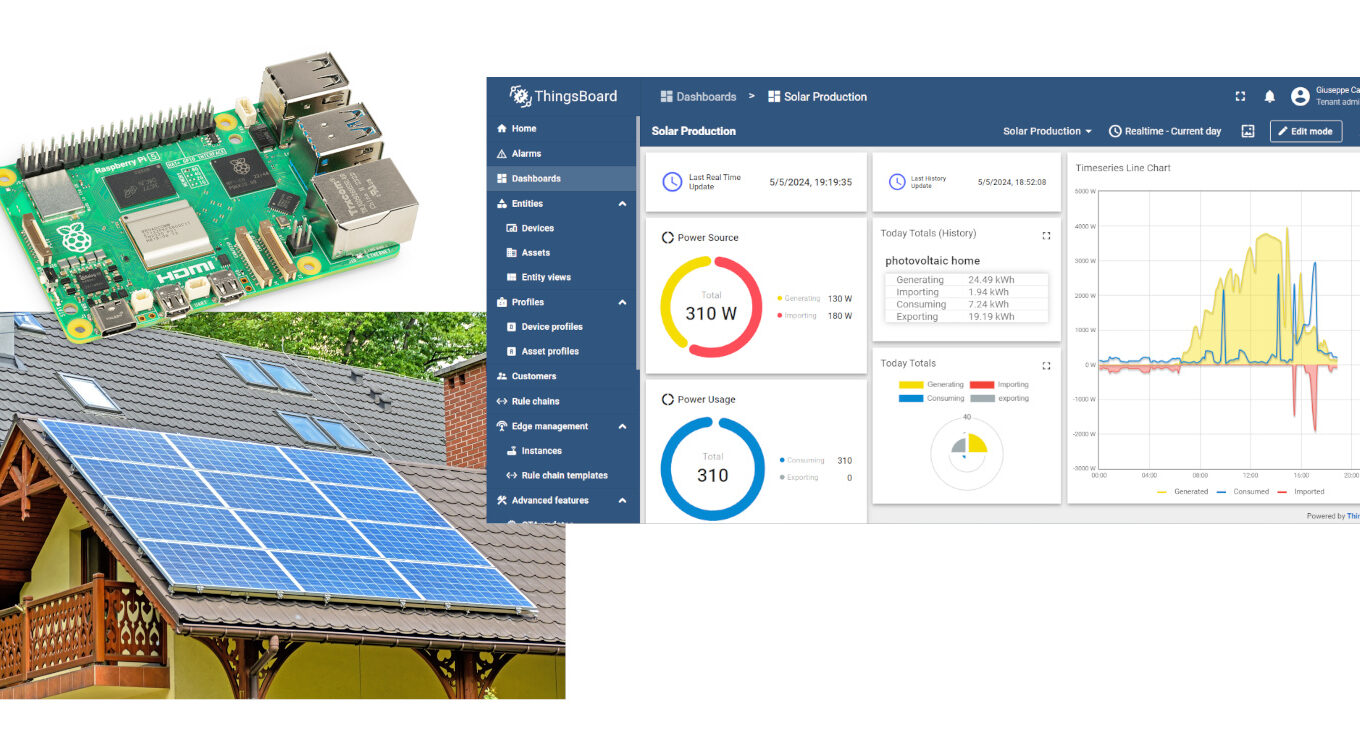
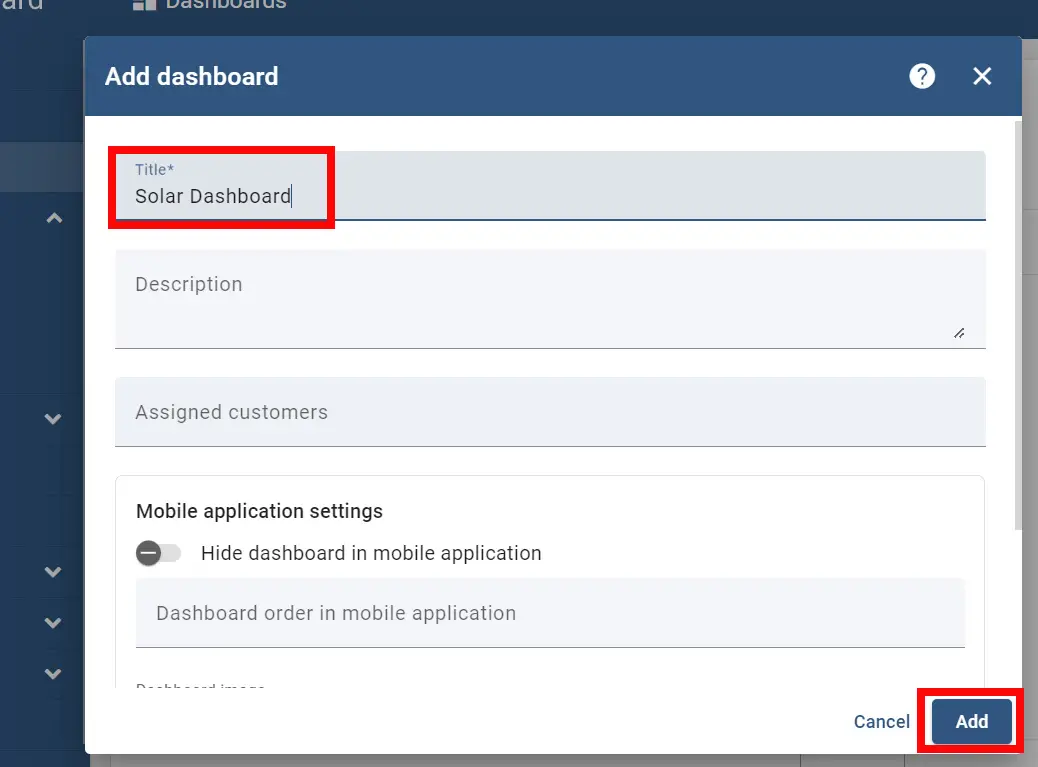
At this point, you should have your first data loaded into your ThingsBoard instance. You can create a new Dashboard, naming it as you like (I will name it “Solar Dashboard”):
Besides the name, you don’t need specific settings:
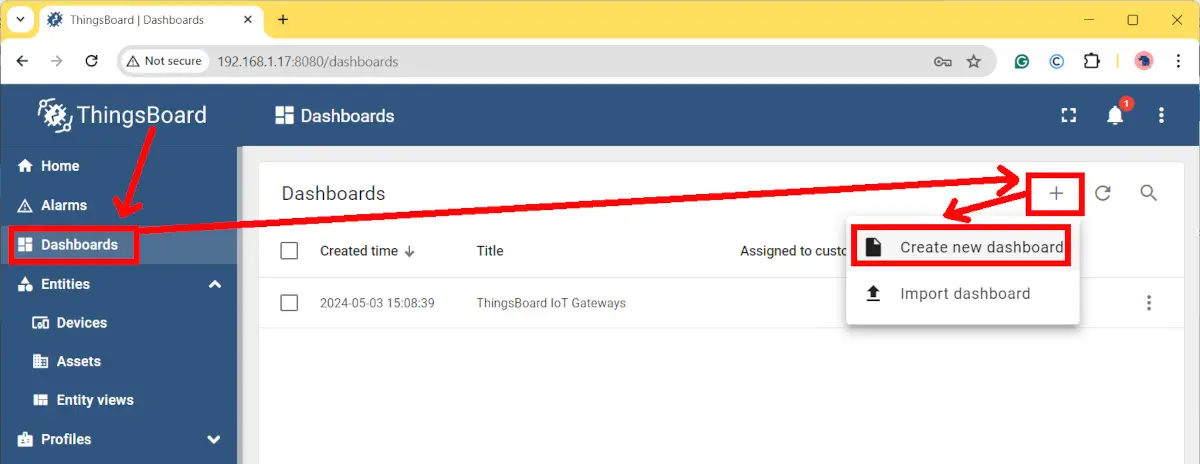
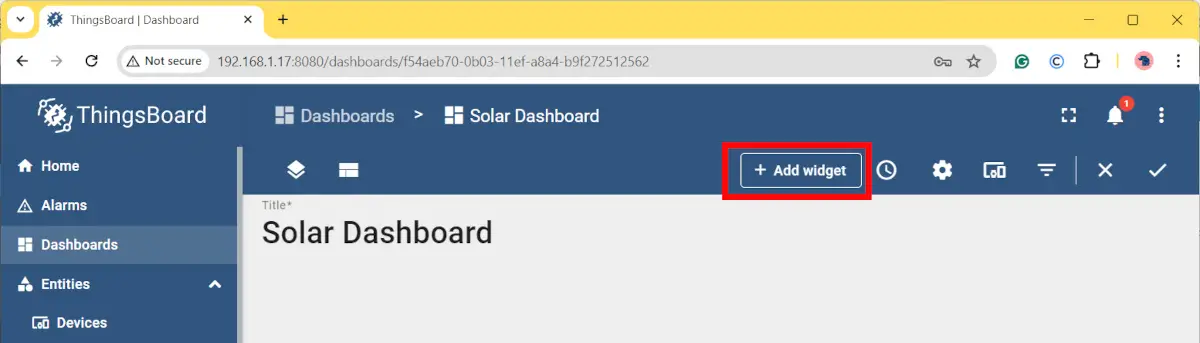
From the new dashboard, you can add widgets with the button highlighted in the following picture:
Here, you can add all the widgets you want and configure them as you prefer, the only limit is your imagination! The only things you need to know when adding a Widget are:
Choose the right device (“Solar Inverter” in my case)
Choose the right measures, as some may appear similar by name, even if carrying different information
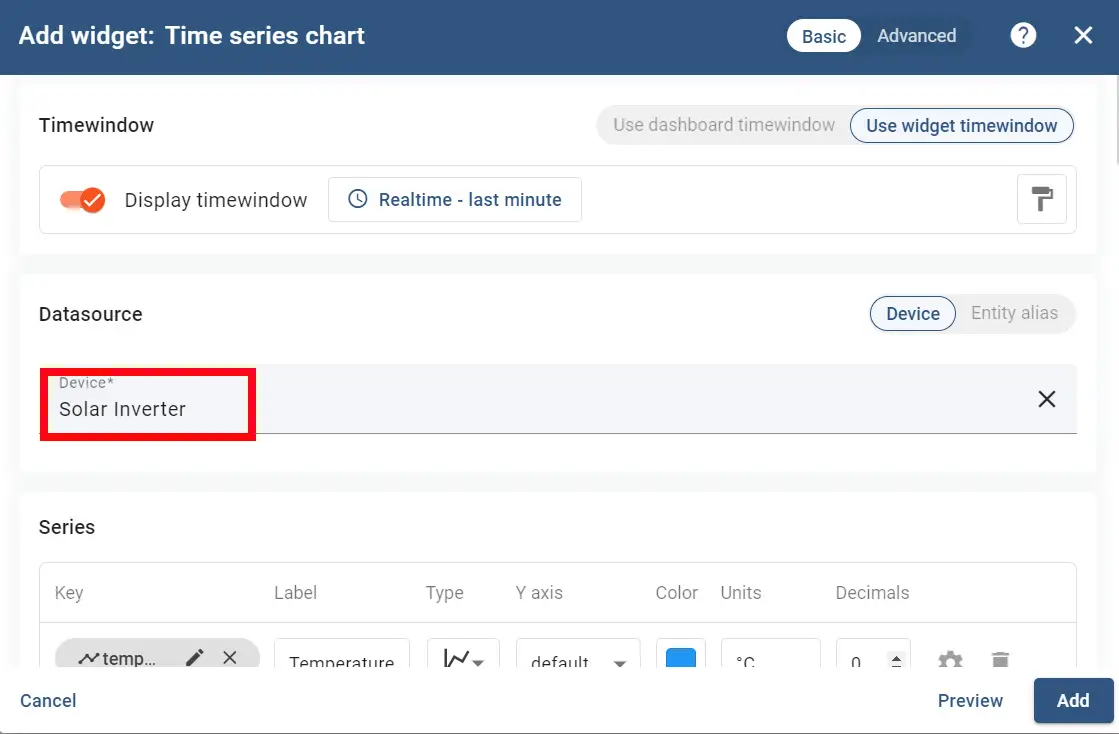
For example, let’s add a Time series chart.
Once you add it, you must select the correct device in the Datasource section:
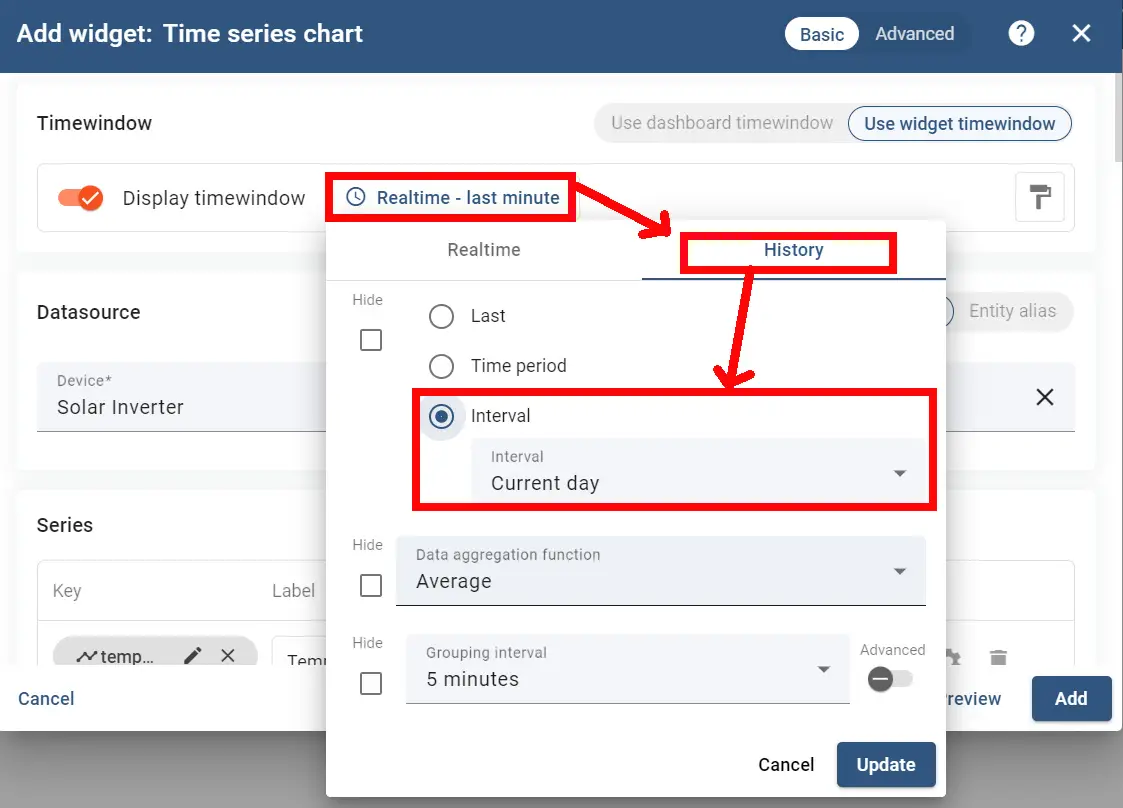
Also, please remind to set the timewindow from real-time to history and select your desired time interval:
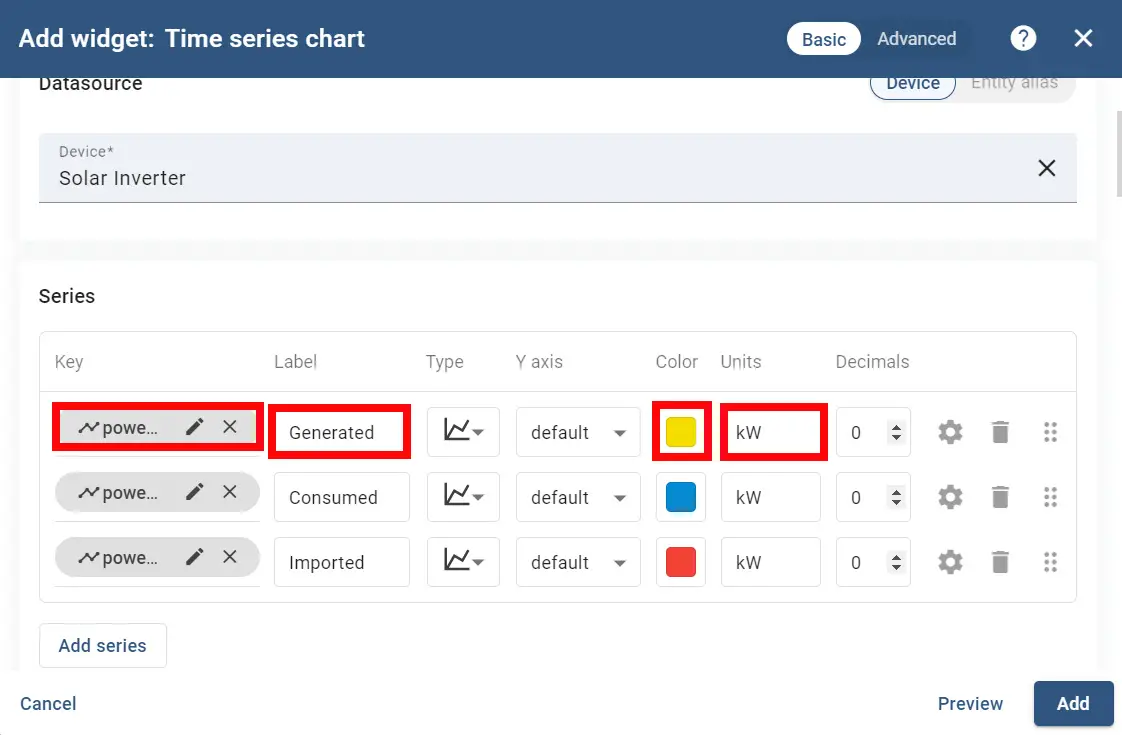
After this, you can select the right series in the following section. With Azzurro ZCS systems, those with a name starting with “power” are the measures of a specific time frame, while others are sums of the day. When you’ll click the key field there, ThingsBoard will propose you the available telemetry measures, so making it simpler to you to choose between the available variables.
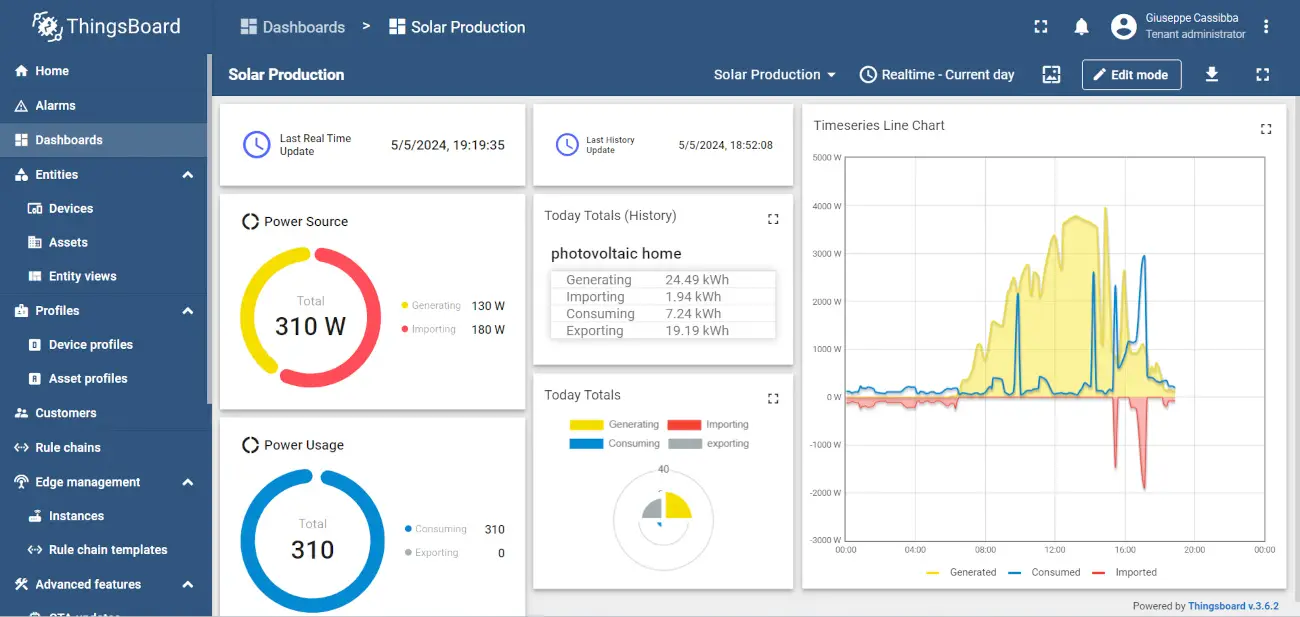
I will create a simple chart with the lines of generated, imported and used power by selecting the powerGenerating, powerConsuming, and powerImporting variables. For each variable, you can set the label to show in your chart legend, the line colour, the unit label, and more:
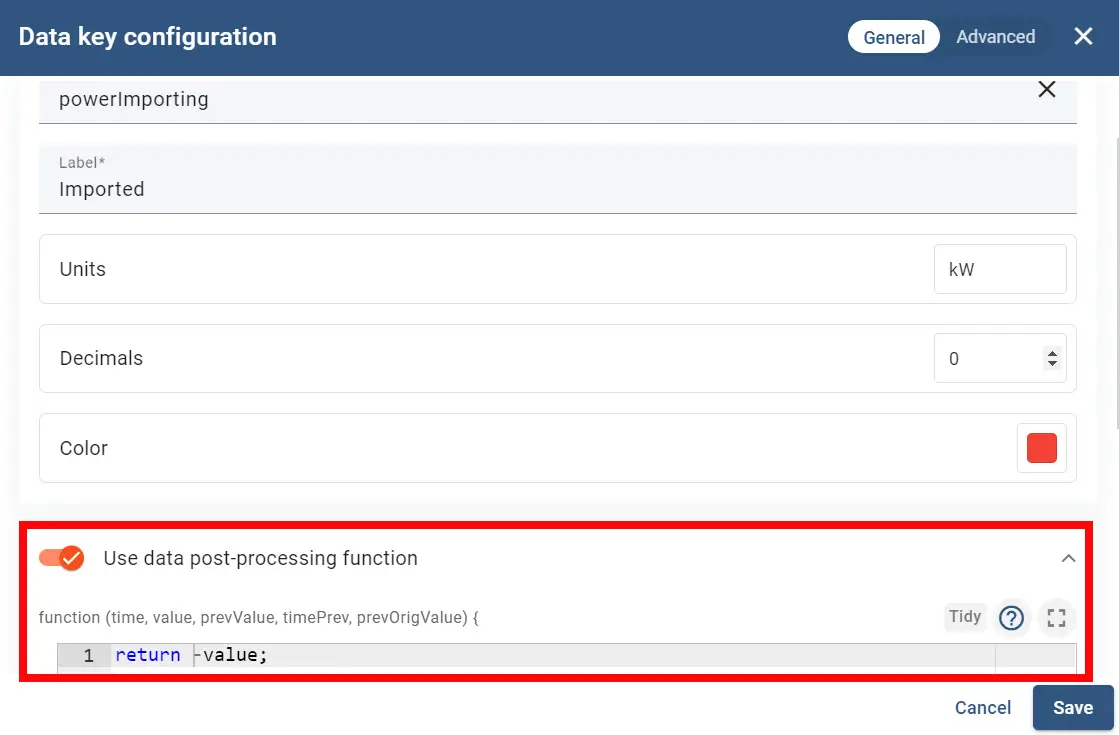
Moreover, by clicking the pencil symbol in the Key field of each line, you can issue more specific settings for each series. For example, you can add a “-” in the “return value;” line, so making it “return –value;” and printing the line in the negative side of the axis:
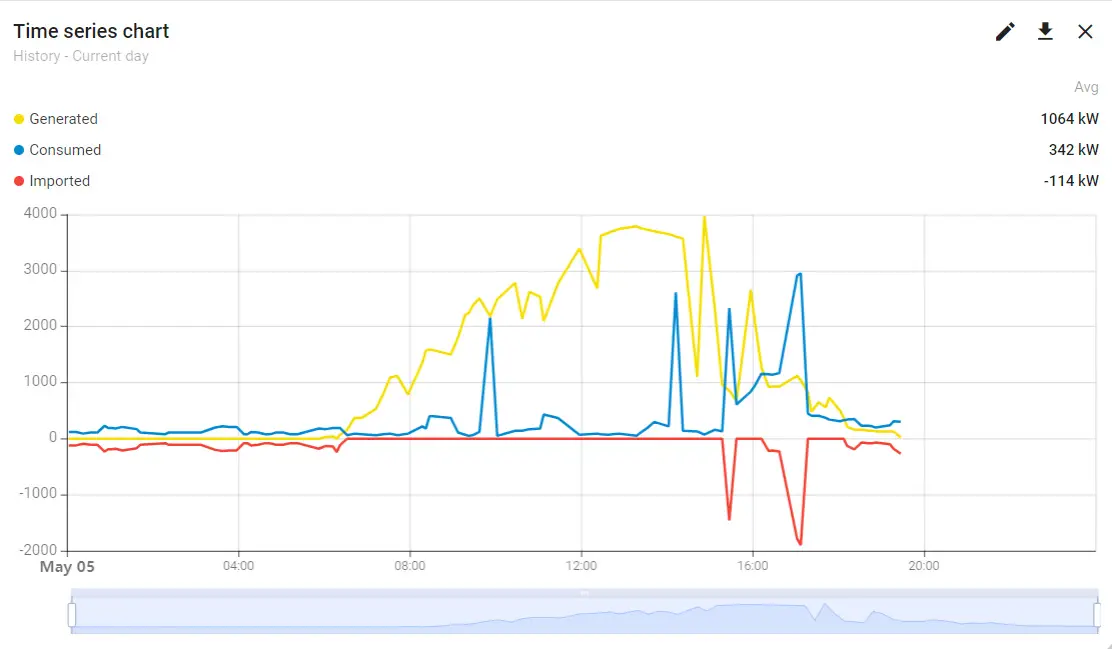
These settings will give you the following output:
By combining different widgets, you can create complex dashboards with a combination of real-time and historical data.
One possible output is the following:
I don’t have an energy storage to include in this dashboard, but you can add it easily in this dashboard with the multiple widgets available in ThingsBoard for the scope.
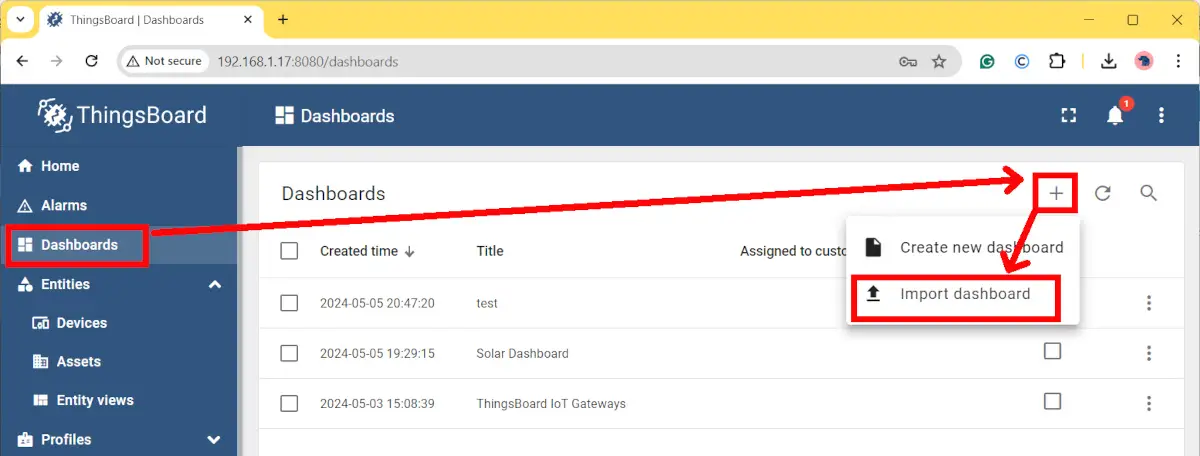
You can achieve this dashboard by downloading the following ThingsBoard’s configuration JSON:
Then you can import it with the “Import dashboard” button as shown in the following picture:
Scheduling the Data Collection
At this point, you need to make the data collection automated instead of manually running the 2 Python scripts just created. For this goal, we can use the cron scheduler available in Raspberry PI OS (as well as in every Linux distribution). From your Raspberry PI terminal console, please your user crontab with the following command (remember to change the “pi” user with your one if different):
crontab -u pi -e
If required, you can choose your favourite text editor, like nano. At the end of the file, please append the following cron jobs:

: Add Device telemetry by MTTQ and Python")

: Professional IoT dashboards")


")

