
Last Updated on 23rd May 2023 by peppe8o
Editing text files on Raspberry PI (like .txt or .conf files) may appear a tricky job for those that are moving their first steps on a Linux terminal. It is necessary for people wishing to get the best performance from the RPI computer board when using a headless Raspberry PI OS Lite. This OS requires fewer resources as it doesn’t come with a desktop environment, but you must know how to create and edit text objects. Here I will give you the basic usage examples, while you can get the full options for any Linux “command”, by typing the terminal with:
man commandSo, for example, you can get the full options of the “cat” command by typing:
man catThis tutorial will show you the main tools available from the OS without the need of installing any package, and I bet that in the end, you will love these tricks and often prefer it to a visual text editing application. I’m not going to explain how to move between folders or remove/copy files, as I assume that the reader has already these minimal skills.
By the way, I also will use this tutorial as my personal notepad for collecting terminal tricks to work with files on the terminal. Anyone wishing to contribute by suggesting more commands and tricks will be welcome and can suggest both using the comment area at the end of this post or by emailing me.
What We Need

As usual, I suggest adding from now to your favourite e-commerce shopping cart all the needed hardware, so that at the end you will be able to evaluate overall costs and decide if to continue with the project or remove them from the shopping cart. So, hardware will be only:
- a Raspberry PI computer board (including proper power supply or using a smartphone micro USB charger with at least 3A)
- high speed micro SD card (at least 16 GB, at least class 10)
Before Starting
Please prepare your Operating System. I suggest you try the Raspberry PI OS Lite, but you can also use these tools and examples with Raspberry PI OS Desktop (in this case working from its internal terminal).
Also, after any fresh installation, I suggest making sure your os is up to date. From the terminal, please use the following command:
sudo apt update -y && sudo apt upgrade -yI’m not going to explain it, but many beginners could find new that in Raspberry PI terminal (as well as in all the Linux terminals) you can fastly complete your commands and filenames typing by using the TAB key from your keyboard after one or few initial letters. Moreover, double tapping on TAB shows all the available options when more than one command/file has the same starting chars as the ones typed.
Nano
Nano is the most basic tool to manage text files with the Raspberry PI terminal.
It is really simple to understand for beginners, at least compared with many older-style text editors like “vi”.
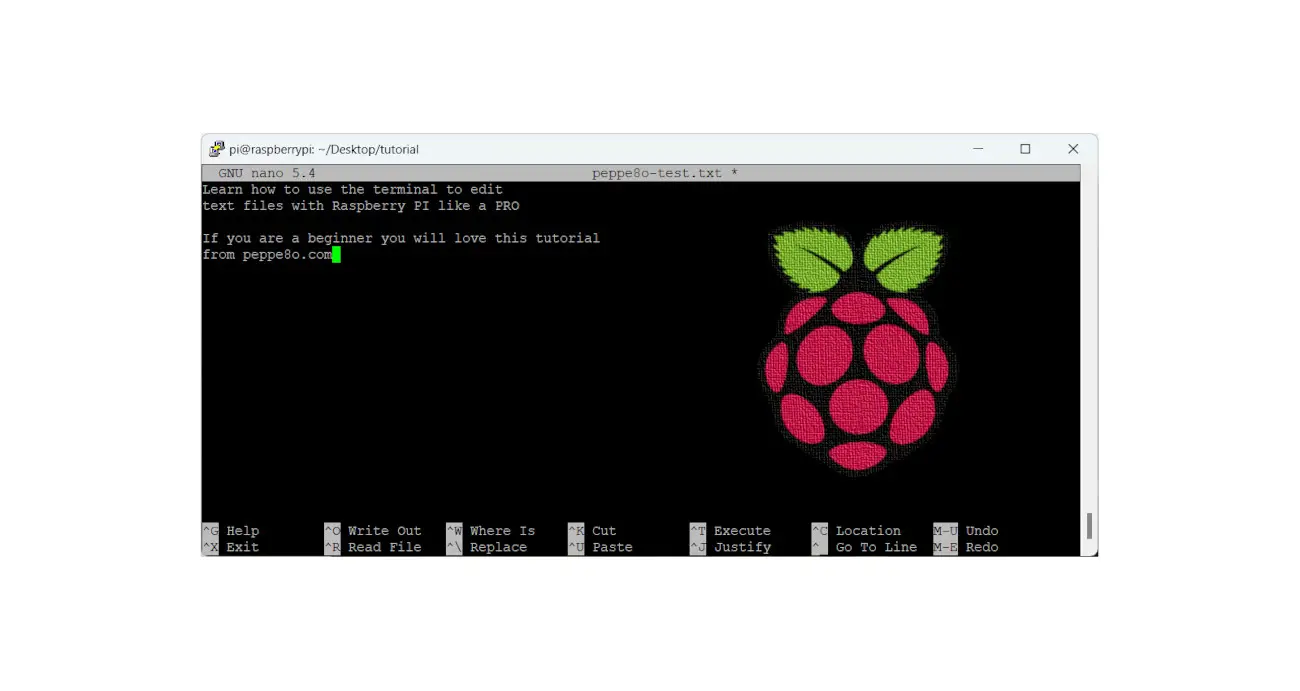
Basically, opening a file with nano doesn’t require any option. Moreover, if the file doesn’t exists nano will create a new file with the specified filename. From the terminal:
nano peppe8o-test.txtThis will open the nano editor, where you can write new text as with any notepad application:

More advanced options are available with shortcuts as shown in the bottom part of the editor. For example, the CTRL+X will trigger the file exit, after choosing if you want to save the file (prompted only if you modified something here).
Other common shortcuts are CTRL+W, to search for text in the file, and CTRL+K (to cut an entire line). If you reached your Raspberry PI terminal with SSH software like Putty, you don’t need to use copy or paste shortcuts, as the mouse selection copies by default the selected text and the right click will paste what was previously copied at the cursor prompt point.
Moreover, by using the “-m” option:
nano -m peppe8o-test.txtyou will be able to use the mouse to move the cursor prompt.
Let’s use it to write the following 2 new rows in the file:
this is the first line
# this is the second line
You will note that the second line has a different color: the reason is that, in Linux files, rows starting with the hashtag char (“#”) are comments and must not execute in programs. Besides explaining the program parts, it is a common practice to use comments also to unselect configurations without completely deleting the syntax. In this way, if you want to re-enable that configuration line in the future, you can simply uncomment the row without the need to remember the exact variable name as it remains there.
Close the file (CTRL+X) and save (press Y, then press RETURN).
Cat
The cat command displays the contents of a file on the terminal. It’s really useful to show what’s configured into a file and/or what’s happening in a log without opening it, so avoiding permission conflicts with programs that may use it and without risking unwanted accidental edits.
To use the cat command, simply type “cat” followed by the name of the file you want to display. Back to our example:
cat peppe8o-test.txtwill give us the following result:
pi@raspberrypi:~ $ cat peppe8o-test.txt
this is the first line
# this is the second line
You can also refer to multiple filenames after the cat command, resulting in the output concatenating all the files together:
cat file1 file2 file3 file4For very long files, you can split the cat output into multiple pages by adding the pipe char (“|”) and the more command. This will allow you to move between pages with the SPACE key of your keyboard.
cat file | moreGrep
Grep is another powerful text editor that is used to search for patterns in a file or stream. To use grep, simply type “grep” followed by the pattern you want to search for, followed by the name you want to search.
For example, if you want to search for the word “first” in our test file, you would type the following (with result):
pi@raspberrypi:~ $ grep first peppe8o-test.txt
this is the first line
the pattern found in our file will be highlighted with a different color.
It is important to note that searching for a string with spaces requires using brackets:
pi@raspberrypi:~ $ grep "first line" peppe8o-test.txt
this is the first line
The pattern can use also regex strings. For example, the regex char “^” means the start of a line, but doesn’t specify which character. We can use it to find lines starting with a specified string or char:
pi@raspberrypi:~ $ grep ^# peppe8o-test.txt
# this is the second line
By the way, the previous command finds all the comments from a file.
Grep also allows using of reverse logic, excluding all the lines with the specified pattern. This is useful to show a configuration file excluding all the commented options and comments. To do it, we use the “-v” grep option:
pi@raspberrypi:~ $ grep -v ^# peppe8o-test.txt
this is the first line
Sed
Sed is my favourite tool for preparing bash scripts, which allows me to automate the editing of text files in Raspberry PI. It’s a powerful text editor that is used to perform text transformations on a file or stream.
The basic usage of sed is substituting a pattern with a string. This requires specifying a string with the operations to perform and the file name. The operations string can be formed with 4 parameters. For example, the ‘s/dog/cat/g’ string means:
- the ‘s’ stands for substitute
- ‘dog’ is the search pattern
- ‘cat’ is the replacement pattern
- ‘g’ stands for global (which means replace all occurrences)
Back to our test, the following command will replace all the occurrences of the word “line” with the word “test”, showing the result:
pi@raspberrypi:~ $ sed 's/line/test/g' peppe8o-test.txt
this is the first test
# this is the second test
It is important that this command doesn’t edit the original file:
pi@raspberrypi:~ $ cat peppe8o-test.txt
this is the first line
# this is the second line
In order to get the modification “in-place” (so, getting the file effectively modified), we need to use the “-i” option:
pi@raspberrypi:~ $ sed -i 's/line/test/g' peppe8o-test.txt
pi@raspberrypi:~ $ cat peppe8o-test.txt
this is the first test
# this is the second test
Sed is also capable to append a line after the line with the specified pattern. In this case, the operations string has the following syntax: ‘/pattern to search/ a\ Line to append’. This will execute the append operation on all the occurrences. With our text example:
pi@raspberrypi:~ $ sed '/first test/ a\this is a new test' peppe8o-test.txt
this is the first test
this is a new test
# this is the second test
Again, note that the missing “-i” option from this command leaves the file as the original. You can use it to make the change in place.
You can also insert the line before the specified pattern. The sintax is similar to the append one, by changing the “a\” with “i\” inside the operations string:
pi@raspberrypi:~ $ sed '/first test/ i\this is a new test' peppe8o-test.txt
this is a new test
this is the first test
# this is the second test
You can achieve a quite similar result by specifying the line number instead of the pattern, if you already know the exact line where to perform the change. In this case, you will specify the line number instead of the For example, appending the same text after the 2nd line can be also done with the following:
pi@raspberrypi:~ $ sed '2 a\this is a new test' peppe8o-test.txt
this is the first test
# this is the second test
this is a new test
Or you can perform your text operation at the end of the file, with the “$” operator:
pi@raspberrypi:~ $ sed '$ a\this is the new last line' peppe8o-test.txt
this is the first test
# this is the second test
this is the new last line
WC
The Word Count tool allows you to make simple counts on file content. It’s useful when you want to just check the number of words contained in a file or the number of lines of the file. Let’s see an example with our original “peppe8o-test.txt” file:
pi@raspberrypi:~ $ wc peppe8o-test.txt
 2 11 49 peppe8o-test.txt
It returns 4 results:
- The first output (“2” in the example) is the count of lines
- The second output (“11” in the example) is the words count
- The third output (“49” in the example) is the byte size of the file
Diff
The diff command lets you compare 2 different files and easily see the differences. Let’s look at it with a simple example.
Let’s create a first file:
nano file1.txtHere we’ll add a number of lines. Fill the file with the following:
line 1
line 2
line 3
line 4
line 5
line 6
line 7
line 8
line 9
Save and close. Now, please create a second file:
nano file2.txtFill it with the following:
line 1
line 4
line 5
lne 6
line 7
line 8
line 9
As you can see, we’ve removed the lines 2 and 3. Moreover, we’ve changed the line 6 by removing the “i” character from the “line” word. Let’s look at how the diff command discovers these changes:
pi@raspberrypi:~/test $ diff file1.txt file2.txt
2,3d1
< line 2
< line 3
6c4
< line 6
---
> lne 6
As you can see from the output, the first part (highlighted in blue for this example clarity) tells you what are the missing lines, while the second part (highlighted in green for this example) shows you what are the lines with differences.
You can also see the differences in a side-by-side layout with the “-y” option:
pi@raspberrypi:~/test $ diff file1.txt file2.txt -y
line 1                                                          line 1
line 2                                                        <
line 3                                                        <
line 4                                                          line 4
line 5                                                          line 5
line 6                                                        | lne 6
line 7                                                          line 7
line 8                                                          line 8
line 9                                                          line 9
Next Steps
Of course, the Linux world is so huge that there are hundreds of terminal tools able to change your life when editing text files with Raspberry PI. So, if you want to suggest more for beginners, please email me or write in the following comment area to keep this tutorial more and more complete and useful.
Are you interested in more projects with your RPI computer board? Take a look at peppe8o Raspberry PI computer tutorials pages.
Enjoy!

Open source and Raspberry PI lover, writes tutorials for beginners since 2019. He's an ICT expert, with a strong experience in supporting medium to big companies and public administrations to manage their ICT infrastructures. He's supporting the Italian public administration in digital transformation projects.
![]()
![]()
![]()
![]()
![]()
![]()
![]()


