
Last Updated on 3rd May 2023 by peppe8o
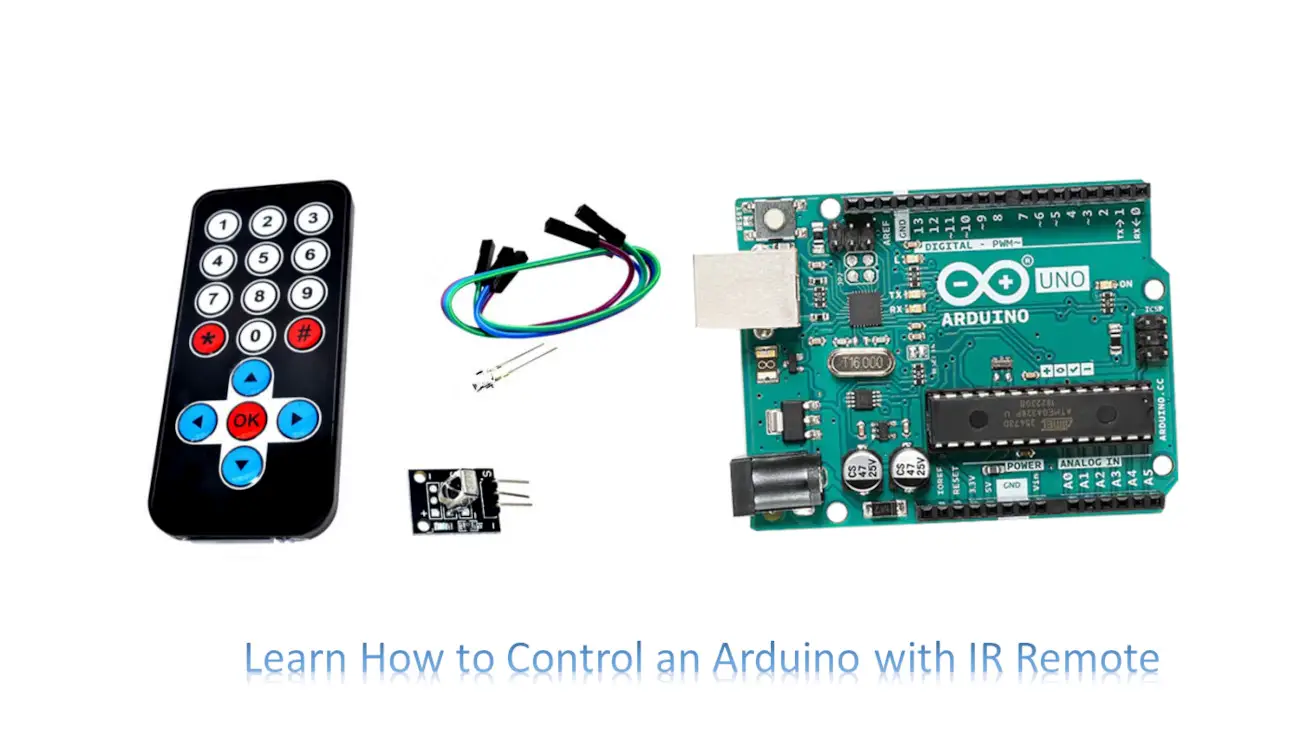
In this tutorial, we will use Arduino with IR remote control. The IR remote is used for controlling the appliances from a short distance. The button press on the remote demonstrates the I2C LCD display.
IR Remote Introduction
An IR remote control typically consists of a couple of devices (transmitter and receiver) able to exchange a defined set of signals from a short distance. The remote controller, usually a handheld device with buttons or keys, transmits signals to manage a device connected to the receiver. The exchanged signal works at infrared or radio frequency. After receiving the signal, the device executes the appropriate action, such as switching the TV station, altering the volume, or turning the device on or off.
The IR remote enables the wireless control of many appliances, including TVs, DVD players, air conditioners, and other domestic appliances.
Working Principle of IR Remote Control
Through an IR (or RF) transmitter module, the remote transmits a signal with a different modulation based on the key pressed.
The receiver device, which has an IR (or RF) receiver module and is controlled by an Arduino microcontroller, receives the signal after it has been broadcast and converts the modulated radio information into a value, based on a pre-configured table matching the signal modulation and the output.
This tutorial will show you how to use Arduino with IR remote, by showing the remote commands on an I2C LCD display.
What We Need

As usual, I suggest adding from now to your favourite e-commerce shopping cart all the needed hardware, so that at the end you will be able to evaluate overall costs and decide if to continue with the project or remove them from the shopping cart. So, hardware will be only:
Step-by-Step Procedure
Wiring Diagram of Arduino with IR remote control and LCD
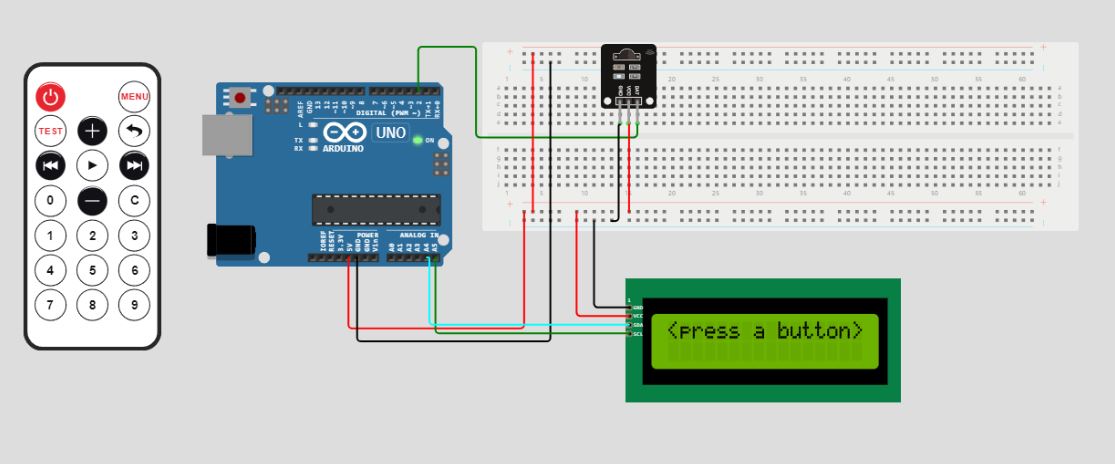
The figure represents the wiring diagram of the IR remote control with Arduino Uno and I2C LCD. This I2C LCD module needs to be connected to the I2C pins of the Arduino.
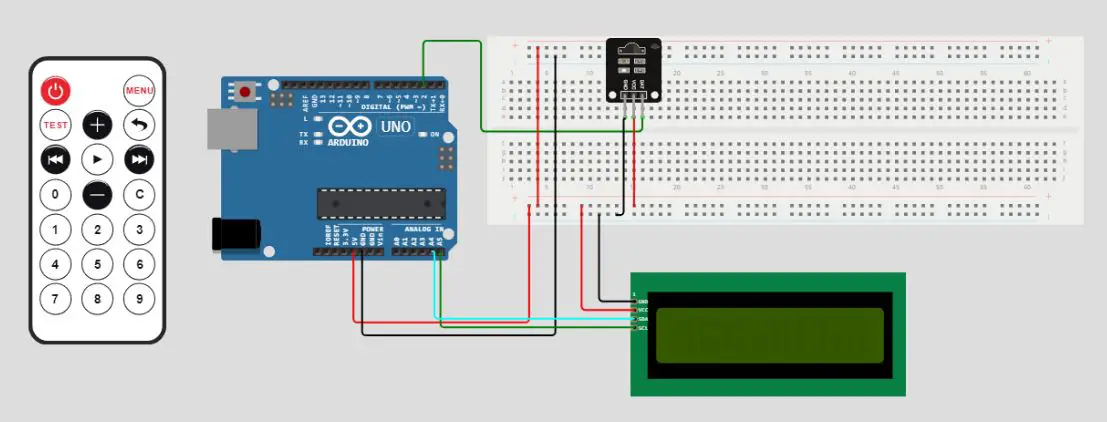
The IR receiver and LCD with the Arduino connect in this pattern.
| IR Receiver | Arduino |
|---|---|
| Pin 1 (right side) | Pin 2 |
| Pin 2 | GND |
| Pin 3 | 5V |
| I2C LCD | Arduino |
|---|---|
| Pin SCL | A5 |
| Pin SDA | A4 |
| Pin 3 | VCC |
| Pin 4 | GND |
Get the code and remote control Libraries
Connect your PC to Arduino and open Arduino IDE. For the very first steps, you can refer to Connecting Windows PC with Arduino tutorial. You can get the .ino code from my download area with the following link:
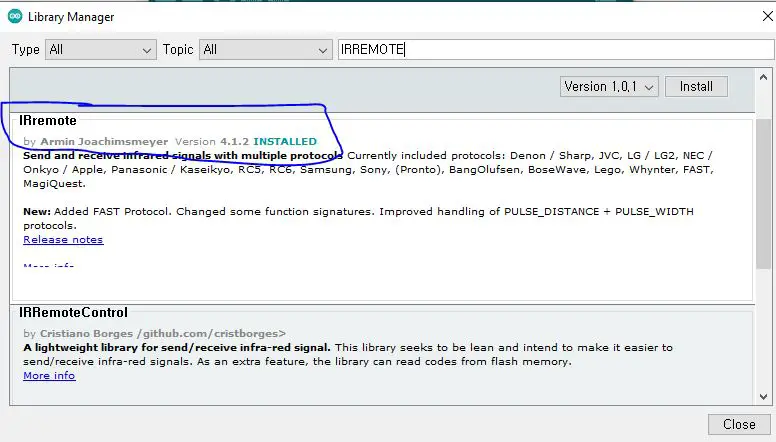
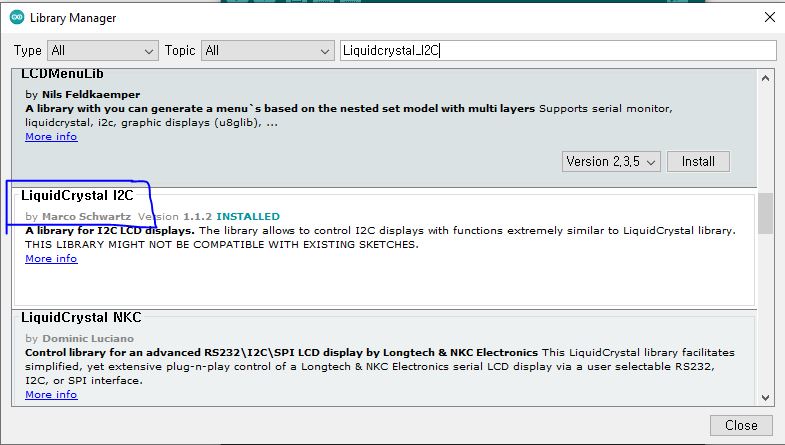
You also need to install the following libraries, according to my Install Arduino Libraries: methods to add libraries with Arduino IDE tutorial.
Code Explanation
Section 1: Before setup and library
This is the section before setup which we’ll use for libraries addition.
#include “IRremote.h” is the library for performing communication with the remote.
#include “LiquidCrystal_I2C.h” is the library for performing communication with the I2C LCD.
The child label of the IR remote and LCD library creates with the name of the receiver and LCD respectively.
The I2C address of the LCD gives as 0x27.
#include <IRremote.h>
#include <LiquidCrystal_I2C.h>
#define PIN_RECEIVER 2   // Signal Pin of IR receiver
IRrecv receiver(PIN_RECEIVER);
#define I2C_ADDR    0x27
#define LCD_COLUMNS 16
#define LCD_LINES   2
LiquidCrystal_I2C lcd(I2C_ADDR, LCD_COLUMNS, LCD_LINES);
Section 2: Setup section
In the setup section, The first line initializes the serial communication between the Arduino board and the computer, with a baud rate of 9600.
void setup()
{ Serial.begin(9600);
The second line initializes the LiquidCrystal library, which allows the Arduino to control a 16×2 character LCD display. The third line turns on the backlight of the LCD display. The fourth line prints the message “<press a button>” on the LCD display.
  lcd.init();
  lcd.backlight();
  lcd.print("<press a button>");
The fifth line initializes the IR receiver, which allows the Arduino to receive signals from an infrared remote control.
  receiver.enableIRIn(); // Start the receiver
}
Section 3: Loop section
This particular version of the loop() function on the Arduino board waits for an IR signal to be picked up by the receiver module. The receiver module’s decode() method is called by the if statement to determine whether an IR signal has been received. If the result of decode() is non-zero, an IR signal has been detected, and the translateIR() function is then called by the code.
void loop()
{
  // Checks received an IR signal
  if (receiver.decode()) {
    translateIR();
    receiver.resume();  // Receive the next value
  }
}
Section 4: Functions section
The purpose of the lcdPrint() function is to format print a provided string of characters on a 16×2 LCD display. Before printing the message “button pressed:” on the first line of the display, the function first clears the screen and moves the cursor to the top-left corner of the screen (0,0). The input string is then printed together with the text “code:” and the value of receiver.decodedIRData.command, which represents the IR code received by the receiver module. Finally, the cursor is moved to the second line and the output is displayed.
Based on the IR code that the receiver module has received, the translateIR() function is designed to execute the necessary action. The function compares the value of receiver.decodedIRData.command to a set of predefined values, each of which is associated with a particular button on the IR remote control, using a switch statement.
void lcdPrint(char* text)
{
  lcd.clear();
  lcd.setCursor(0, 0);
  lcd.print("button pressed:");
  lcd.setCursor(0, 1);
  lcd.print(text);
  lcd.print(" code: ");
  lcd.print(receiver.decodedIRData.command);
}

void translateIR()
{
  // Takes command based on IR code received
  switch (receiver.decodedIRData.command) {
    Serial.println(receiver.decodedIRData.command);
    case 162:
      lcdPrint("POWER");
      break;
    case 226:
      lcdPrint("MENU");
      break;
    case 34:
      lcdPrint("TEST");
      break;
    case 2:
      lcdPrint("PLUS");
      break;
    case 194:
      lcdPrint("BACK");
      break;
    case 224:
      lcdPrint("PREV.");
      break;
    case 168:
      lcdPrint("PLAY");
      break;
    case 144:
      lcdPrint("NEXT");
      break;
    case 104:
      lcdPrint("num: 0");
      break;
    case 152:
      lcdPrint("MINUS");
      break;
    case 176:
      lcdPrint("key: C");
      break;
    case 48:
      lcdPrint("num: 1");
      break;
    case 24:
      lcdPrint("num: 2");
      break;
    case 122:
      lcdPrint("num: 3");
      break;
    case 16:
      lcdPrint("num: 4");
      break;
    case 56:
      lcdPrint("num: 5");
      break;
    case 90:
      lcdPrint("num: 6");
      break;
    case 66:
      lcdPrint("num: 7");
      break;
    case 74:
      lcdPrint("num: 8");
      break;
    case 82:
      lcdPrint("num: 9");
      break;
    default:
      lcd.clear();
      lcd.print(receiver.decodedIRData.command);
      lcd.print(" other button");
  }
}
Arduino with IR Remote and LCD Results
The following pictures show how the code works on Arduino with IR Remote.
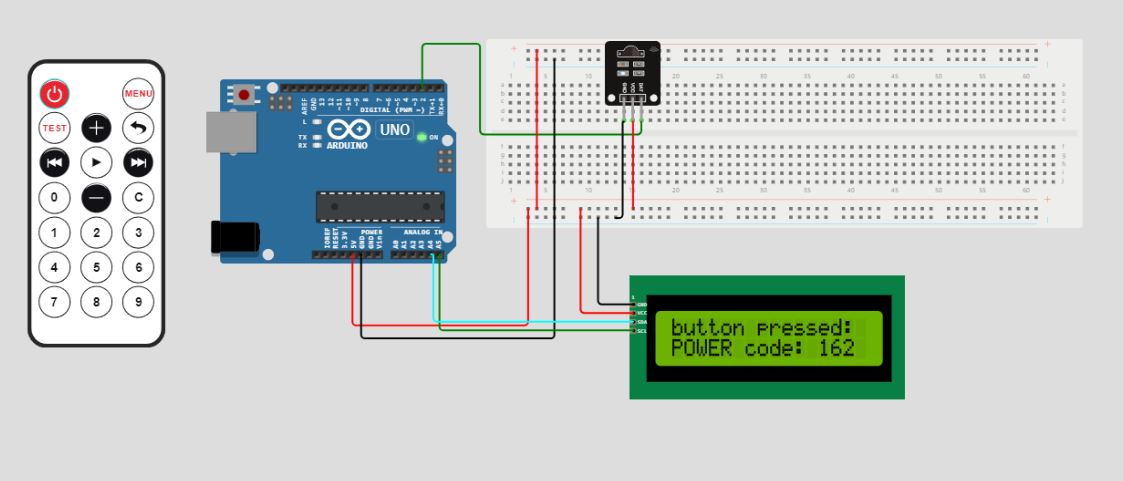
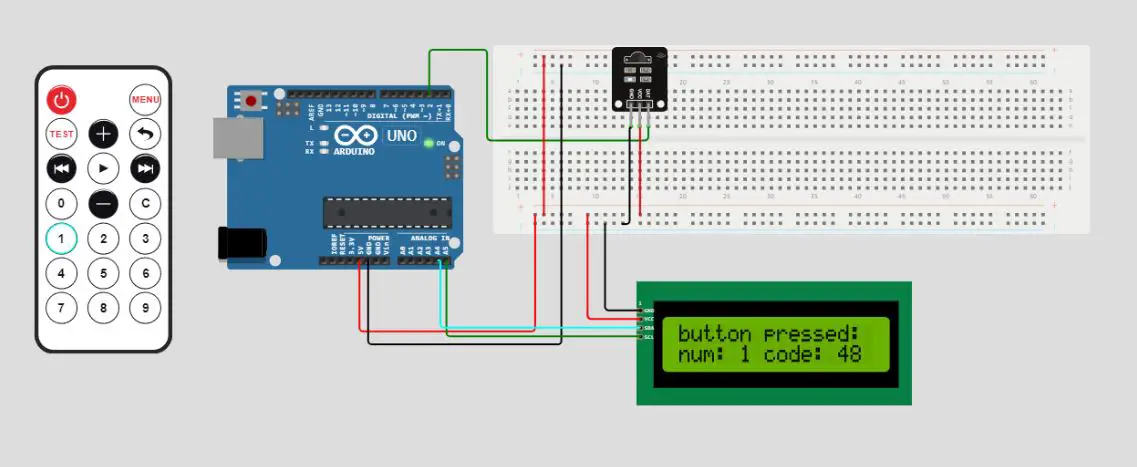
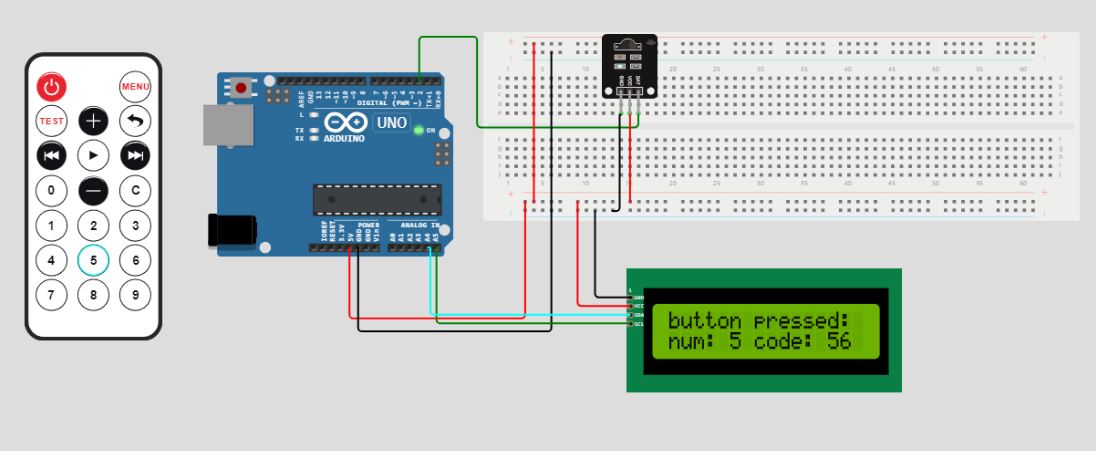
The results display the button press on the remote to display on the LCD which connects to Arduino Uno. This allows the user to see which button presses on the remote control, and the program can then take appropriate actions based on the button pressed.
Initially, it is asking to press the button on the LCD, based on the button press it shows its name and the code command it receives. In the results, the power button, button 1 and number 5 demonstrate.
What’s Next
Please find more tutorials on Arduino in peppe8o Arduino archives.
Enjoy!
Umar Jamil
For any queries and help for work, please contact me at:
Whatsapp: +92-346-661-7017/ Link
Fiverr: Link

I'm an Electronic Engineer, well-skilled to solve the issues of hardware and software. I do have laboratory which contains unlimited sensors and modules for testing the working. Also, I am experienced in Arduino programming, Android mobile application, microcontroller programming, IOTs and embedded projects. I provide services to control, realize the sensor data in the Mobile Application. For any queries and help for work Contact: Whatsapp:+92-346-661-7017 Email: umarjamil0007@gmail.com
![]()


