

Last Updated on 22nd March 2026 by peppe8o
In this tutorial, I’m going to show you how to set up Privoxy on a Raspberry PI computer board.
Smart devices are becoming familiar to very young people, and kids are going to be more exposed to web content. Unfortunately, the web has also become populated by people with rather questionable purposes.
This means that controlling home devices and defending kids from accessing dangerous sites is a must for parents all over the world. An additional desirable service is also protecting kids from unwanted advertisements, which can include paid services.
With this in mind, Raspberry PI offers a fantastic opportunity because it can provide powerful proxying services with filtering capabilities.
For this tutorial, I will use my Raspberry PI 5 Model B computer board, but this should work with any Raspberry PI computer board. Moreover, different from the official installation procedure, I will show you how to install Privoxy with Docker, as this keeps our Raspberry PI OS clean from unnecessary packages while keeping the process very easy.
What is Privoxy
Privoxy is a non-caching web proxy with advanced filtering capabilities for enhancing privacy, modifying web page data and HTTP headers, controlling access, and removing ads and other obnoxious Internet junk. Can be used both for single device protection (by installing it on the device you want to protect) and network protection (by configuring network devices to use the Privoxy server as a proxy).
Privoxy is Free Software and licensed under the GNU GPLv2.
In addition to the core features (ad blocking and cookie management), Privoxy provides many advanced features listed in the Privoxy official introduction.
What We Need
As usual, I suggest adding from now to your favourite e-commerce shopping cart all the needed hardware, so that at the end you will be able to evaluate overall costs and decide if to continue with the project or remove them from the shopping cart. So, hardware will be only:
- Raspberry PI Computer Board (including proper power supply or using a smartphone micro USB charger with at least 3A)
- high-speed micro SD card (at least 16 GB, at least class 10)
As usual, I suggest adding from now to your favourite e-commerce shopping cart all the needed hardware, so that at the end you will be able to evaluate overall costs and decide if to continue with the project or remove them from the shopping cart. So, hardware will be only:
Step-by-Step Procedure
Prepare the Operating System
The first step is to install the Raspberry PI OS Lite to get a fast and lightweight operating system (headless). If you need a desktop environment, you can also use the Raspberry PI OS Desktop, in which case you will work from its terminal app. Please find the differences between the 2 OS versions in my Raspberry PI OS Lite vs Desktop article.
Please make sure that your Operating System is up to date. From your terminal, use the following command:
sudo apt update -y && sudo apt full-upgrade -yWe also need to install Docker. You can use my tutorial for this: Beginner’s Guide to Install and Use Docker with Raspberry PI.
Install Privoxy
The aptitude package manager strongly simplifies the Privoxy installation. From the terminal, please use the following command:
sudo apt install privoxy -yPrivoxy installation will also include a settings folder, stored in /etc/privoxy/.
To use very basic protection, please edit the Privoxy configuration to expose its services from the Raspberry PI’s IP address. Open the file for editing with the following:
sudo nano /etc/privoxy/configIdentify the following line:
listen-address 127.0.0.1:8118change it with your Raspberry PI IP address, followed by “:8118”. In my case, my IP is 192.168.1.78, so my configuration will be:
listen-address 192.168.1.218:8118Close and save the file. Restart the privoxy service:
sudo systemctl restart privoxy.serviceConfigure the Browser Proxy Settings
This section varies depending on the used browser. A good guide to perform this task is available at froxy.com – how to use proxy in browser.
You should change your current configuration by setting the proxy to http://192.168.1.218:8118 (again, this is an example, please use your IP address instead of 192.168.1.218).
Additional Useful Configurations
Config File
As said, the main configuration file is “/etc/privoxy/config”.
In this file, configuration lines consist of an initial keyword followed by its value(s), all separated by whitespace. For example:
confdir /etc/privoxySets “confdir” parameter to “/etc/privoxy” value.
Excluding confdir and logdir, all other parameters are optional (with the meaning that they use their default if not explicitly set). The main config file controls Privoxy’s service operations that are not location-dependent (no matter where you may be surfing).
Action FIle
The action files are used to define Privoxy tasks executed against URLs. Some examples can be images and HTTP content handling, both in general dropped URLs and specifically explicit URLs.
Combining actions will result in complex and advanced effects against a given URL set.
Filter File
Privoxy filters give options to manipulate page parts before entering under Action rules. Common tasks for content filters are eliminating common annoyances in HTML and JavaScript (like pop-up windows, exit consoles and crippled windows without navigation tools).
Multiple filter files can be defined through the filterfile config directive. The filters as supplied by the developers are located in default.filter. It is recommended that any locally defined or modified filters go in a separately defined file, such as user.filter.
Substitutions are made at the source level, so if you want to “roll your own” filters, you should first be familiar with HTML syntax and, of course, regular expressions.
Filter definitions start with a header line that contains the filter type, the filter name and the filter description. A content filter header line for a filter called “foo” could look like this:
FILTER: foo Replace all "foo" with "bar"Below that line, and up to the next header line, come the jobs that define what text replacements the filter executes. They are specified in a syntax that imitates Perl’s s/// operator. If you are familiar with Perl, you will find this to be quite intuitive and may want to look at the PCRS documentation for the differences in Perl behaviour.
Working With Other Proxies (parent proxy)
This can be done and is often useful to combine the benefits of Privoxy with those of another proxy. To do this, you need to understand your proxy chain and setup parts accordingly.
An example can be using Squid (which listens, by default, on the 3128 port). In this case, the proxy chain will be the following:
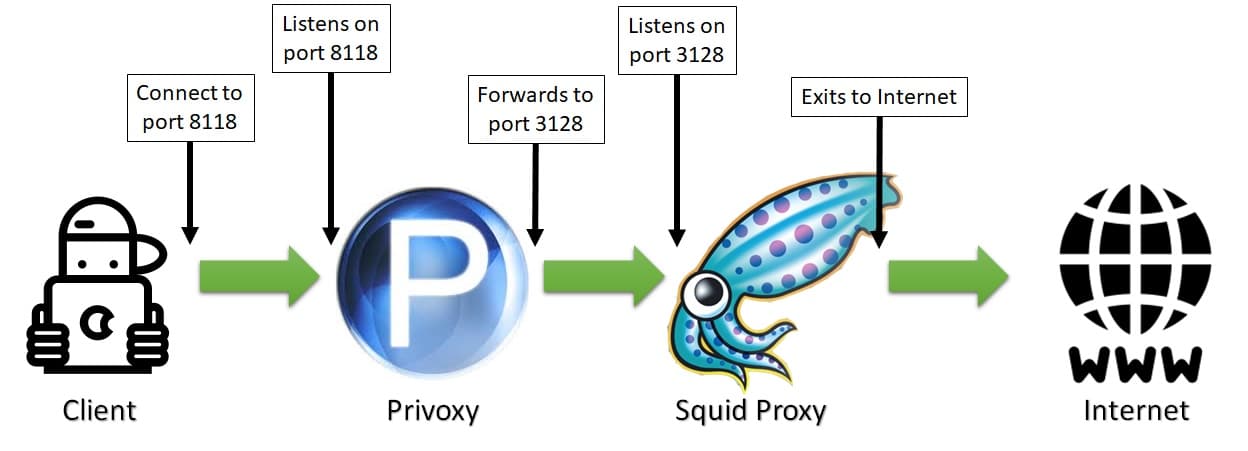
In this example, Privoxy needs to be configured to forward its HTTP requests to the Squid host proxy on port 3128. Supposing squid running on the same device, Privoxy will forward to port 3128 on the same host (127.0.0.1), and its config file will be set with the following parameter:
forward / 127.0.0.1:3128If you want to use Privoxy with TOR (The Onion Routers) to improve anonymity, you need to consider that TOR implements a SOCKS5 proxy and uses port 9050 by default. In this scenario, the proxy chain will be:
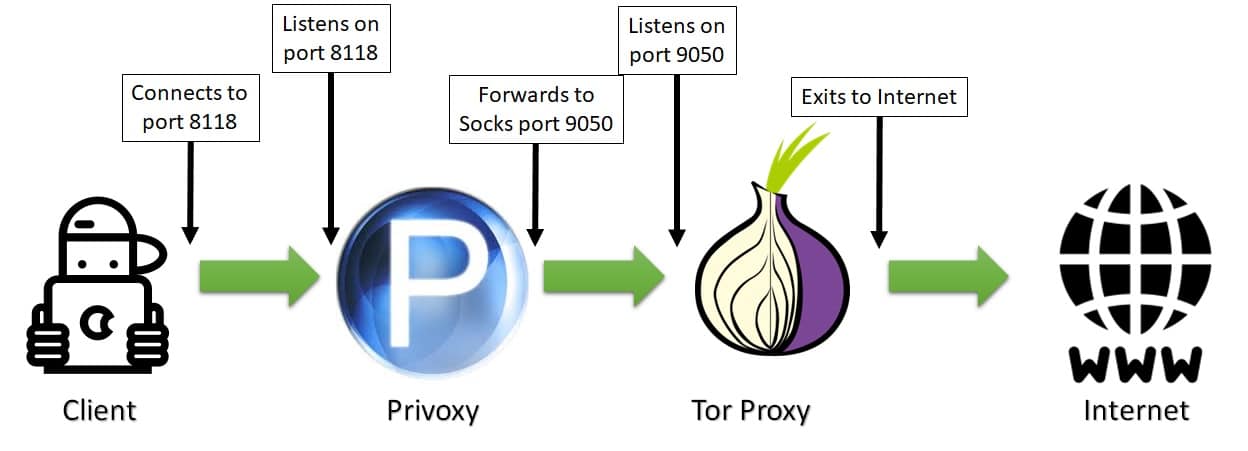
This time, Privoxy needs to know that its follower in the chain is a socks5 proxy which listens on the 9050 port. Again, supposing that TOR is running on the same host, the Privoxy config file will be configured, including the following line (including the last dot):
forward-socks5t / 127.0.0.1:9050 .Resources
- https://www.privoxy.org/
- https://www.privoxy.org/user-manual/introduction.html
- https://blog.froxy.com/en/how-to-use-proxy-in-browser
Next Steps
If you are interested in more Raspberry PI projects (both with Lite and Desktop OS), take a look at my Raspberry PI Tutorials.
Enjoy!

Open source and Raspberry PI lover, writes tutorials for beginners since 2019. He's an ICT expert, with a strong experience in supporting medium to big companies and public administrations to manage their ICT infrastructures. He's supporting the Italian public administration in digital transformation projects.
![]()
![]()
![]()
![]()
![]()
![]()
![]()


