
Last Updated on 13th April 2024 by peppe8o
In this tutorial, we’ll interface the joystick with Arduino Uno including code, connection diagram, and component list.
To deal with the control of the robotic movement in directions joystick is the best choice, as it has the ability to control four directions
The Dual-axis XY Joystick Module PS2
Whenever the name of the joystick came into mind, the game controller comes to mind straight away. Joysticks are mainly used for playing games but this is not their only use. In electronics, there are many cool applications of the joystick. They use to rotate or change the direction of the camera. Controlling the robots can also be another application of the joystick. This is a self-centering device which means that whenever it releases it will come back to the center. The cap of the joystick gives a comforting experience to enable the user to use it without getting disturbance.
How joystick module work?
The main purpose and idea of the joystick are to translate the position of the stick on the X-axis (right and left) and Y-axis (up and down) into electronic information that is understandable by Arduino. There is a rod that links to two shafts. One shaft is for the motion along X-axis (left and right) and another shaft is for motion on Y-axis (up and down). When the thumb handle is moved in any direction the rod sitting in the shafts allows motion in 2 axis that is forward, backward, left, and right. When the stick is tilted forward or backwards the Y-axis shaft pivots in its respective direction. Whereas when the stick tilts towards the left and right sides, the X-axis shaft pivots in its respective direction.
A potentiometer connects to each shaft of the joystick which uses to interpret the position of the rod in the form of an analog value that is sent to Arduino. Rotating the rod with the thumb changes the contact point of the potentiometer. Each contact point provides a distinct value of resistance and thus helps the Arduino decode or interpret the position of the joystick. In other words when the joystick is in the left position the contact arm of the potentiometer is in a specific position similarly for other positions like right, forward and backwards the contact arm of the potentiometer is in a different position giving the different value of resistance.
Reading analog values from joystick
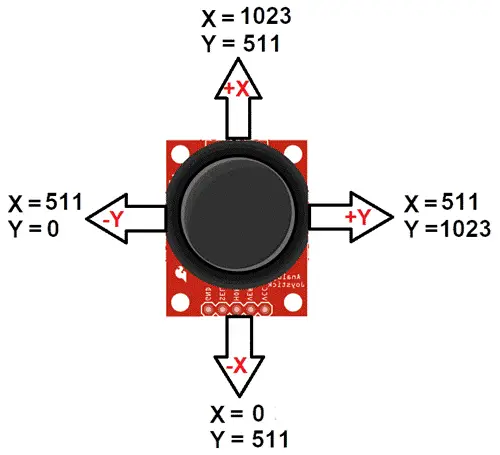
In order to read the position of the joystick, it requires to read the analog value of resistance provided by the potentiometers of the joystick. Analog input pins of Arduino uses to read the value of resistance. Behind these analog pins, the Analog to Digital Converter (ADC) mechanism is in place. Using this ADC the analog value of resistance converts to a digital value which is understandable for Arduino. As the resolution of ADC in Arduino is 10 bit so the value changes from 0 to 1023 because 210 gives the value 1024.
This value is for each analog input in other words for each of the two axes which are the X-axis and Y-axis. This means that if the thumb rotates from one end of the X-axis to the other end of the X-axis, the value will change from 0 to 1023. Similarly for Y-axis, moving the rod from one end to the other end provides a value within the same range that is from 0 to 1023.
Joystick Module Pinout
There are 5 pins on the joystick module namely Vcc, Gnd, VRx, VRy, and SW.
VCC: This pin connects with a 5volt pin on Arduino.
GND: This pin connects with the ground pin on Arduino.
VRX: It gives the value of the joystick on X-axis which is the horizontal direction. It knows whether the knob is on the left or right side.
VRY: It gives the value of the joystick on Y-axis which is the vertical direction. By this value, it knows whether the knob is in a forwarding or backward position.
SW: This pin connects to the pushbutton. It gives the logic HIGH when the pushbutton is pressed.
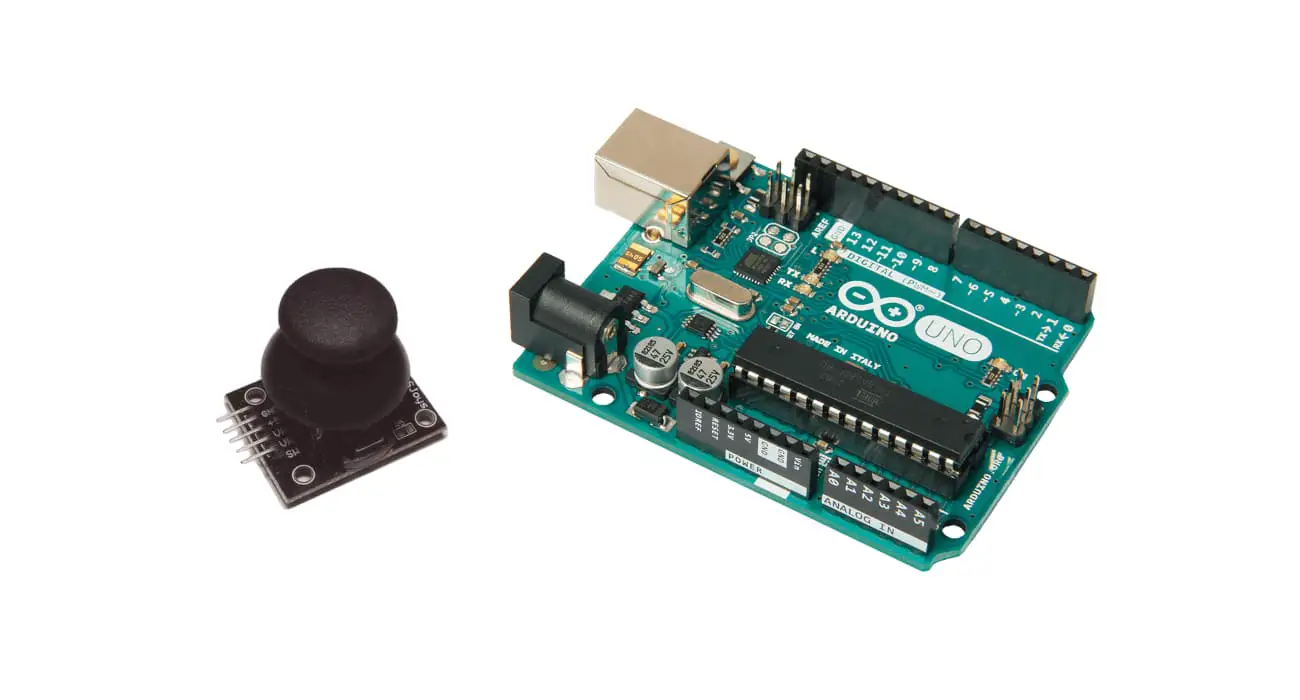
What We Need

As usual, I suggest adding from now to your favourite e-commerce shopping cart all the needed hardware, so that at the end you will be able to evaluate overall costs and decide if to continue with the project or remove them from the shopping cart. So, hardware will be only:
- Arduino Uno Board
- Joystick
- breadboard (optional)
- dupont wirings
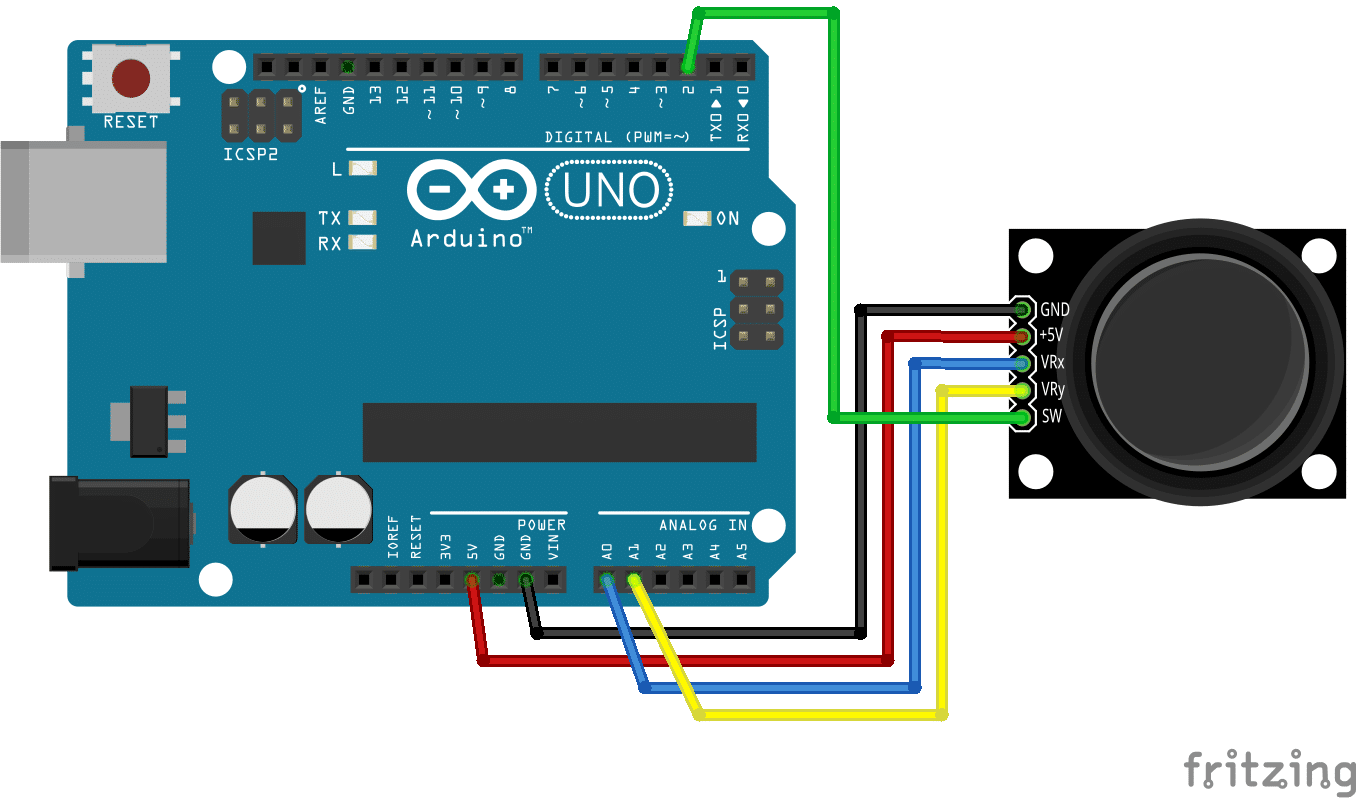
Connection Diagram
With the help of the image given below connect the joystick with Arduino. After connecting the joystick in such a manner upload the code given below in Arduino
Code with Explanation
Connect your PC to Arduino and open Arduino IDE. For the very first steps, you can refer to Connecting Windows PC with Arduino tutorial. You can get the .ino code from my download area with the following link:
At the beginning of the code, the pin declaration carries out. SW pin, X_PIN, and Y_PIN declare and it is made clear that X_PIN connects to the A0 pin of Arduino and Y_PIN connects to the A1 pin of Arduino. In the setup function, the pins declare to be input and the serial monitor is initialized at the baud rate of 9600.
int SW_PIN=2;
int X_PIN=A0;
int Y_PIN=A1;
int x_value;
int y_value;
void setup() {
pinMode(X_PIN, INPUT);
pinMode(Y_PIN, INPUT);
Serial.begin(9600);
}
In the loop section, the X_PIN value is read and printed on the Serial monitor. This is the value of the joystick’s motion along the X-axis in other words horizontally or left and right. Similarly, the value of motion of the knob is read along Y-axis by reading the analog value of Y_PIN. This is the value of the joystick vertically that is up and down. The value is then printed on a serial monitor.
void loop() {
x_value= analogRead(X_PIN);
y_value= analogRead(Y_PIN);
Serial.print("x value is :   ");
Serial.print(x_value);
Serial.println("y value is :   ");
Serial.print(y_value);
Serial.println();
}
Applications
To control the direction of a robot or in other words to have a controlled motion in two dimensions is that left/right or forward/backwards has been a desire and dream for centuries and a joystick helps in making that dream into a reality. Using a joystick the motion in two dimensions convey to the controller or Arduino. To make it practically possible there are built-in potentiometers of 10k ohms on each axis. With this change in the value of resistance, the position of the joystick determines whether it is on the right or left side, forward or backward.
What’s Next
Please find more tutorials on Arduino in peppe8o Arduino archives.
Enjoy!
Umar Jamil
For any queries and help for work, please contact me at:
Whatsapp: +92-346-661-7017
Email: umarjamil0007@gmail.com

I'm an Electronic Engineer, well-skilled to solve the issues of hardware and software. I do have laboratory which contains unlimited sensors and modules for testing the working. Also, I am experienced in Arduino programming, Android mobile application, microcontroller programming, IOTs and embedded projects. I provide services to control, realize the sensor data in the Mobile Application. For any queries and help for work Contact: Whatsapp:+92-346-661-7017 Email: umarjamil0007@gmail.com
![]()


