
Last Updated on 14th June 2026 by peppe8o
This tutorial will show you how to manage Raspberry PI Undervoltage Detected warnings, where to check them and how to deal with the problem.
Similarly to all electronic computers, the Raspberry PI computer boards need a stable power supply in order to work correctly. A Raspberry PI Undervoltage Detected Warning may show that something is not providing the right values and it’s important to know where to check if there are ongoing problems.
Voltage Level for Raspberry PI Computer Boards
Voltage is important with the Raspberry Pi because it ensures that the correct amount of electrical power is supplied to the device. If the voltage is too low, the device components will not work properly, and if the voltage is too high, it can cause damage to the device. Moreover, low voltage can cause Operating System operations on the SD card not to close correctly, so breaking your OS.
The Raspberry Pi requires a specific voltage range of 5 volts with a tolerance of ±5%. This means that the voltage supplied to the device should be between 4.75 and 5.25 volts for optimal performance and to avoid problems. It is important to use a power supply capable of providing a stable voltage within this range and to avoid using power supplies with voltage outputs that fall outside of this range.
For this reason, the Raspberry PI Foundation suggest using the official Power Supply. Better checking its datasheet, you will find that it is capable of providing a nominal 5,1V power supply. Keep in mind this value.
CPU Throttling
While we can imagine the problems on voltage levels higher than the allowed ones, what happens if the voltage is lower than the tolerance?
The reaction to voltage outside the allowed ranges usually is managed at the hardware level. When a low voltage (or Undervoltage) is detected within certain acceptable levels, the Raspberry PI lowers the CPU frequency in order to try using lower power levels and manage the problem. This phenomenon is also known as “CPU Throttling”.
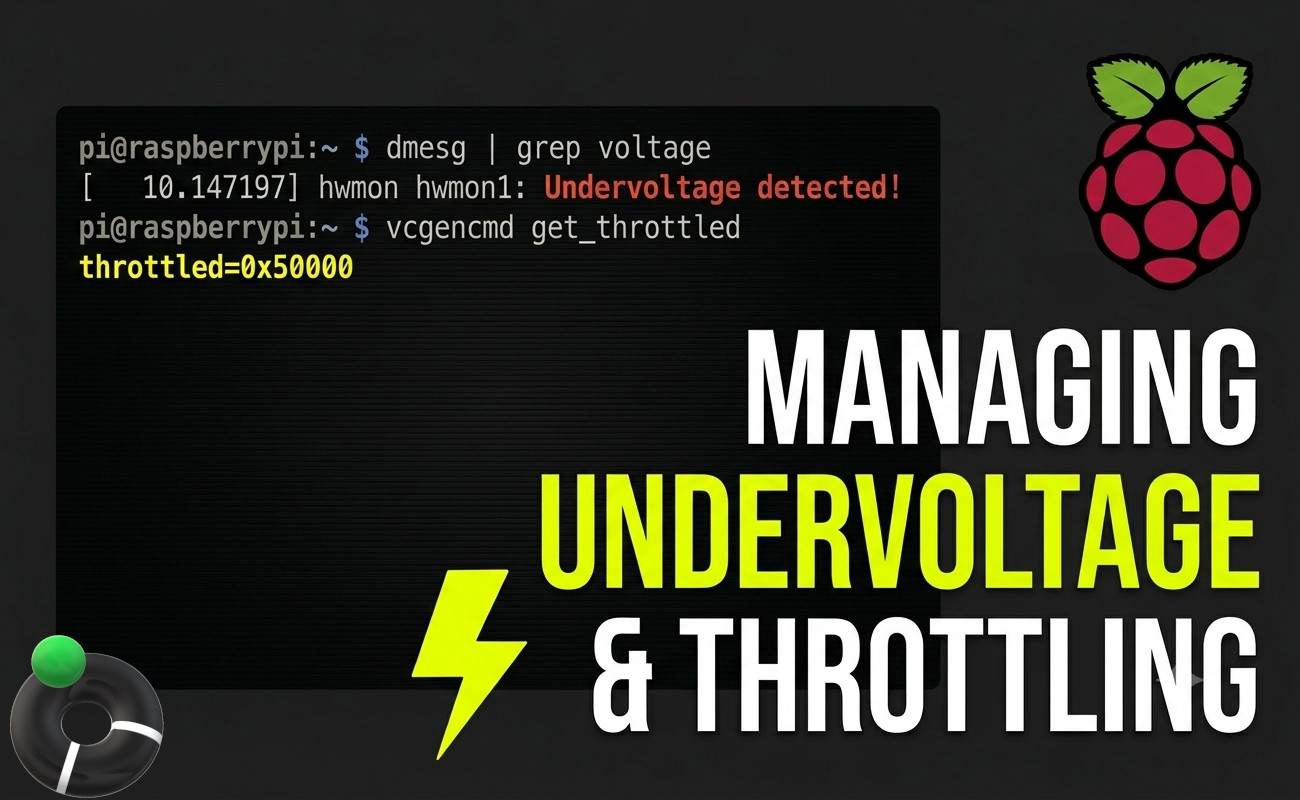
How to Identify Raspberry PI Undervoltage Detected messages
The Raspberry PI OS doesn’t have a command that checks the voltage input directly at the power supply source (or, at least, I don’t know if there’s a way). And I wasn’t able to find a command able to give me the current input voltage. But, the Raspberry PI can check if there are problems at the GPU (Graphics Processing Unit), which brings the vcgencmd terminal tools. The command:
vcgencmd get_throttledwill give us important information on throttling status, which is a direct consequence of an Undervoltage issue. The command will return us a value that summarizes both the current and historical status (from the last boot). Possible results are:
- throttled=0x0 -> this means a clean status, where voltage is ok
- throttled=0x50000 -> this means that throttling happened at least 1 time from the boot, but now the voltage status is ok
- throttled=0x50005 -> this means that throttling happened at least 1 time from the boot, and the problem is currently active
To say the truth, this command can give you more info than the main ones previously listed and the complete documentation can be found at raspberrypi.com get_throttled docs, which lists a table with the possible results:
| Bit | Hex Value | Meaning |
| 0 | 1 | Under-voltage detected |
| 1 | 2 | ARM frequency has been caped |
| 2 | 4 | Currently throttled |
| 3 | 8 | Soft temperature limit is active |
| 16 | 1000 | Under-voltage has occurred |
| 17 | 2000 | ARM frequency capping has occurred |
| 18 | 4000 | Throttling has occurred |
| 19 | 8000 | Soft temperature limit has occurred |
The value near the “throttled=0x” string shown is the sum of the Hex Values from the previous table. For example, a value of 5005 is the sum of:
- 1 (Under-voltage detected)
- 4 (Currently throttled)
- 1000 (Under-voltage has occurred)
- 4000 (Throttling has occurred)
A lot of info is into a 5 chars number. Isn’t great?
When an Undervoltage event is detected by the Raspberry PI, it also records a kernel message available from the following command:
dmesg | grep voltagethat, in case of Undervoltage events, will result in specific system logs. You can check if your kernel has logged this issue by running the dmesg command:
pi@raspberrypi:~ $ dmesg | grep voltage
[   10.147197] hwmon hwmon1: Undervoltage detected!
If you see the hwmon hwmon1: undervoltage detected! error message, your Raspberry Pi is actively struggling with power. The number at the beginning of the line is the number of seconds from the last Raspberry Pi boot when the issue was detected, while the “Undervoltage detected” string clearly identifies the core problem.
With Raspberry PI OS Desktop, the same Undervoltage Detected warning has also a thunderbolt icon shown at the top-right side of the display:
The DC-DC Step Up Converter
Now, you could ask: what the hell is this and why?

Measuring a MicroUSB output power precisely means attaching a Digital Multimeter to the Micro USB plug and it’s a hard operation if you want to do it without destroying your power supply. The DC-DC Step UP converter, on the other side, offers us a lot of advantages, the main being:
- it allows input both from the micro USB input port or from the VIN+ and VIN- PINS. This means that the power PINs of Micro USB are directly connected to these PINs and you can check the actual input voltage level of USB from these 2 PINS
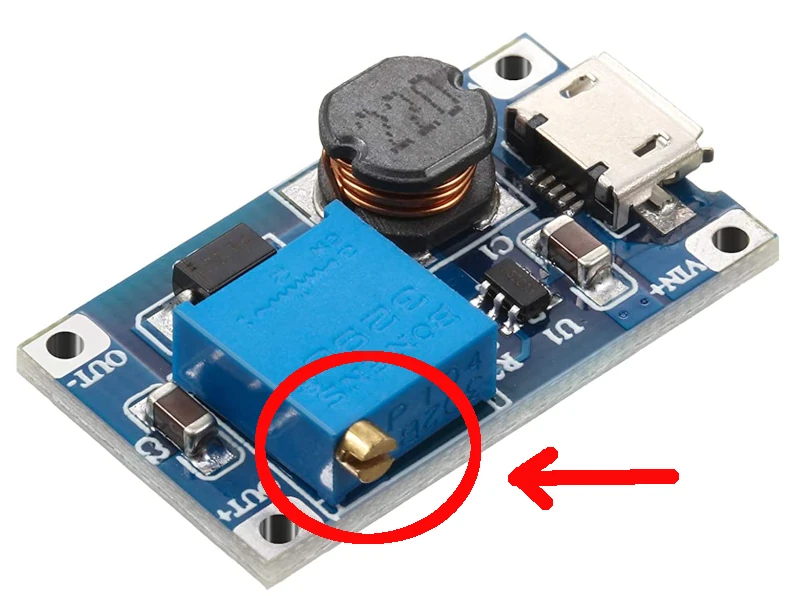
- The output can be adjusted with a potentiometer and you can both decrease and increase the output voltage with a simple screwdriver
These points will allow me to connect my power supply to the Micro USB port. I will power the Raspberry PI from its 5V and GND PINs, by connecting them directly to the “VIN+” and “VIN-” ports (when testing the power supply alone), or to the “OUT+” and “OUT-” ports (when using the converter to find the thresholds and triggering the Undervoltage warning.
This will appear more clear with the wiring pictures in the following chapters.
Please note that this device has a particular procedure for the very first usage. The potentiometer screw, highlighted in the following picture, will make it possible to you to increase or decrease the output voltage level when using the same power supply input. At the very first time, you will have to rotate it in anti-clockwise sense for several rotations (usually the producer tells about 15-20 rotations) in order to make it correctly “hook” the potentiometer and start to modulate the output.
If you want to know more about how Digital Multimeters work, please refer to my Raspberry PI Pico W Power Consumption (mA) and How to Reduce It tutorial.
Please note that, for my tests, I’ve used a Raspberry PI 3 Model A+ computer board, but the following procedure will be the same for all the Raspberry PI computer boards.
What We Need
As usual, I suggest adding from now to your favourite e-commerce shopping cart all the needed hardware, so that at the end you will be able to evaluate overall costs and decide if to continue with the project or remove them from the shopping cart. So, hardware will be only:

- Raspberry PI 3 Model A+ (including proper power supply or using a smartphone micro USB charger with at least 3A) or newer Raspberry PI Board
- high speed micro SD card (at least 16 GB, at least class 10)
- DC-DC Step UP Converter
- Digital Multimeter
- dupont wirings
Step-by-Step Procedure
Preparing the OS
We need to install the Operating System in our Raspberry PI in order to be able to check the Undervoltage Detected warning. You can use both Raspberry PI OS Lite (for headless OS) and Raspberry PI OS Desktop (including the Raspberry PI desktop environment, in this case working from its terminal). The difference between the 2 OSes can be found in my Raspberry PI OS Lite vs Desktop: comparison between the 2 distributions article.
Once installed, a good practice is always to keep the operating system updated with the following terminal commands:
sudo apt update -y && sudo apt upgrade -yTesting the Power Supply
In this test, we’ll check my commercial power supply (that historically was giving me Undervoltage Detected warning), marked from the product to provide a nominal 5V output with a max current of 2A. We’ll connect it to the Raspberry PI directly (by using the DC-DC Step UP Vin PINs). The connection will follow this wiring diagram:
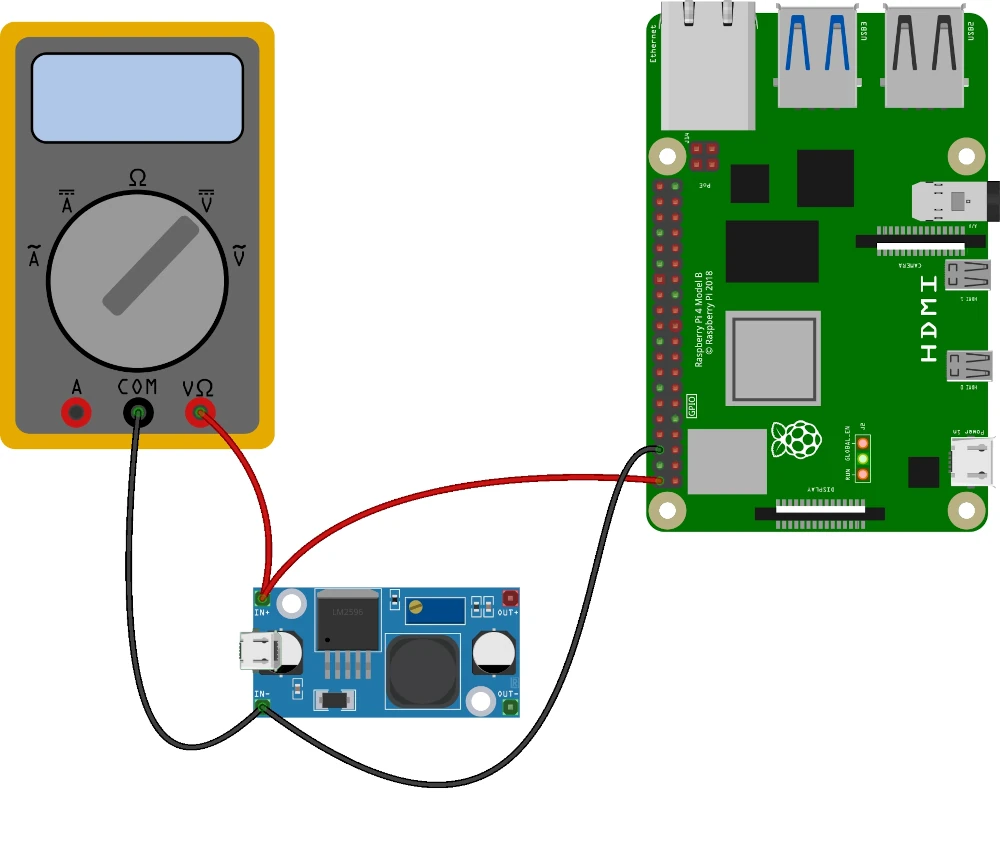
Here came the surprise. I plugged the power supply Micro USB to my DC-DC Step Up converter and then connected the Digital Multimeter (set to Voltmeter). The Raspberry PI was still disconnected. In this way, I was able to measure only the voltage provided by my Power Supply and it was… 5.11V (checked from the digital multimeter)! And it is the same as the original Raspberry PI power supply!
So, how is it possible the Undervoltage Detected warning?
The answer came soon, as I added the Raspberry PI to the wiring diagram shown before. If you have the same problem, when you add the computer board you will see it starting its boot and the voltage will drop down for seconds, depending on CPU load, then going back to 5V and above. That’s where the Undervoltage detected warning is generated.
So, my power supply hasn’t enough “capacitance” to keep the voltage stable on Raspberry PI load, while it can surely provide the required 5V input.
Testing the Power Supply + Converter
Shut down the Raspberry PI safely, and then move the computer board at the Step Up converter output, as in the following wiring diagram:
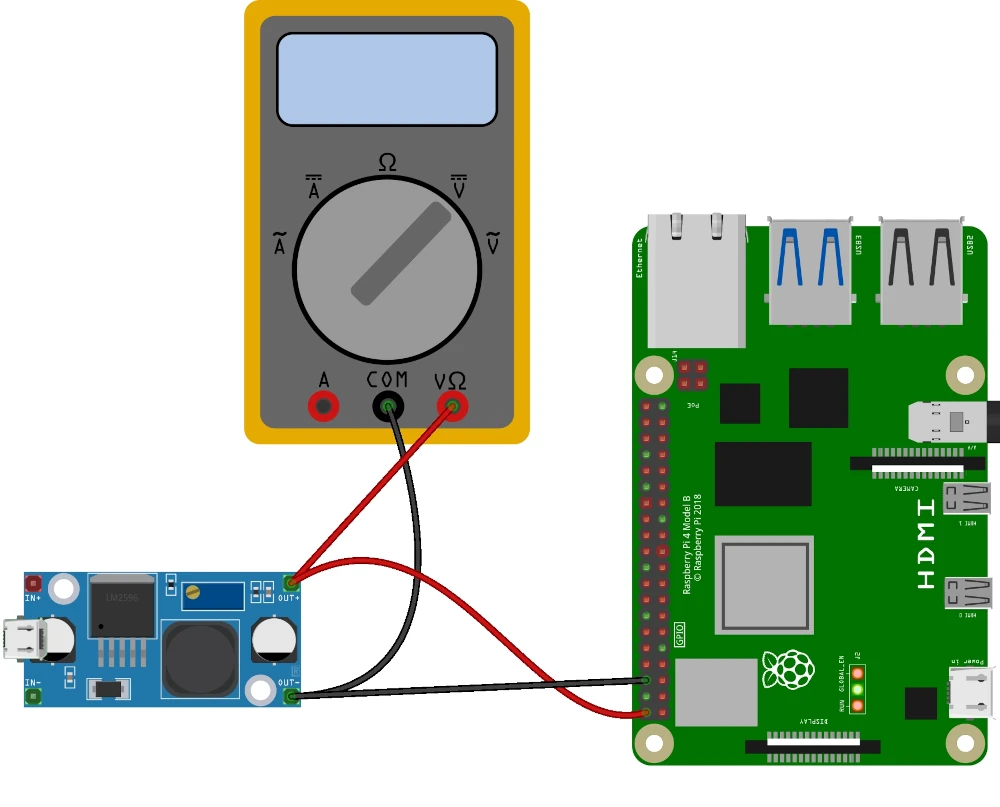
Before connecting the Raspberry PI computer board, please take care in tuning the potentiometer in order to get a 5,10V output from the DC-DC Step Up Converter.
Then connect the Raspberry PI and… here I found the following surprise: the output voltage remained stable at 5,10V. This means that the module can output a more stable voltage compared to the power supply alone. It is great news and this, alone, can be a solution for those having big problems with the Raspberry PI undervoltage.
But my inspection didn’t end there. I was wishing to get the voltage level where the warning activates.
With this current configuration, you can use the potentiometer of our DC-DC Step Up converter to make the input voltage lower or higher. Moving to lower values, I found that the warning raises at 4,77V.
Dealing with the Raspberry PI Undervoltage Detected warning
Now, we are at the conclusion of this study. When you have a Raspberry PI Undervoltage Detected error, you can manage it in the following ways:
- If the event is really rare, you can leave it as is. Check the “dmesg | grep undervoltage” terminal command to verify how frequently this appears. A rare undervoltage event will just limit your CPU for low periods and hardly will make problems to your micro SD card. You can manage this residual risk with a proper backup plan, that is a useful practice anyway.
- Add a module that can make the power supply output more stable, as the DC-DC Step Up Converter or any similar modules
- Buy the official Raspberry PI Power Supply
What’s Next
If you want to discover cool projects for your Raspberry PI computer board, you can take a look at peppe8o Raspberry PI tutorials.
Enjoy!

Open source and Raspberry PI lover, writes tutorials for beginners since 2019. He's an ICT expert, with a strong experience in supporting medium to big companies and public administrations to manage their ICT infrastructures. He's supporting the Italian public administration in digital transformation projects.
![]()
![]()
![]()
![]()
![]()
![]()
![]()


