
Last Updated on 13th April 2024 by peppe8o
In this tutorial, I will give you my review of the Pironman Raspberry PI Case, ending with my personal suggestions.
Computer boards make a significant part of projects when looking at performances. But there are some “accessories” that can give your board a boost in terms of performance. The Pironman Raspberry PI case is great equipment in this sense.
Why a Case is Important for your Raspberry PI computer board?
A case for your Raspberry Pi computer board is important for a number of reasons, the main being the following:
- Protection: The Raspberry Pi board is a small and delicate board. A case can provide protection from physical damages
- Cooling: especially for Raspberry PI 4 computer boards, the heating can limit your performance. Having a case with a built-in cooling solution (such as fans or heat sinks) can help keep the board cool and prevent overheating, allowing your microcomputer to get the most from its hardware
- Aesthetics: there is a variety of styles and designs for cases, meeting everyone’s preferences. You can choose one that fits your personal style or the project you’re using the Raspberry Pi for.
- Convenience: A case can also provide additional convenience by including things like power stabilization, and easy access to ports and buttons.
In summary, a case for your Raspberry Pi board can provide protection, improved cooling, personalization and convenience for your device. It’s a good idea to have one to keep your device in good condition and extend its lifespan.
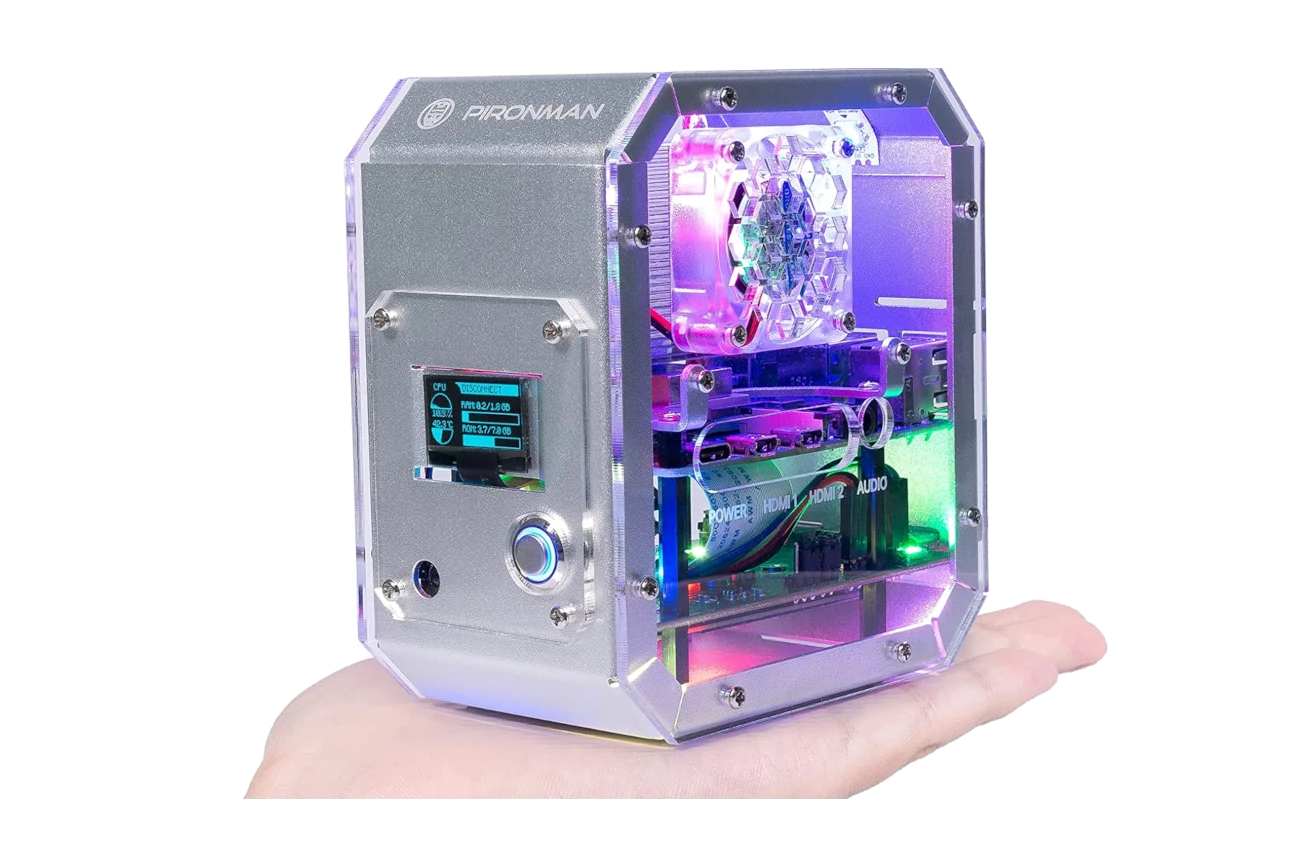
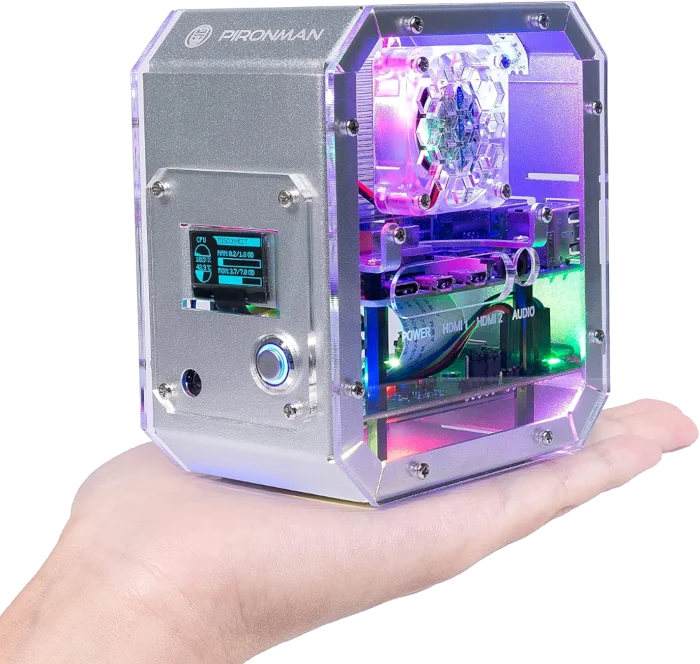
The Pironman Raspberry PI case
The Pironman case fits all the above-mentioned needs, also adding some cool features to make your Raspberry PI computer aesthetically attractive. The main are:
- Aluminum Tower Case for Raspberry Pi 4 Model B (Not Compatible with Pi 3)
- Ice Tower Cooler with 5mm Copper Pipe; Silent RGB Fan with Temperature Control
- Onboard USB to M.2 SATA SSD, Supports TRIM and UASP. (NVME/PCIe SSD NOT Supported). Available SSD Lengths: 22mm x 30mm, 42mm, 60mm, and 80mm
- Programmable 0.96″ OLED to Display CPU/RAM/ROM Usage, CPU Temperature and IP address
- IR Receiver for Media Center like Kodi or Volumio; Power Button for Safe Shutdown
Moreover, it adds a 16x WS2812 Addressable RGB LEDs strip, that makes it possible to customize the appearance.
What We Need
As usual, I suggest adding from now to your favourite e-commerce shopping cart all the needed hardware, so that at the end you will be able to evaluate overall costs and decide if to continue with the project or remove them from the shopping cart. So, hardware will be only:
- Raspberry PI 4 computer board (including proper power supply or using a smartphone micro USB charger with at least 3A)
- Pironman case (you can also find it in SunFounder shop)
- high speed micro SD card (at least 16 GB, at least class 10)
- (optionally) M2. SATA SSD storage
- (optionally) a USB/wireless keyboard and mouse
- (optionally) HDMI Monitor with micro-HDMI to HDMI cable
The Keyboard/mouse and Monitor are optional as you don’t need them if you are going to work with headless Raspberry PI OS versions. The M2. SSD storage is optional as you can use the Raspberry PI 4 (and its case) with a MicroSD card, but the M2. SSD storage can give you an incredible speed boost as it will make your OS run faster compared to micro SD cards. I also suggest you avoid storage with Jmicron chips, as they can’t run at the full speed with the RPI computer boards, even if they are anyway a great boost to your OS if you already own one of these.
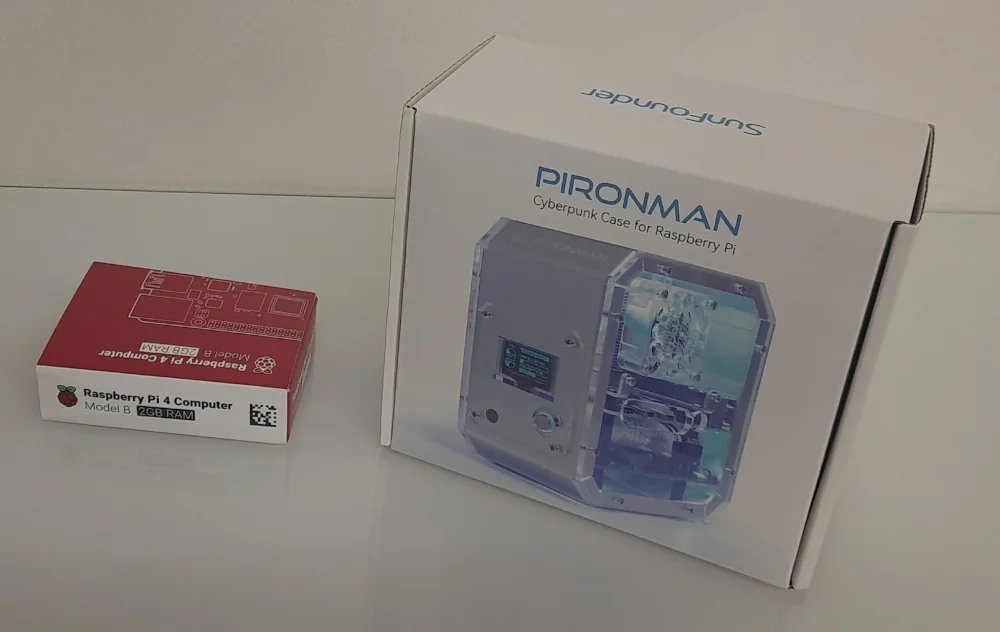
The Package
From the 2 available bundles (with or without the Raspberry PI 4 Model B), I get the one including the computer board. They come in 2 boxes: the first one is the original box of our Raspberry PI 4 (2 GB RAM version), while the second one is the box with the Pironman case:
Opening the Pironman box and once removed the assembly manual, we find an external polystyrene layer, carefully enveloping the case from all sides. The first part available is the acrylic transparent surface, with its protection adhesive sheet:
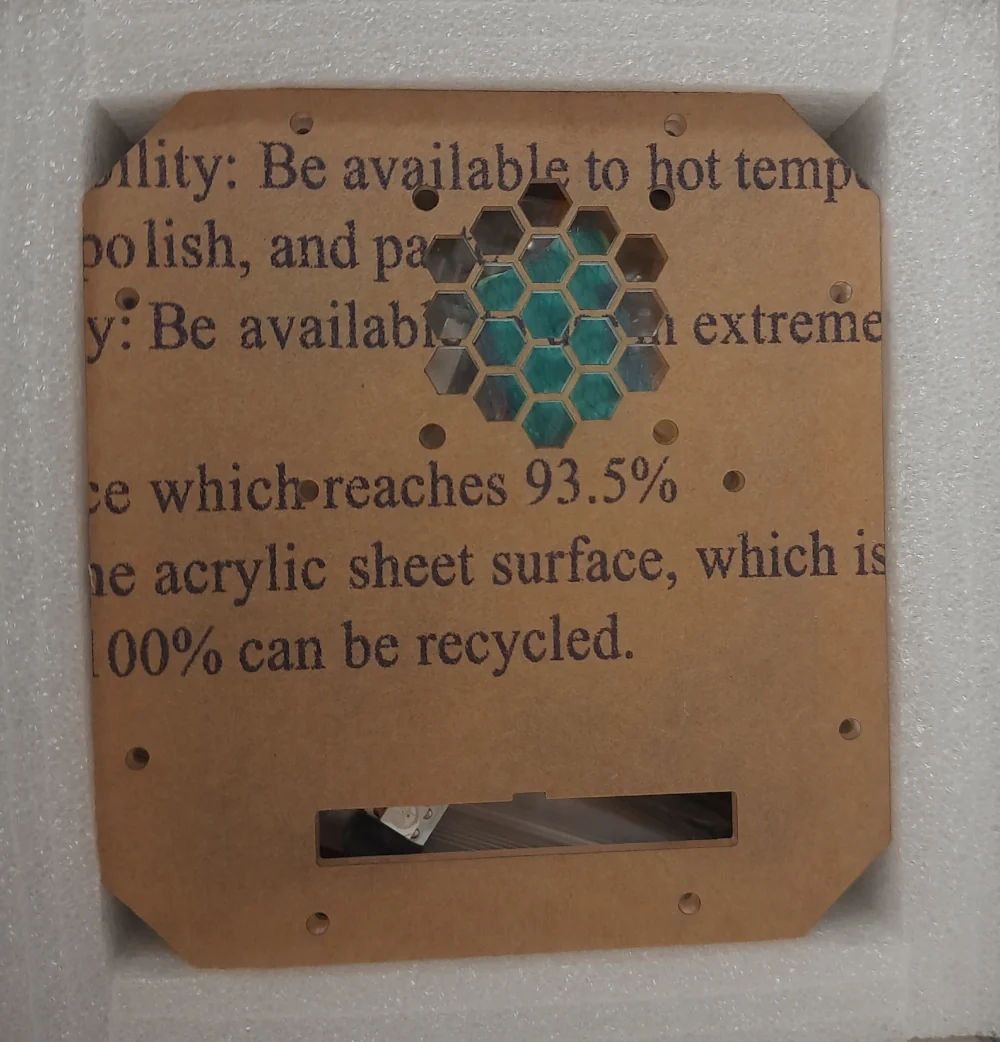
By getting this part off, we’ll reach all the remaining components, carefully packaged and positioned inside the remaining part of the shell:
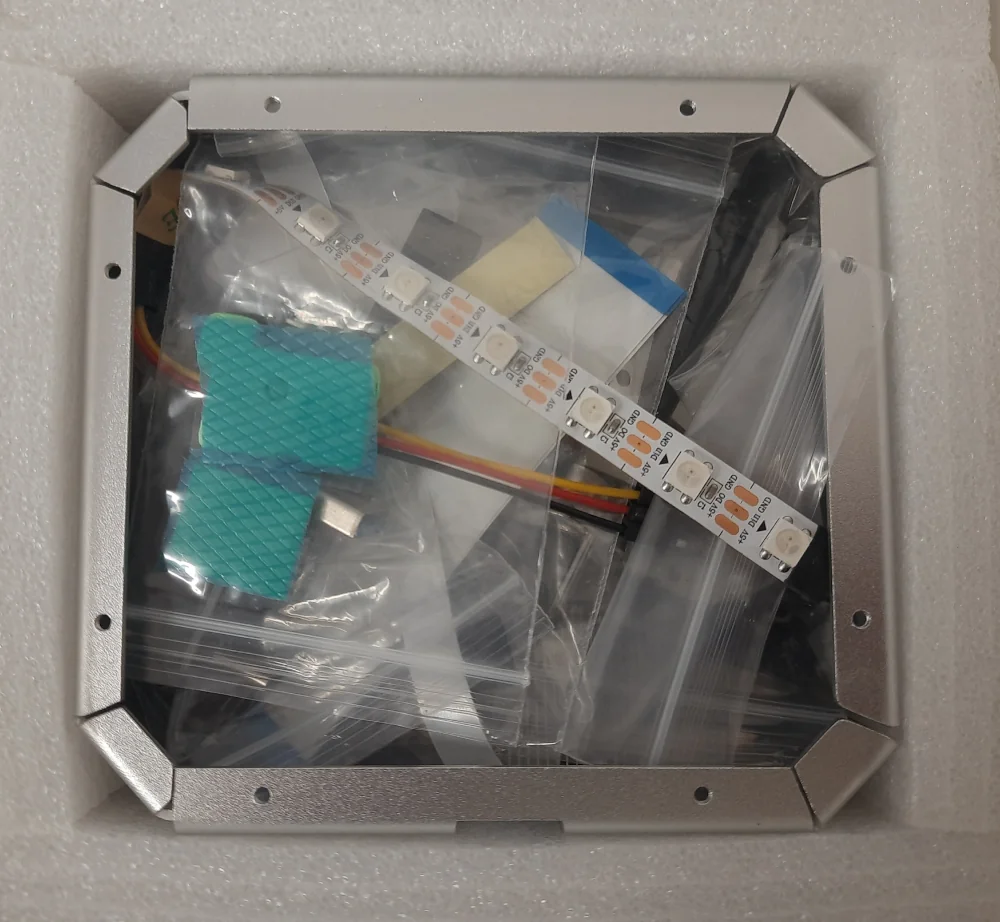
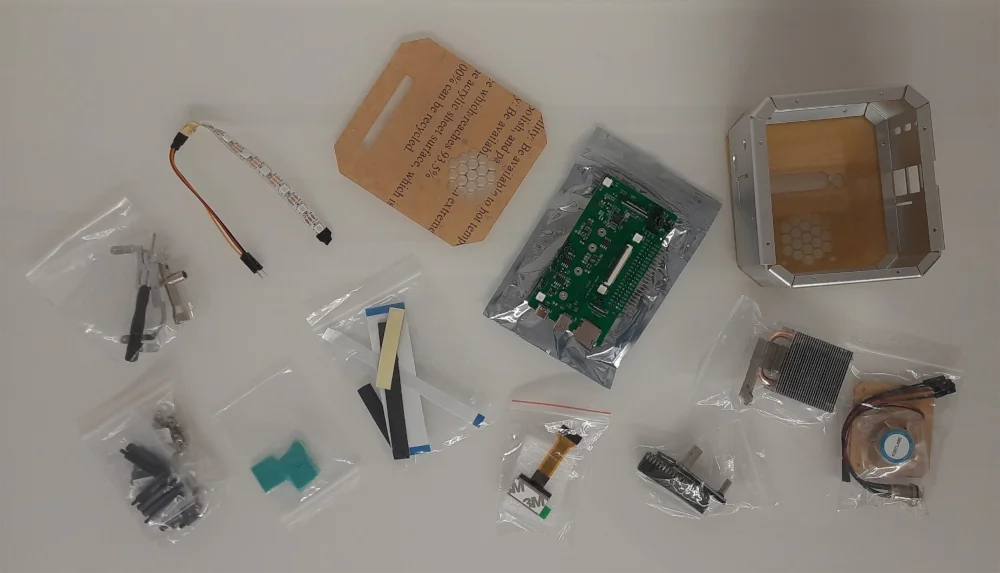
The following picture shows the whole parts:
It is important to note that the kit doesn’t include the Micro SD card or the Power Supply. You have to buy both separately in your favourite seller.
Assembling the Pironman Raspberry PI case
Please prepare all the needed parts (Pironman, Raspberry PI, Micro SD, Power supply).
The Pironman comes with a well-done assemble instruction sheet. This shows all the steps to follow in order to get it mounted in the right way. I would define it as built in an “Ikea-style”, in the sense that I really love these mounting manuals showing what to use and how to mount quite for each screw. An example is shown in the following picture:
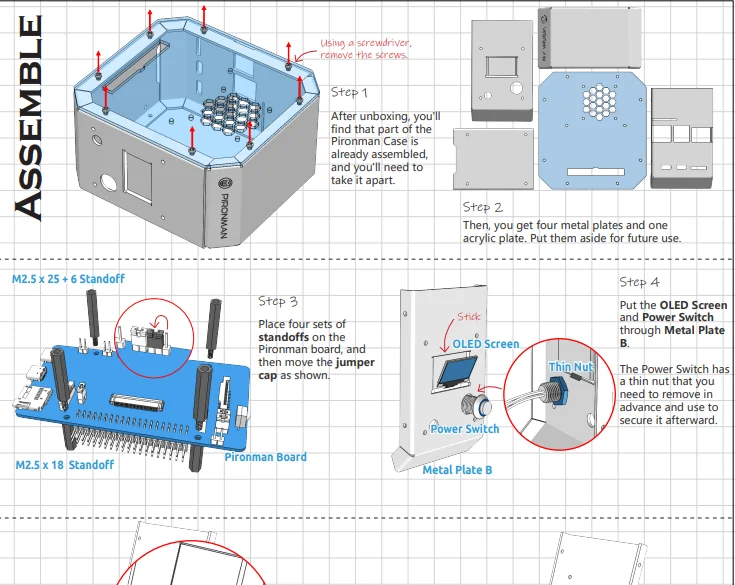
The full assemble sheet is also available from their GitHub page, with the following link:
https://github.com/sunfounder/sf-pdf/raw/master/assembly_file/z0303v12-a0000891-pironman.pdf
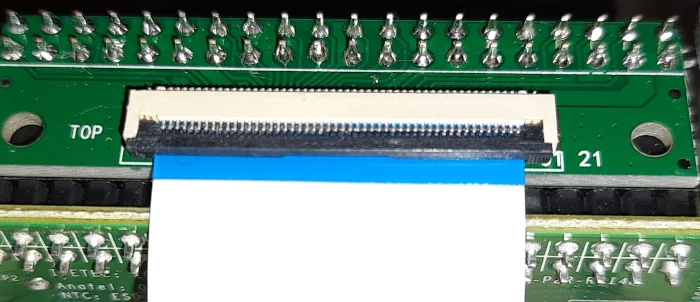
I’m not going to show here what is always well explained there. But I just want to warn you about mounting correctly the GPIO FFC (step 8) and the SD Card FFC (step 9). Assembling them with the right side will avoid you a big unmount if your SD card doesn’t appear on your Raspberry PI or if your Raspberry PI doesn’t get power for boot.
The right sense for the GPIO bridge is the following (use the blue band reference to mount it correctly):
Moreover, at step 21 take care of having the FAN wires out from the FAN fins: besides being a safety issue, this could make your fan really noisy.
Before closing the bottom part at step 22, if you have an M.2 SSD storage you can install it directly. This will avoid you to unmount again the bottom side of the Pironman and the steps can be found on SunFounder Pironman SSD instructions page.
Also, the SunFounder video tutorial (and GPIO bridge images) from their sunfounder list and assembly page are a great help:
Preparing the OS
You use the Pironman Raspberry PI case both with Raspberry PI OS Lite (for headless OS) and Raspberry PI OS Desktop (including the Raspberry PI desktop environment). The difference between the 2 OSes can be found in my Raspberry PI OS Lite vs Desktop: comparison between the 2 distributions article.
The first one can be used for server-like services (NAS, web server, monitoring system, etc). The second one, with a keyboard, mouse and monitor, will make your Raspberry PI a small personal computer.
Once installed, you can make your operating system updated with the following terminal commands:
sudo apt update -y && sudo apt upgrade -yInstall the Pironman utilities
You will note that the Pironman doesn’t work out of the box with the default Raspberry PI OS. You will need to add a few packages (as explained in SunFounder setup Pironman page).
First of all, the following terminal command will install the required packages, if not already available in your Raspberry PI OS version:
sudo apt install git python3-pip python3-setuptools python3-smbus -yThen, we need to open the /boot/config.txt file for editing:
sudo nano /boot/config.txtand append the following lines at the end:
# PIRONMAN settings
dtoverlay=gpio-poweroff,gpio_pin=26,active_low=0
dtoverlay=gpio-ir,gpio_pin=13
Close and save.
We are now ready to install the pironman packages in your user default home folder:
cd ~
git clone https://github.com/sunfounder/pironman.git
cd ~/pironman
sudo python3 install.py
After these commands, all the Pironman features will start to work.
- The OLED screen will display the CPU, RAM and ROM Usage, CPU Temperature and IP Address of the Raspberry Pi. After 60 seconds, the OLED display goes into sleep mode.
- The fan is set to activate its cooling at 50 degrees Celsius.
- The WS2812 RGB strip turns on, with blue color (#0a1aff) and in breath mode (change rate: 50%).
- The Pironman button is now activated, with these functions:
- with a short press, you can activate again the display for 60 more seconds.
- with a press and hold for 2 seconds, you will safely shut down the Raspberry PI.
- with a press and hold for 10 seconds, you will forcibly shut down the Raspberry PI.
You can customize at any time quite all of these settings from the following config file:
sudo nano ~/.config/pironman/config.txtI’m using the “quite” as apparently the power button can’t be assigned to different functions.
The config file will give you access to the following configuration lines:
temp_unit = C
fan_temp = 50
screen_always_on = False
screen_off_time = 60
rgb_switch = True
rgb_style = breath
rgb_color = 0a1aff
rgb_blink_speed = 50
After changing them, saving and closing, you will need to restart the pironman service in order to get the new settings running:
pironman restartMoreover, the installed “pironman” command will give you a fast way to access and edit these configurations without the need to enter the configuration file and restart the service. The full help for this command tool can be found with the “pironman –help” command:
pi@raspberrypi:~ $ pironman --help

config file: /home/pi/.config/pironman/config.txt

Usage:
  pironman <OPTION> <input>

Options:
  start            start pironman service
  stop             stop pironman service
  restart          restart pironman service
  -h,--help        help, show this help
  -c,--check       show all configurations
  -a,--auto        [ on ],enable auto-start at boot
                   [ off ], disable auto-start at boot
  -u,--unit        [ C/F ], set the unit of temperature,
                       C or F (Celsius/Fahrenheit)
  -f,--fan         [ temp ], Temperature at which the fan switches on,
                   in celsius (default 50),in range (30 ~ 80)
  -al,--always_on  [on/off], whether the screen is always on,
                   default False
  -s,--staty_time  [time], screen display duration in second,
                   in second, default 30
  -rw,--rgb_sw     [on/off], rgb strip switch
  -rs,--rgb_style  rgb strip display style, default: breath,
                   in [breath / leap / flow / raise_up / colorful]
  -rc,--rgb_color  [(HEX)color], set the color of rgb strip,
                   default: 0a1aff
  -rb,--rgb_speed  [speed], rgb blink speed (0 ~ 100, default 50)
Detailed info on Pironman setup is also available from the previously referenced SunFounder setup Pironman page.
A few Pictures from Pironman Raspberry PI case
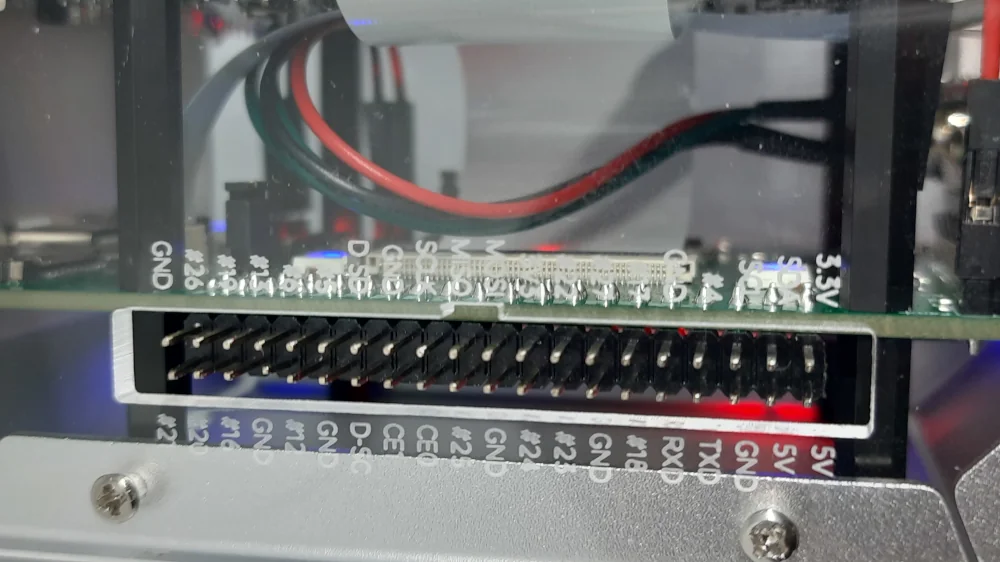
The GPIO ports are exposed at the side of the Pironman case by the GPIO bridge and the Pironman board. This makes their access really simple, also adding a useful set of labels to identify the needed GPIO:
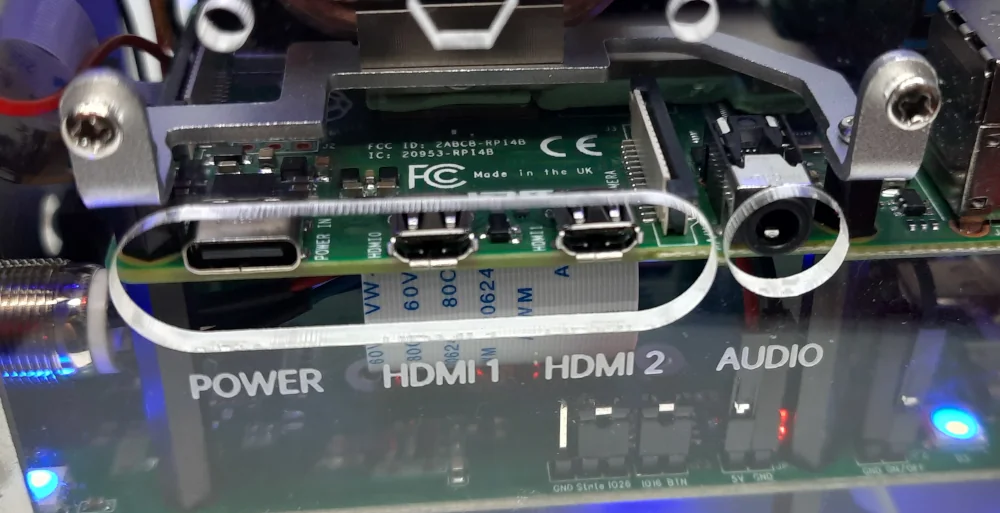
Also, the other Raspberry PI ports are well-exposed and easy to access. It is important to note that you don’t have to use this Power port when powering the Pironman Raspberry PI Case from the Pironman power supply port:
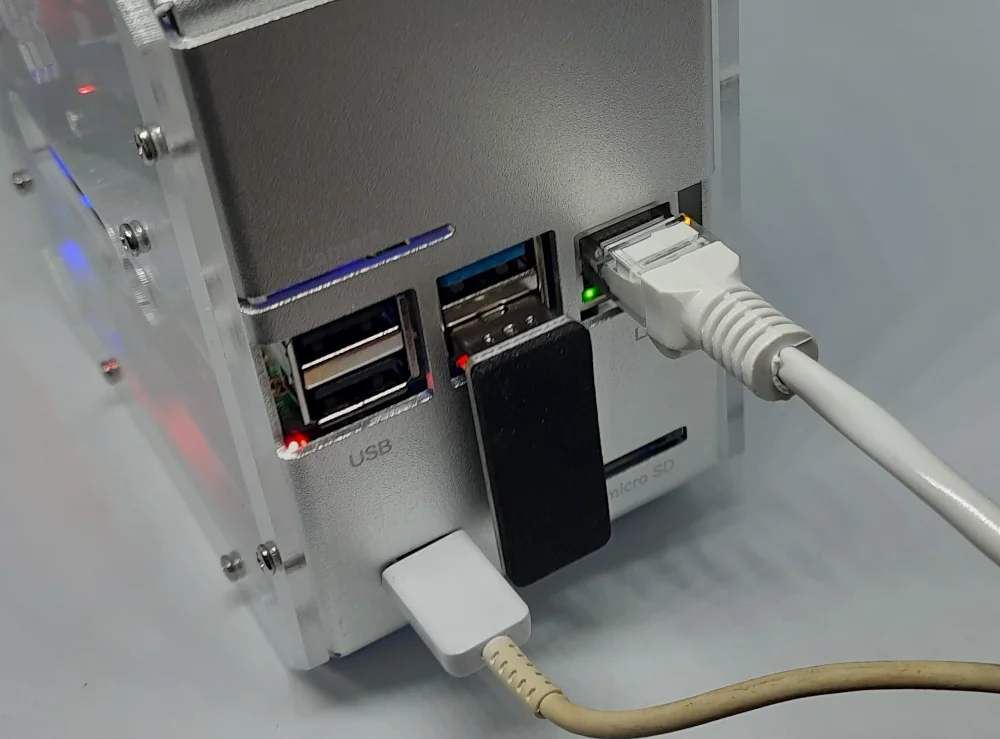
Also, access to Raspberry PI USB, Ethernet and Micro SD slots is easy. One of the Raspberry PI USB 3.0 ports (those blue) must be used if you want to use the M.2 SATA SSD storage. There’s also space to add a camera cable. The port at the bottom-left side of this picture is the Power Supply port connected to the Pironman board that will power also the Raspberry PI via the GPIO bridge:
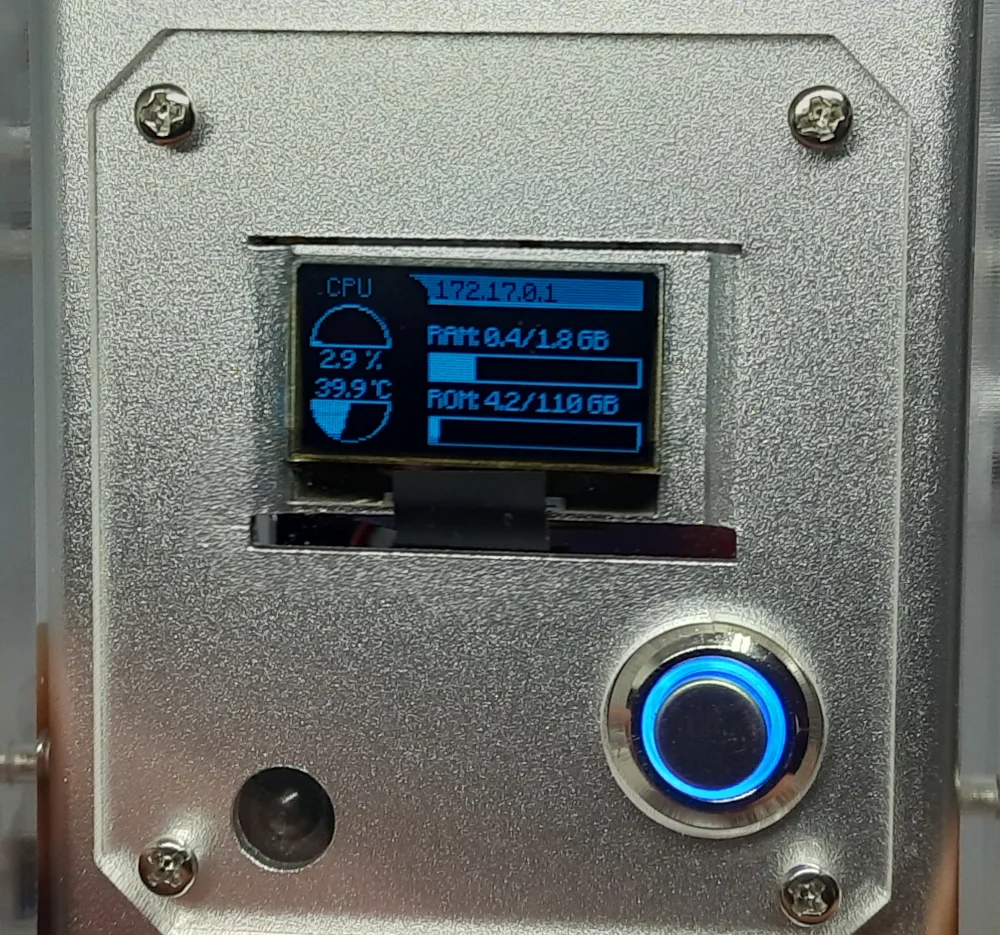
The front side includes the small OLED display activated from the Pironman package, with the power button and the IR receiver:
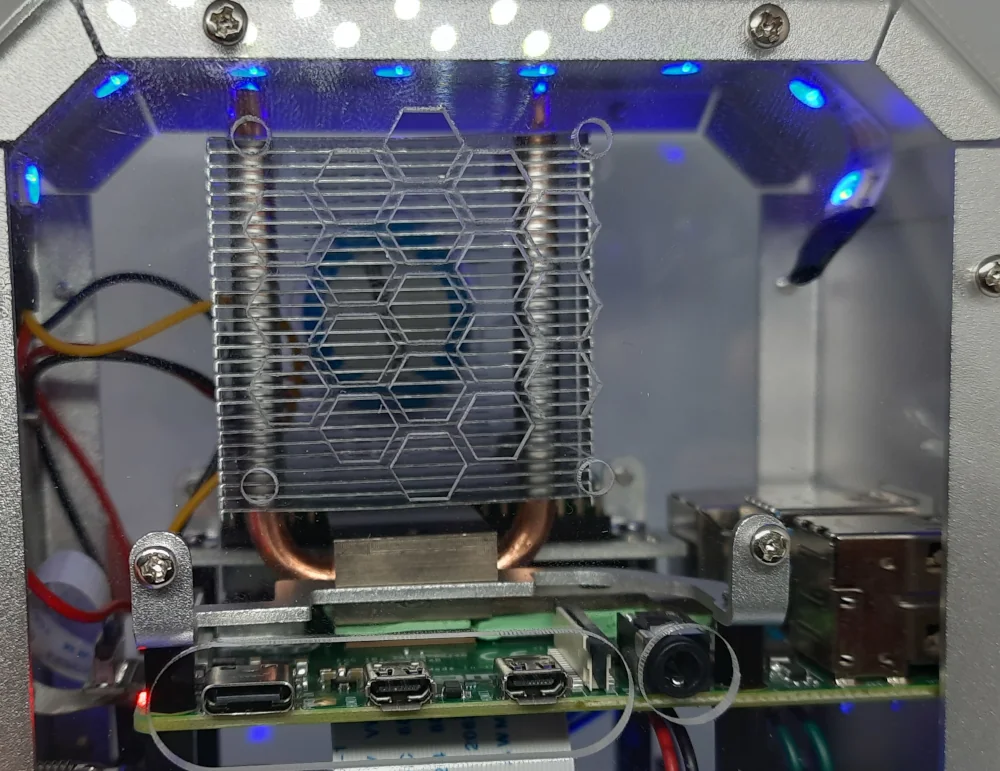
One of my favourite features added by this case is the cooling system. The big air cooler helps to keep the temperature under control even during CPU-intensive usage:
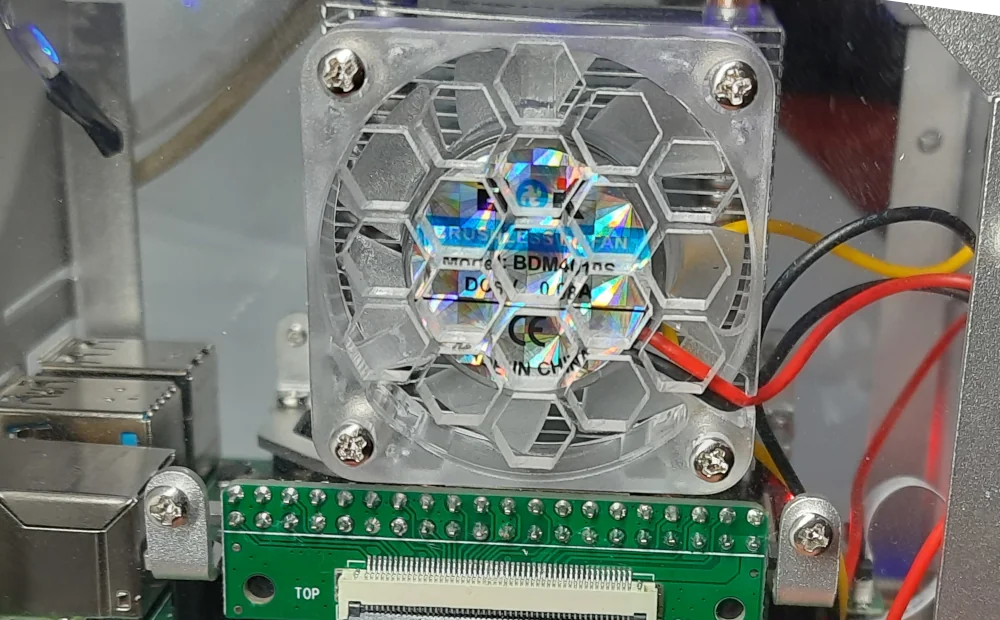
Moreover, the really silent fan brings an increased cooling capacity and is activated only when needed (by setting the fan temperature switch). This will save your fan lifetime:
My Opinion
The Pironman Raspberry PI case soon took the place of my old Raspberry PI home server.
The acrylic/aluminium shell is really solid and makes the box resistant to accidental bumps.
While you will mount it, you will note that all the screws and all the holes are perfectly sized. This means a good production process (think about how many times you had to force parts for DYI accessories with holes not fitting between them!).
I strongly suggest evaluating it, if you are looking for an excellent enclosure that will save your Raspberry PI computer board.
Finally, a few points show my personal PROs, CONs and Improvement opportunities.
PROs
- The packaging is excellent. Every single part is carefully bagged and brings a clear bag label in order to identify it easily (useful for the screws). There’s also included a small screwdriver.
- The box also includes spare parts for handoffs, screws, and nuts. It is important because if you accidentally lose one of them you will not need to become crazy looking for a spare with the same sizes or fanciful fixes 🙂
- The fan is really silent. Many Raspberry PI cases include a fan that seems more like a tractor in your room instead of a cooling system for a small credit card-sized computer
- The Power Button is really a power button. In the sense that many power buttons from the market simply cut the power, not handling correctly the Raspberry PI shutdown, The one provided, in this case, makes the job in the right way
CONs
- A very minor CONs, is the missing of power supply from the package. The power supply is the most delicate accessory for Raspberry PI. As it here connects directly with the Pironman board and as people many times use “the first USB-C power supply available” at home to give it a first try, having a correct one provided by the SunFounder would be, in my opinion, a must.
Improving Opportunities:
The following are suggestions on this product, that would make it even better in my personal opinion.
- specify better the OLED mounting side at steps 4/5: in the assemble sheet I would suggest adding a picture in order to make clearer the OLED side or to keep a photo in the Pironman assembly page (Pironman list and assembly page), as already done for the GPIO bridge
- specify better GPIO and SD bridges from the assemble sheet (steps 8 to 12). Also for the SD bridge, a picture would help on the same assembly web page
- specify better the fan side at step 19, as if the fan works on the opposite side it could have less cooling performance. Also here, a photo would make the job
- Add a dust filter at the fan holes in the acrylic face where the air enters the Pironman. This would help keep the internal parts of the box cleaner
- Add a battery backup module, that could help to better manage sudden power supply breaks
What’s Next
If you want to discover many other projects for your Raspberry PI computer board, you can take a look at peppe8o Raspberry PI tutorials.
Enjoy the Pironman Raspberry PI case!

Open source and Raspberry PI lover, writes tutorials for beginners since 2019. He's an ICT expert, with a strong experience in supporting medium to big companies and public administrations to manage their ICT infrastructures. He's supporting the Italian public administration in digital transformation projects.
![]()
![]()
![]()
![]()
![]()
![]()
![]()


