
Last Updated on 13th April 2024 by peppe8o
In this tutorial, I’m going to show you how to connect and use a PIR with Raspberry PI computer boards using Python.
Projects involving motion detection actions require a reliable way to run their code when an object movement happens. One of the most common solutions to accomplish this task is by the HC-SR501 PIR sensor with Raspberry PI.
What is a PIR
A PIR (Passive InfraRed, sometimes named “PID” as “Passive Infrared Detector”) sensor is an electronic device able to measure the infrared (IR) light radiating from objects. The term passive means that the PIR module doesn’t radiate energy for detection purposes: it only detects infrared radiation emitted by or reflected from objects.
It can make your project aware if a generic movement happened in its range of view, but it can’t give more information (like, for example, who, where and how many the object moved).
You can find a more detailed description of how the PIR works from the following Glolab PIR page.
Common PIR sensor applications include security alarms and automatic lighting.
PIR Module Features
The PIR module can use a Vcc voltage ranging from 4.8V to 20V. Its signal output is 3.3V.
It can cover a 120 degrees area, giving a broad monitoring angle. Motion detection usually reaches 7 meters. Besides the time and sensitivity adjustment potentiometers, its back plane also offers a jumper that the user can modify:
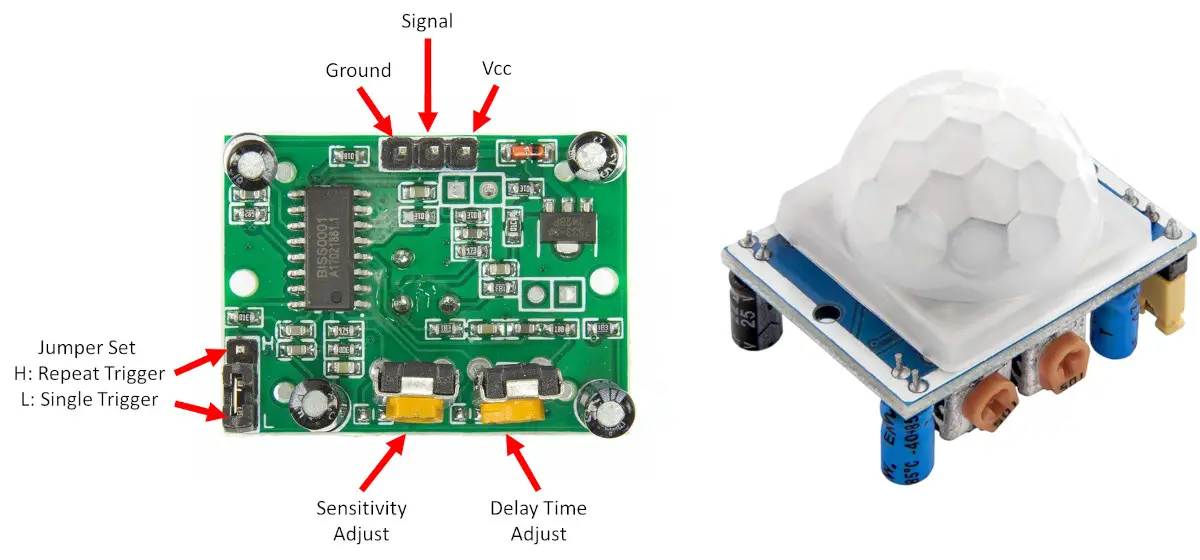
With the jumper to trigger Mode “L” (single trigger mode), the output will go high only one time until the hardware time delay period is completed, no matter how many times an object is moved in front of the sensor’s detection range.
With the jumper to trigger Mode “H” (repeat trigger mode), the output will go high as many times as the object moves in the detection range of the sensor. In this case, the hardware time delay starts again every time a single motion is detected.
The PIR datasheet can be downloaded from adafruit pir sensor.pdf.
What We Need
As usual, I suggest adding from now to your favourite e-commerce shopping cart all the needed hardware, so that at the end you will be able to evaluate overall costs and decide if to continue with the project or remove them from the shopping cart. So, hardware will be only:
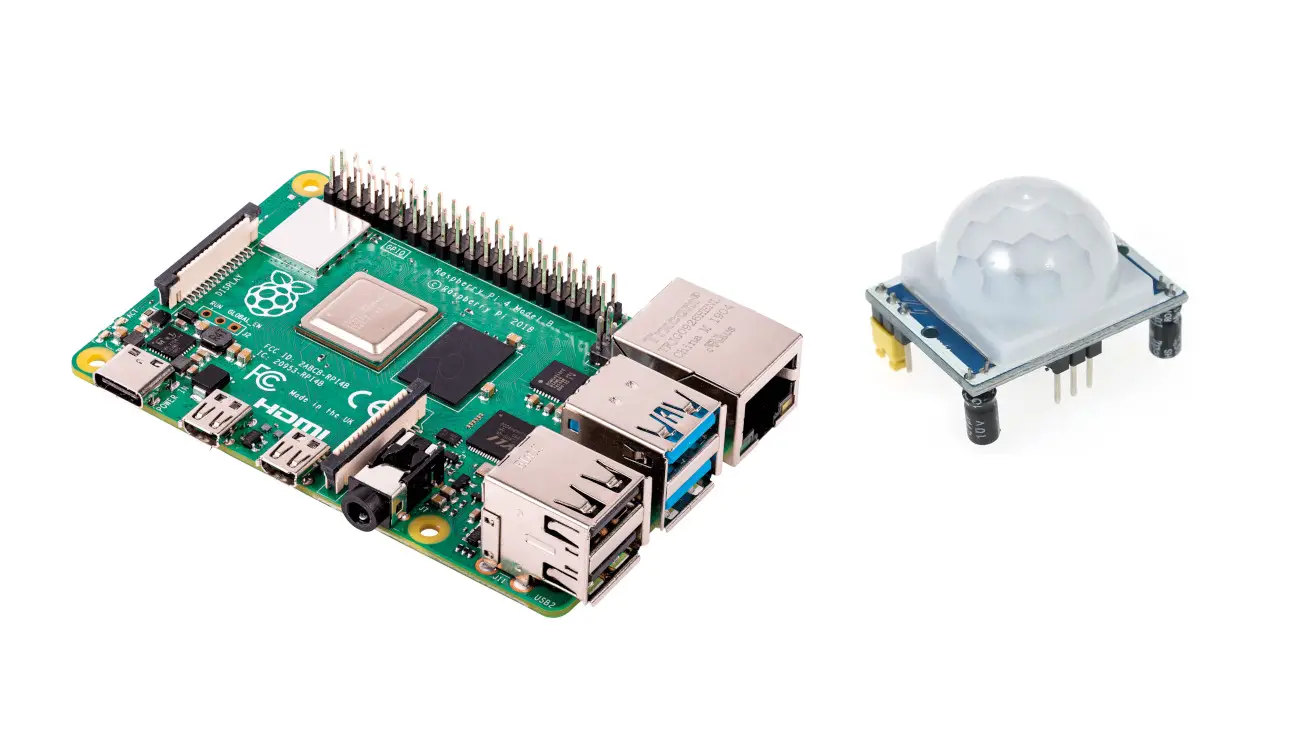
- a Raspberry PI computer board (including proper power supply or using a smartphone micro usb charger with at least 3A)
- high speed micro SD card (at least 16 GB, at least class 10)
- HC-SR501 PIR module
- breadboard
- dupont wirings
Check hardware prices with the following links:


Step-by-Step Procedure
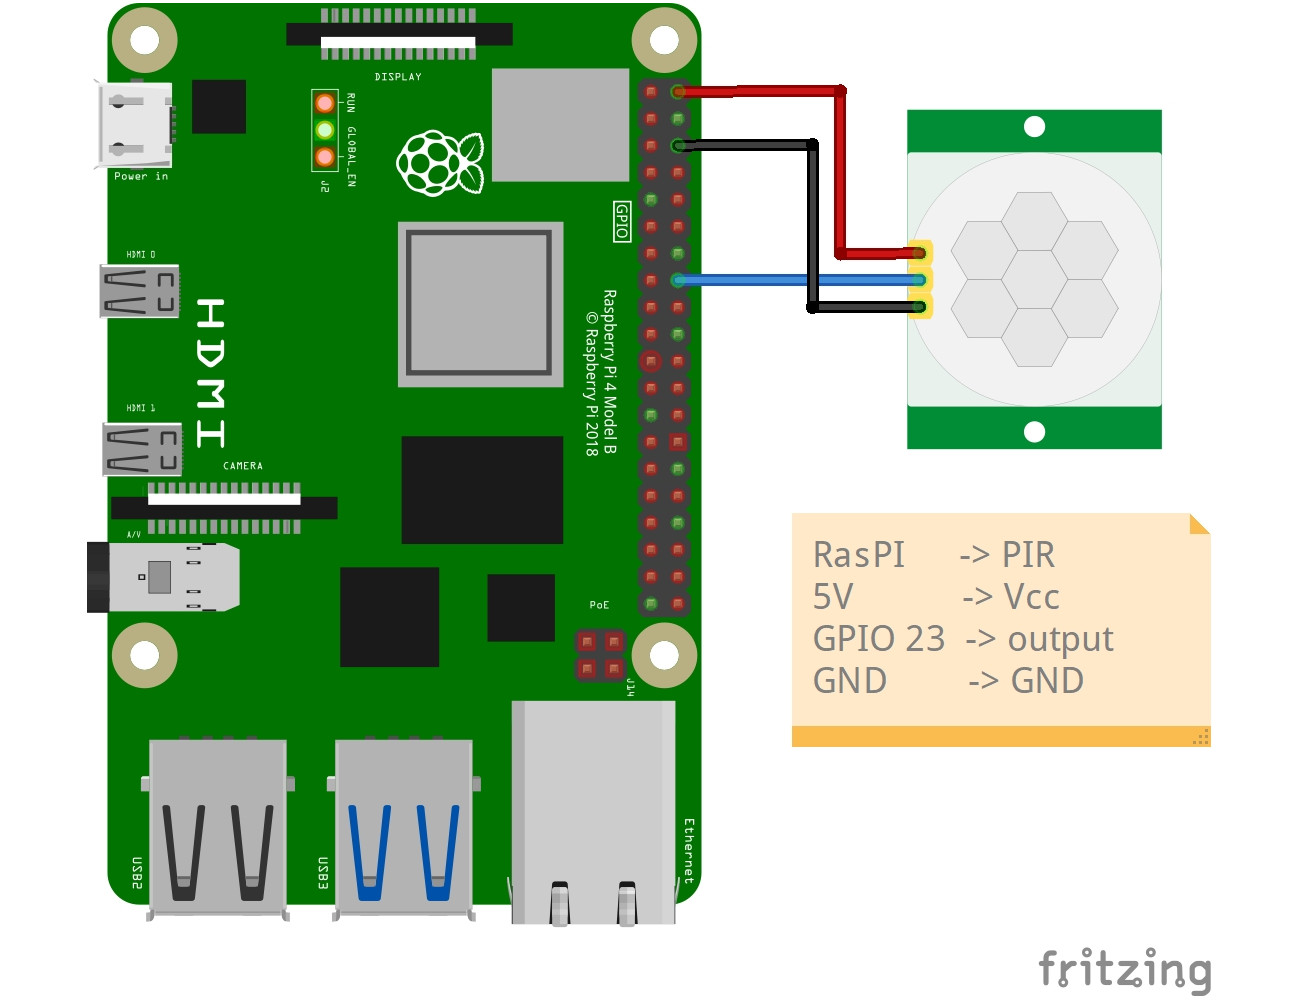
Wiring Diagram: connect the PIR with Raspberry PI
Prepare cabling as shown in the following picture, according to Raspberry PI Pinout (that is the same as Raspberry PI Zero Pinout):
I can’t show “live” pictures of my cabling, as I will use my CrowPi2 board that has built-in wiring, but the wiring process should be simple as only 3 cables are needed.
Please note that in my case I connect the PIR signal wire directly to my GPIO input port, as its datasheet states that the output will be no more than 3.3V. If you use a PIR module different from HC-SR501, please check this. If your output is greater than 3.3V, use a resistors divider circuit to reduce to the supported Raspberry PI input (similarly to what I’ve made in my How To Control a Ultrasonic Distance Sensor with Raspberry PI).
Prepare Operating System
Start with OS installation using install Raspberry PI OS Lite guide. This procedure also works with Raspberry PI OS Desktop, using its internal terminal.
Make your OS up-to-date. From the terminal, use the following commands:
sudo apt update -y && sudo apt upgrade -yThe Raspberry PI OS installation should already include the RPI.GPIO package (otherwise, you can install it with the command “sudo apt install python3-rpi.gpio”).
To use the PIR with Raspberry PI we don’t need specific packages, so we can go on directly with the Python code.
Get my rpi-pir Python Script
You can get my test code directly into your Raspberry PI with the following command:
wget https://peppe8o.com/download/python/pir/rpi-pir.pyThe following lines will explain how this code works.
At the start, we import the required libraries:
import RPi.GPIO as GPIO
import time
We define a pir_gpio variable for better code management: if you will need to change your signal pin wiring for any reason, you will have to correct the input port only in this line:
pir_gpio = 23As we’re using the Broadcom (BCM) port naming, we declare this and we setup the port to input mode:
GPIO.setmode(GPIO.BCM)
GPIO.setup(pir_gpio, GPIO.IN)
We now define, with the help of Python’s custom functions, what happens when a motion is detected or not. You can add here your code to execute. For this exercise, we’ll simply print a “Nothing moves” string when NO motion is detected. On the other side, we’ll print a “Motion detected” string, followed by the date and time provided by time.ctime() function.
def no_motion():
    print("Nothing moves …")

def motion_detected():
    print("Motion detected at "+str(time.ctime()))
The setup is now complete. we can enter the main (infinite) loop with the “try:” clause that runs infinitely until an exception occurs. Here, if the PIR module returns a negative signal (GPIO.input(pir_gpio) == 0), we execute the no_motion() function. On the other hand, if the PIR module detects a movement, we’ll run the motion_detected().
A time sleep of 100 milliseconds will make the result readable for humans.
try:
  while True:
    if(GPIO.input(pir_gpio) == 0):
        no_motion()
    elif(GPIO.input(pir_gpio) == 1):
        motion_detected()
    time.sleep(0.1)
Finally, an “except” will handle the interrupt signal from user. You can stop the running script by pressing CTRL+C. These lines will intercept the interrupt and, besides notifying with the shell print statement, it will clean the GPIO in order to have them available for the next runs without warnings:
except KeyboardInterrupt:
  print('interrupted!')
  GPIO.cleanup()
Run the rpi-pir.py Python Script
You can execute this script from a terminal with the “python3 rpi-pir.py” command. It will result into a continuous motion checking and it will return the date and time on motion detection:
pi@raspberrypi:~ $ python3 rpi-pir.py
Nothing moves …
Nothing moves …
Nothing moves …
Nothing moves …
Nothing moves …
Motion detected at Sun Jun 26 08:45:57 2022
Motion detected at Sun Jun 26 08:45:57 2022
Motion detected at Sun Jun 26 08:45:57 2022
Motion detected at Sun Jun 26 08:45:57 2022
You can also stop this script at any time by pressing CTRL+C on your keyboard.
Calibrating the PIR sensor
The HC-SR501 PIR module allows for calibrating its sensitivity and delay with the help of 2 potentiometers that you can set using a screwdriver. A good procedure to accomplish this task is described in Adafruit testing a PIR tutorial.
What’s Next
Interested in more cool projects for your Raspberry PI? Take a look at peppe8o Raspberry PI tutorials.
Enjoy!

Open source and Raspberry PI lover, writes tutorials for beginners since 2019. He's an ICT expert, with a strong experience in supporting medium to big companies and public administrations to manage their ICT infrastructures. He's supporting the Italian public administration in digital transformation projects.
![]()
![]()
![]()
![]()
![]()
![]()
![]()


