
Last Updated on 13th April 2024 by peppe8o
In this tutorial, I’ll show you how to interface the color sensor TCS34725 with Arduino, explaining with a wiring diagram, code, and components list.
To sort out the things with respect to the colors like different color balls, Arduino can interface the TCS34725 that is the cheap and best color sensor which can handle such application
TCS34725 Color Sensor Features
In order to differentiate the stunning colors or to detect the RGB TCS34725 is the best module to use. With the best color sensing elements, this module is easily available in the market.
- This module has an IR filter that filters out the IR spectrum resulting in a larger color spectrum that is viewable once the high accuracy is available.
- It is suitable and highly recommended that a sensor should be used behind the dark glass.
Working Explanation
The constituents of RGB TCS34725 are a 3×4 photodiode array, analog to digital converter (ADC) data registers, and I2C interface. 3×4 photodiode array contains red filtered, green filtered, and blue filtered photodiodes. The photodiode current is converted into 16bit value by the analog to digital converters. After the completion of the conversion of the data, it sends results to data registers. The communication of the TCS34725 color sensor is carried out under the I2C communication protocol. The I2C protocol enables the sensor to be easily interfaced with any microcontroller.
In addition to the I2C protocol, TCS34725 has interrupt signal output. The interrupt enables the user to set upper and lower limit thresholds.
Maximum Ratings
| Sr. | Parameter | Voltage |
| 1 | Supply Voltage | 6V |
| 2 | Input Terminal Voltage | -0.5V to 3.8V |
| 3 | Output Terminal Voltage | -0.5V to 3.8V |
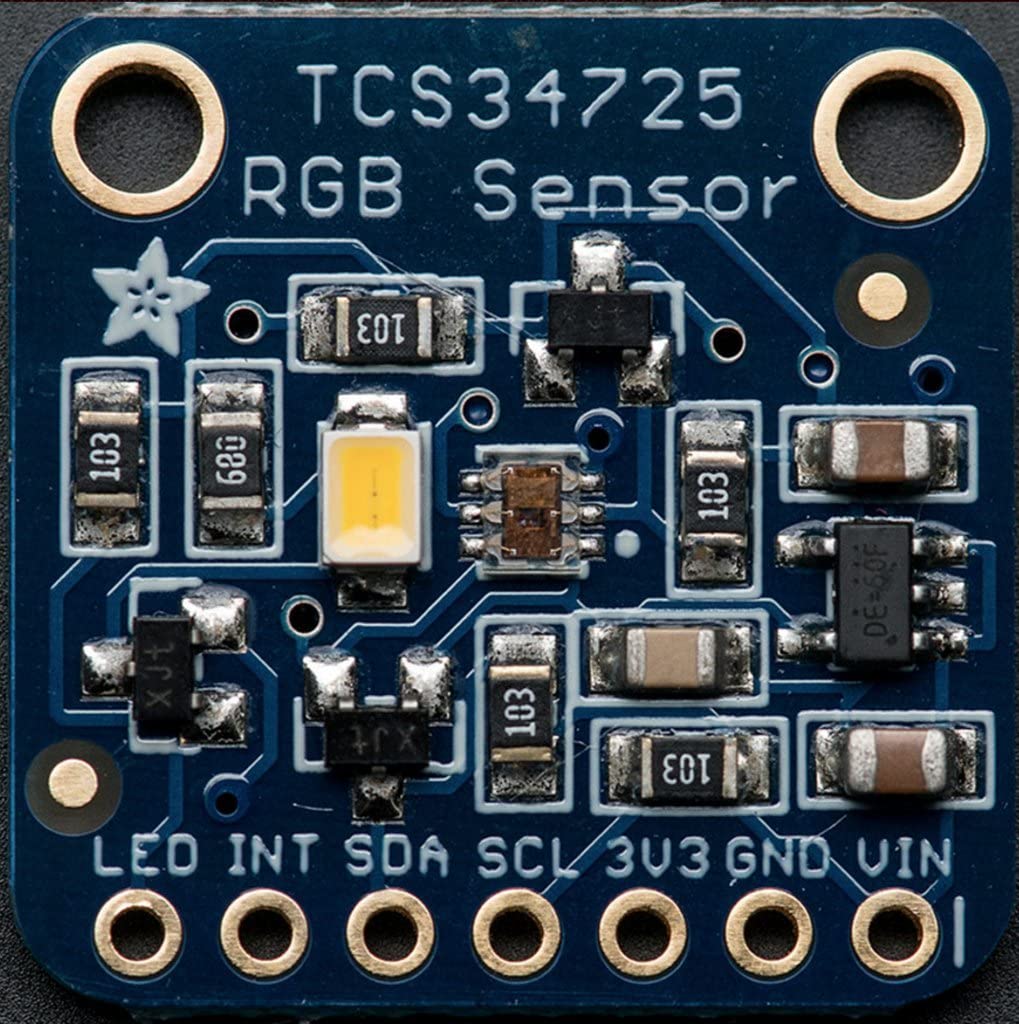
TCS34725 Color Sensor Pinout
There are 7 pins in TCS34725 Color Sensor Module namely VCC, 3.3, GND, SCL, SDA, INT, and LED.
- VCC: Module Power Supply 5v
- 3.3 V: Module Power Supply 3.3V
- GND: Ground Pin
- SCL: Clock Pin which is connected to a dedicated A5 pin on Arduino Uno.
- SDA: Data Pin which is connected to a dedicated A4 pin on Arduino Uno.
What We Need

As usual, I suggest adding from now to your favourite e-commerce shopping cart all the needed hardware, so that at the end you will be able to evaluate overall costs and decide if to continue with the project or remove them from the shopping cart. So, hardware will be only:
Check hardware prices with the following links:


Step-by-Step Procedure
Interfacing TCS34725 with Arduino Uno
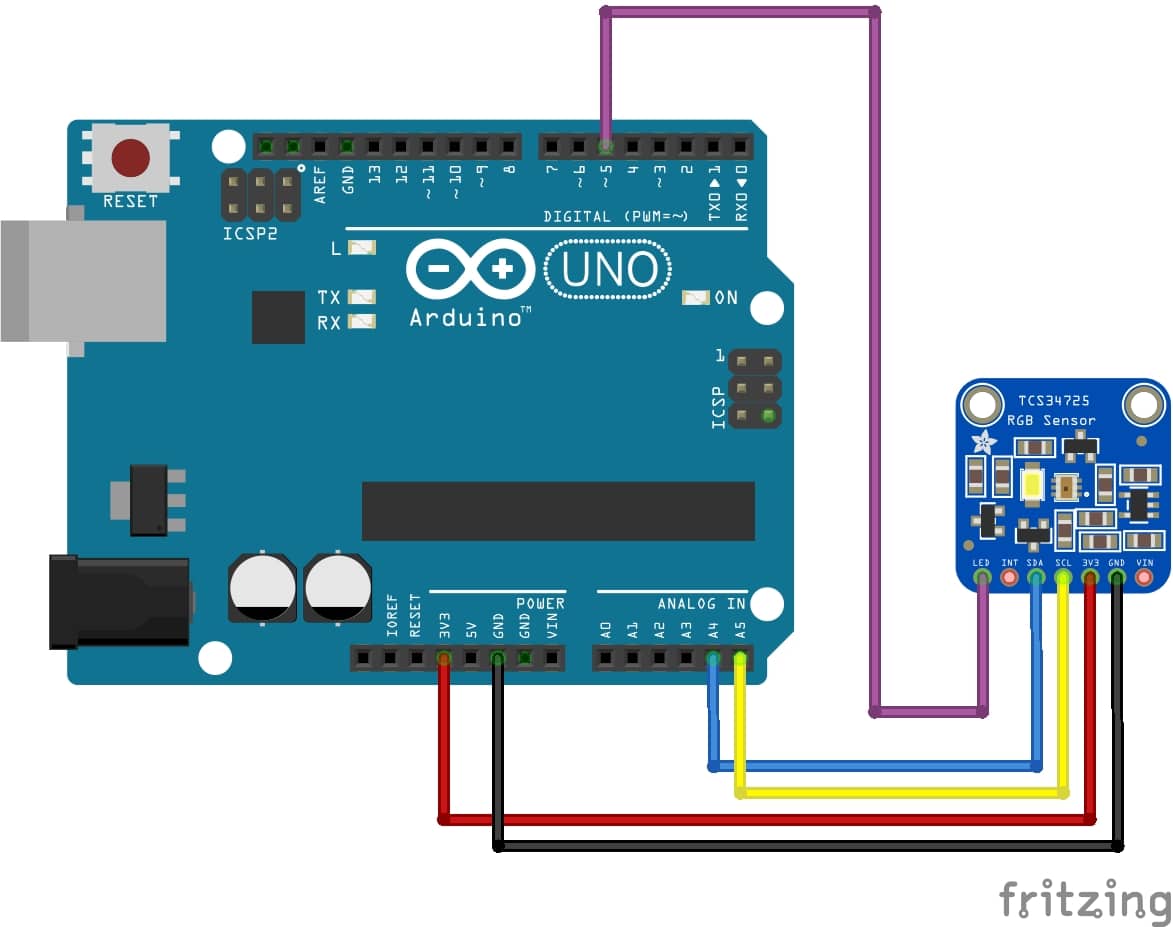
The following diagram is self-explanatory when it comes to connecting the TCS34725 color sensor with Arduino Uno.
- The LED pin is connected to any digital pin
- SDA is a data pin that is connected to an A4 pin on Arduino Uno.
- SCL is a clock pin that is connected with an A5 pin on Arduino Uno.
- 3.3 V is connected with a 3V3 pin on Arduino Uno
- GND is connected with a ground pin on Arduino Uno.
Please arrange the wiring as shown in the following picture, according to Arduino Uno Pinout:
Get the TCS34725 Color Sensor Code for Arduino
Connect your PC to Arduino and open Arduino IDE. For the very first steps, you can refer to Connecting Windows PC with Arduino tutorial. Get the .ino code from my download area with the following link:
Add the Adafruit_TCS34725-master.zip library in your Arduino IDE (if you need help in this, please refer to my Install Arduino Libraries: methods to add libraries with Arduino IDE). Open the “.ino” file in your Arduino IDE.
Please find below a brief code description.
TCS34725 Code Explaination
In the beginning, we include two libraries:
#include <Wire.h>
#include "Adafruit_TCS34725.h"
int led = 5;
We start the serial monitor at the baud rate of 9600. The following “IF” statement checks and warns whether the connections are right or not. If that condition gives value one, this means that connections are correct. Otherwise, please recheck your wiring.
void setup(void) {
  Serial.begin(9600);

  pinMode (led, OUTPUT);
  if (tcs.begin()) {
    Serial.println("Found sensor");
  } else {
    Serial.println("No TCS34725 found ... check your connections");
    while (1);
  }
}
Now, in the loop section, the following function detects RGB values. Then we print these values on the screen of the serial monitor.
void loop(void) {
  uint16_t r, g, b, c;
  tcs.getRawData(&r, &g, &b, &c);
  Serial.print("Red: "); Serial.print(r, DEC); Serial.print(" ");
  Serial.print("Green: "); Serial.print(g, DEC); Serial.print(" ");
  Serial.print("Blue: "); Serial.print(b, DEC); Serial.print(" ");
  Serial.print("Color: "); Serial.print(c, DEC); Serial.print(" ");
  Serial.println(" ");
analogWrite (led, c);
  delay(100);
}
Determining the Color from RGB values
Every color has a distinct RGB value. From these values, you can judge any color. You can find easily on internet matrices showing the RGB values for every color. We can also find out the RGB value and code it.
For example, let’s suppose that we have a scenario whit two papers: one looks like red and the other one looks like green. We want that whenever the green color is detected, the door should open. And for the red color, the door must remain closed. If the color of paper doesn’t match the standard values of RGB, we can still note the range of RGB values and, upon those values, red-colored paper and green color paper can be differentiated. Hence the reliance on standard values is not a must. We can also read values with the sensor, note them down, and programme according to real-time samples.
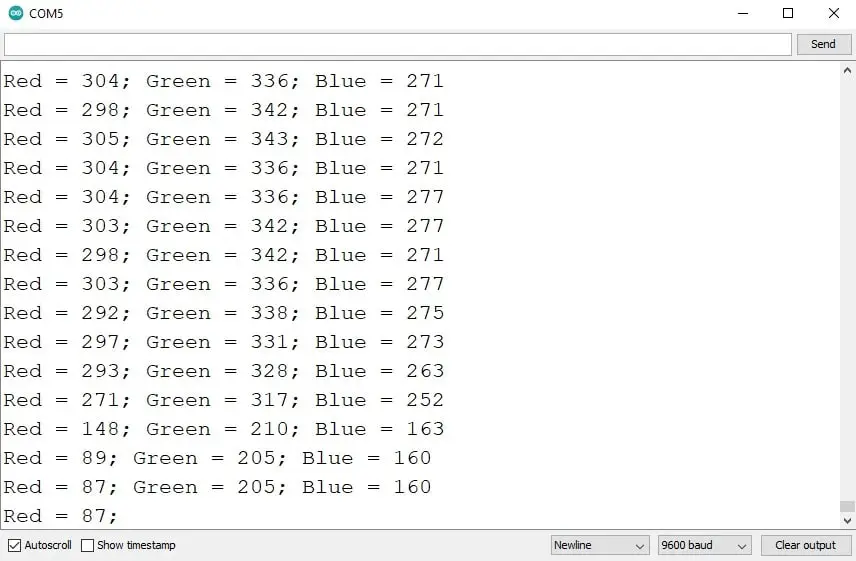
Result
As a result, the serial monitor will show the measured color:
Enjoy!
Please find more tutorials on Arduino in peppe8o Arduino archives.
Umar Jamil
For any queries and help for work, please contact me at:
Whatsapp: +92-346-661-7017
Email: umarjamil0007@gmail.com

I'm an Electronic Engineer, well-skilled to solve the issues of hardware and software. I do have laboratory which contains unlimited sensors and modules for testing the working. Also, I am experienced in Arduino programming, Android mobile application, microcontroller programming, IOTs and embedded projects. I provide services to control, realize the sensor data in the Mobile Application. For any queries and help for work Contact: Whatsapp:+92-346-661-7017 Email: umarjamil0007@gmail.com
![]()


For example, let’s suppose that we have a scenario whit two papers: one looks like red and the other one looks like green. We want that whenever the green color is detected, the door should open. And for the red color, the door must remain closed. If the color of paper doesn’t match the standard values of RGB, we can still note the range of RGB values and, upon those values, red-colored paper and green color paper can be differentiated. Hence the reliance on standard values is not a must. We can also read values with the sensor, note them down, and programme according to real-time samples.
hello im new to arduino and i don´t know how to write the above example it is exactly what i need for my project. i need the arduino to react to the switch of red to green. i thought it might work with an if statement for example if (red => green) {
do a function
}
can u maybe help me ?
yes it can be made by just getting the range of the sensor. And based on the range if conditions can be created. Make sure else condition is also implemented otherwise the situation will not return to normal.
Hi!
If I use your circuit and skecht I only get nubers between 3 and about 30 on the serial monitor.
Its in correct tendence but much too low numbers. If I place red I get red to 25-30 … but NEVER more.
I already tested several sensors… same problem.
can u maybe help me ?
sure, I can help.
It looks like the issue is with the voltage input, there is a potentiometer on the colour sensor rotating it. It will change the value of the sensors.
Sorry, but WHERE on a TCS34725 can you see a potentiometer?
Website only for picture.
https://www.robotistan.com/cjmcu-tcs34725-color-sensor-module
Normally this module comes with a potentiometer for adjustment of the colour intensity while this is not. With which microcontroller you are using the sensor? The same Arduino Uno, then it should work the same as in this tutorial. If you are using some other controller like ESP32, they have different results.