
Last Updated on 2nd September 2023 by peppe8o
This tutorial will show you how to connect the Raspberry PI Pico with batteries, focusing on the related requirements.
When the RPI Pico runs portable projects (without a power plug), you may need a way to power your microcontroller safely. In these cases, knowing how to power the Raspberry PI Pico with batteries is a common need.
Before starting with the practical part, we need to get an overview on battery standards, on the different connections, and on the Raspberry PI Pico power input.
Battery Types
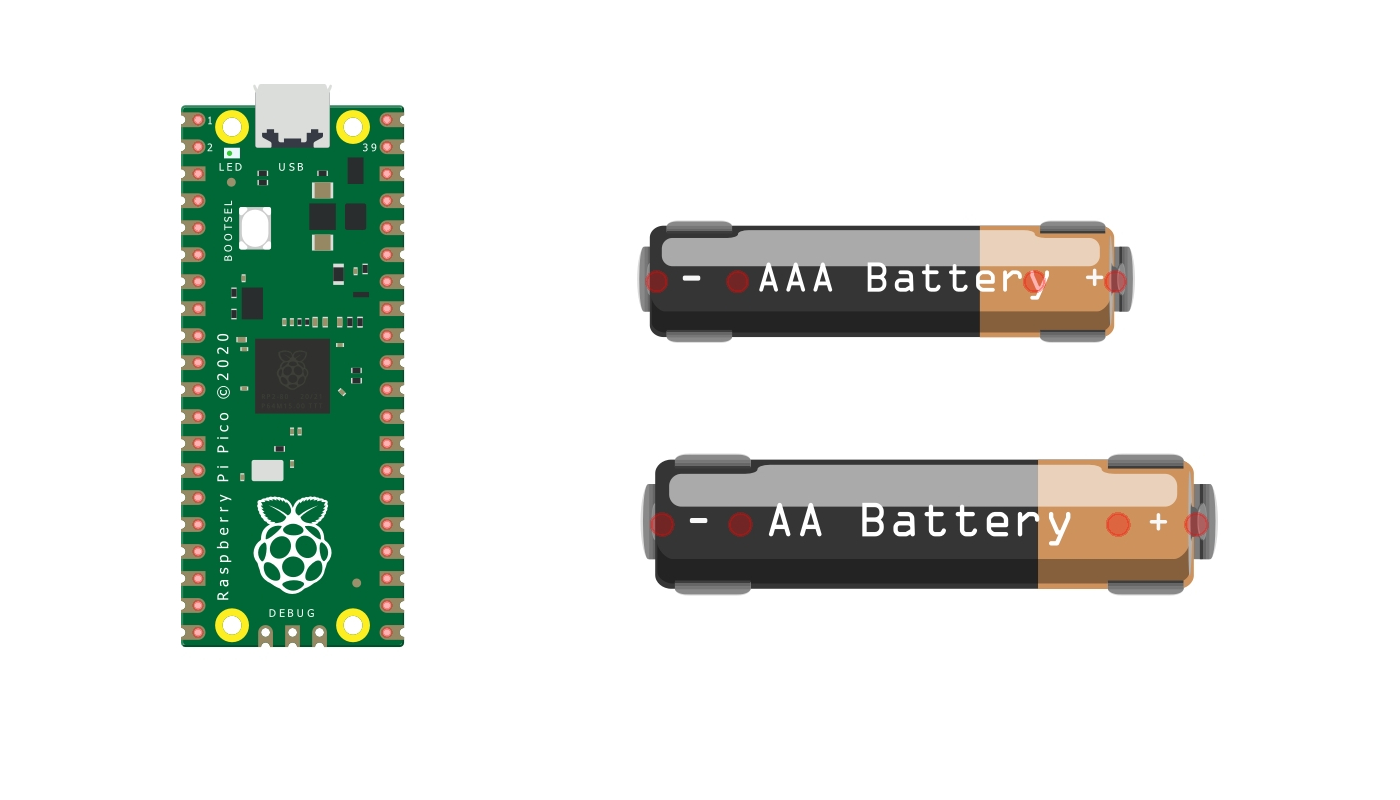
For years there have been many kinds of batteries on the market, as the application fields had different requirements in terms of size, capacity and so on. Today, the most widespread battery kinds are the AA and AAA.
The AA battery (or double-A battery) is referred to by many people as “the standard-size” single-cell battery, even if this is only one of the different standards. It is the most common format and measures 49.2–50.5 mm (1.94–1.99 in) in length, including the button terminal—and 13.5–14.5 mm (0.53–0.57 in) in diameter (ref. https://en.wikipedia.org/wiki/AA_battery). Usually, it is capable to provide 1,2-1,5 V of output voltage, even though there are some models capable of higher voltage.
The AAA battery (or triple-A battery) is another standard-size dry-cell battery. These batteries are commonly used in low-drain portable electronic devices like remotes. They measure 10.5 mm (0.41 in) in diameter and 44.5 mm (1.75 in) in length, including the positive terminal button (ref. https://en.wikipedia.org/wiki/AAA_battery). Also these batteries are capable to provide 1,2-1,5 V of output voltage, and also for these there are some models capable of higher voltage.
The main difference between the 2 battery models is, besides the size, the capacity they can provide. A good comparison table is available at https://www.batteryequivalents.com/aa-vs-aaa-battery.html where comparing the same chemistry and taking as an example the Alkaline, a typical AA battery can provide between 1800-2700 mAh, while a typical AAA battery is referred to stay between 850-1200 mAh. As the mAh is a measure to identify how long the battery will be able to provide current to your circuit, this means that the AA model will last longer. Of course, all these assumptions strongly depend on the producer and can vary between different battery marks.
There are other size standards that will not be referred to in this tutorial, but in case of curiosity, you can check the different sizes at https://en.wikipedia.org/wiki/List_of_battery_sizes.
Connecting Batteries Together
Batteries can be connected in 2 different ways, depending on the need of your circuit.
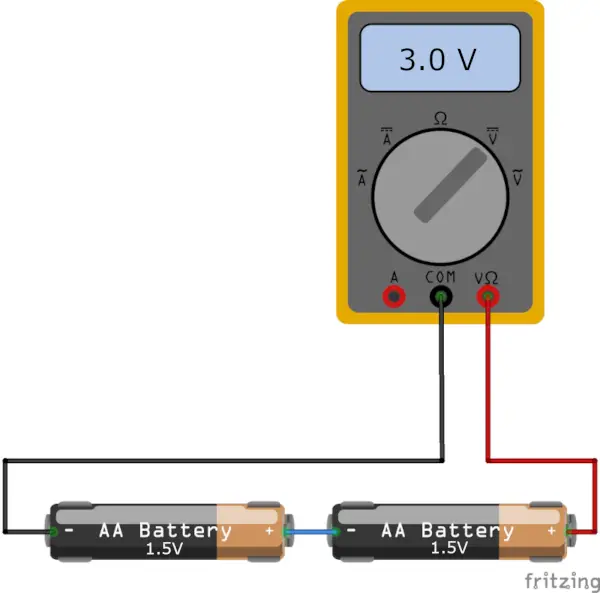
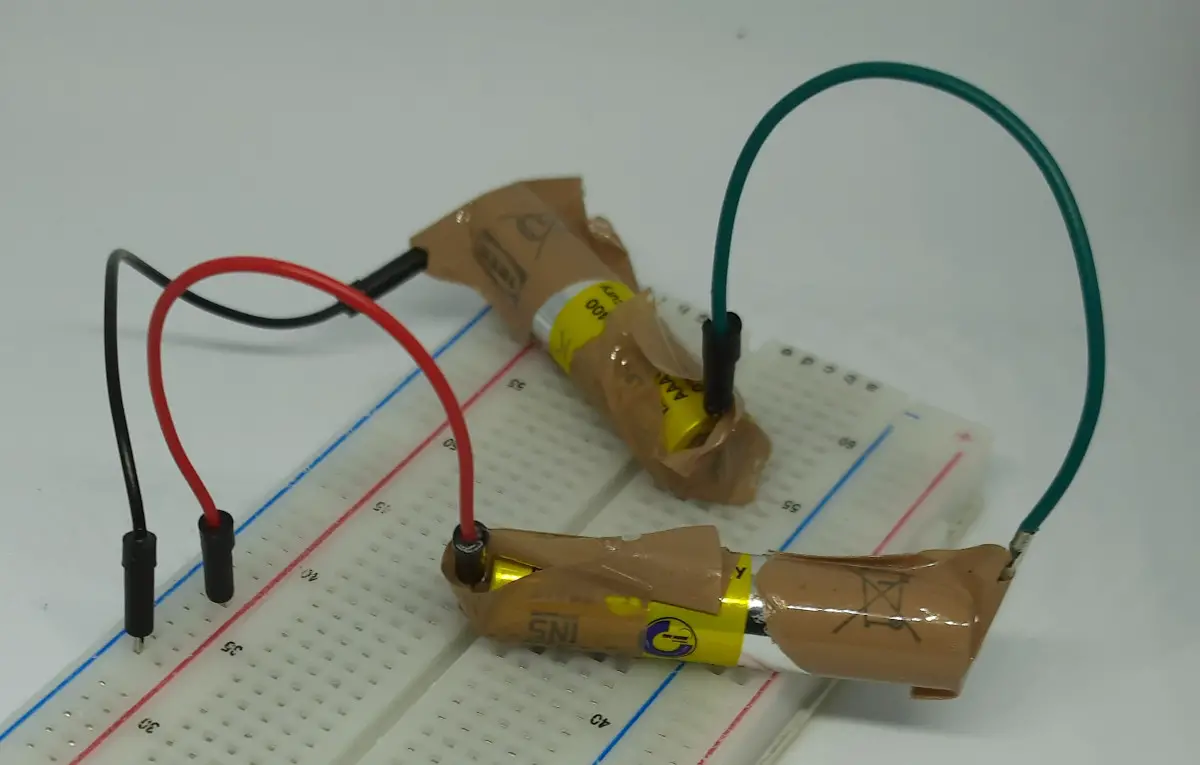
The first connection way is the serial connection: in this configuration, the positive pole of a battery is connected with the negative one of the following. This creates a battery series which produces a resulting voltage given by the sum of the batteries composing the series, as shown in the following picture:
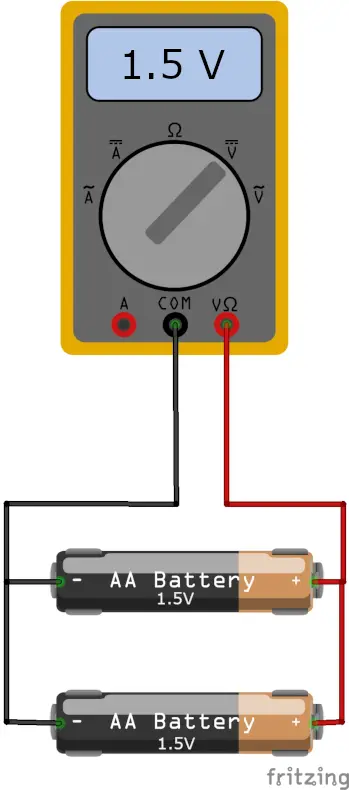
The parallel connection: in this configuration, where all the batteries should have the same voltage, the terminations with the same pole are connected together. The result is a battery assembly providing the same voltage capacity as the single batteries, but with an increased capacity of energy provision. This means that this configuration will give you a battery pack lasting more time compared with a single battery:
Of course, the picture refers to AA batteries, but the concept is the same also with other battery models.
Raspberry PI Pico Power Circuit
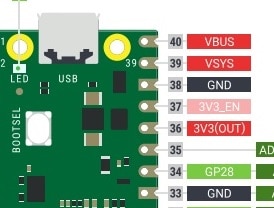
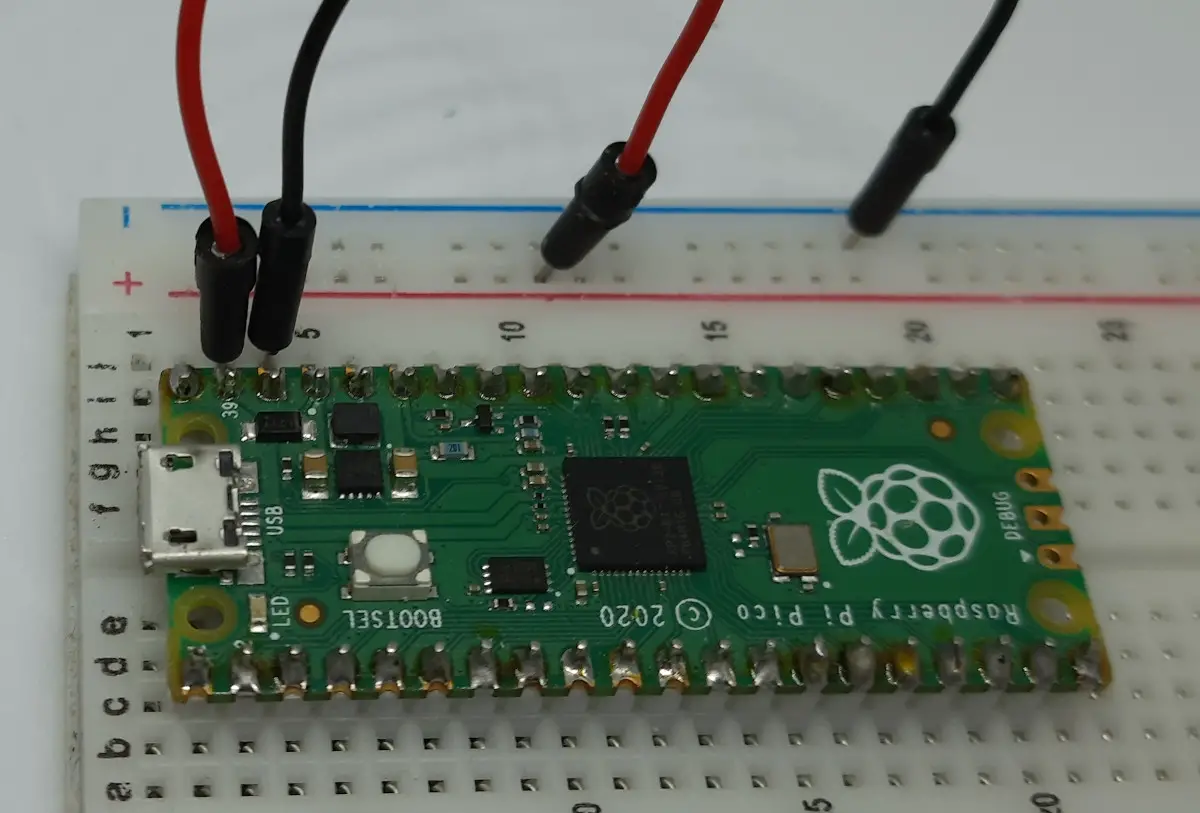
The Raspberry PI Pico (also the newer W) works with a power supply between a minimum of 1,8V and a maximum of 5,5 V (DC, of course). Usually, powering the RPI Pico with a common smartphone charger or a Raspberry PI Power Supply gives our board a 5V current. But we can also use a different power supply like common AA or AAA batteries (or this post would make no sense). You can achieve this goal by using the VSYS and one of the GND PINs from the Raspberry PI Pico ports (you can refer to my Raspberry PI Pico pinout to identify these PINs).
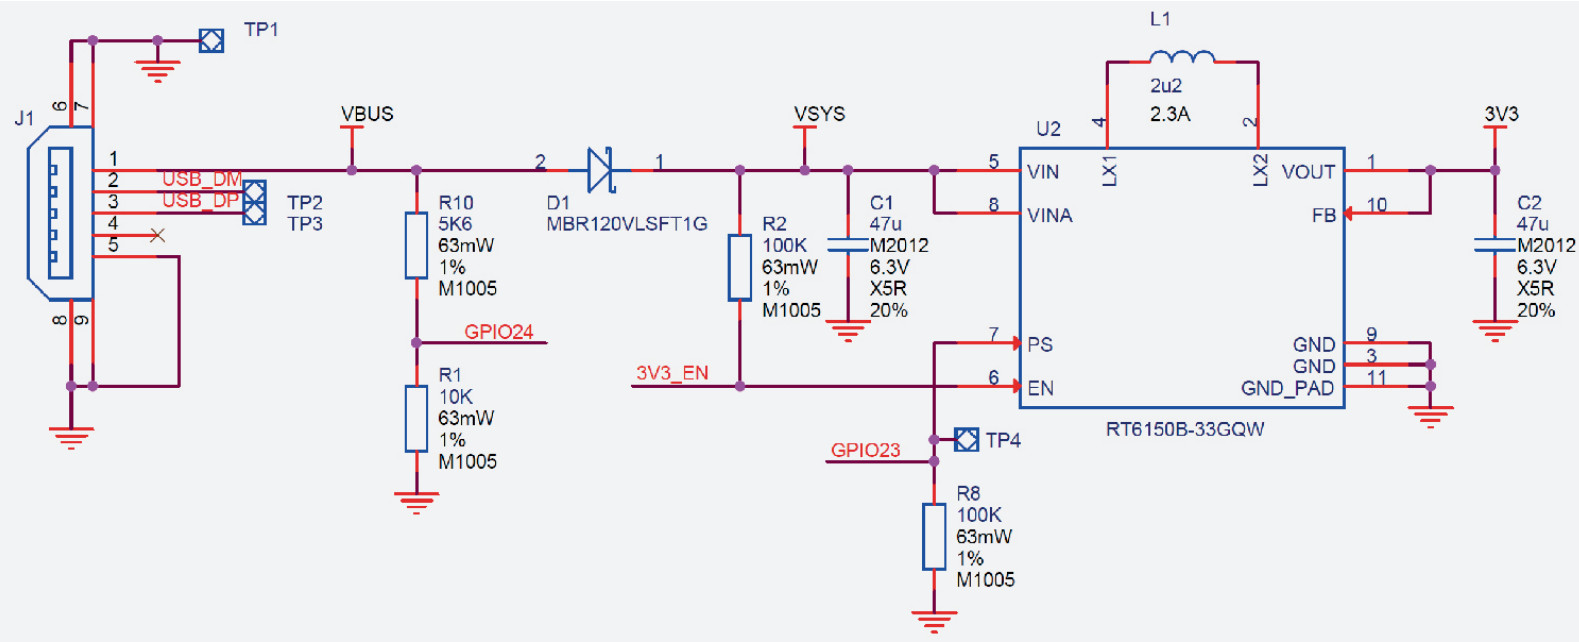
A particular note is that all know that the Raspberry PI Pico outputs provide 3,3V. One could ask how it is possible if we power the board with a lower voltage.
To achieve this goal, the microcontroller uses an SMPS (Switched Mode Power Supply) circuit that manages the input voltage in order to give back a stable output. This circuit, based on the Richtek RT6150 chip, is a buck-boost DC-DC converter capable to operate from input voltages above, below or equal to the output voltage. The RT6150 chip datasheet can be found at richtek.com.
Moreover, the following picture from Raspberry PI Pico datasheet explains the microcontroller power supply chain. This shows how the VBUS, VSYS and 3V3 PINs are connected and protected between themselves by the D1 diode and the RT6150 chip:
Finally, it is important to note that you can also use a “2-sources” power supply, powering both the VBUS (USB) and VSYS (battery input) in a configuration similar to a redundant. For this case, the Raspberry PI Pico datasheet suggests using a Schottky diode in order to make the Pico using the higher from the 2 power lines and preventing reverse current flows between the two sources:

Ref.: Raspberry PI Pico datasheet
What We Need
As usual, I suggest adding from now to your favourite e-commerce shopping cart all the needed hardware, so that at the end you will be able to evaluate overall costs and decide if to continue with the project or remove them from the shopping cart. So, hardware will be only:
- A common computer (maybe with Windows, Linux or Mac). It can also be a Raspberry PI Computer board
- Raspberry PI Pico microcontroller (with a common micro USB cable)
- AA or AAA batteries
- a battery holder (optional, but really comfortable at advanced levels of your projects as it gives stability to the battery connection)
- breadboard (optional)
- dupont wirings
Check hardware prices with the following links:


Step-by-Step Procedure
Prepare the MicroPython code
Before arranging the wiring, it is useful to prepare the Raspberry PI Pico code (I will use a simple MicroPython code that blinks the on-board LED). If you are new to this, you can refer to my First steps with Raspberry PI Pico for Beginners. After uploading the MicroPython firmware, please create a new file with the following code lines:
from machine import Pin, Timer
led = Pin(25, Pin.OUT)
timer = Timer()

def blink(timer):
    led.toggle()

timer.init(freq=2, mode=Timer.PERIODIC, callback=blink)
and dave it as “main.py” in your Raspberry PI Pico storage. This naming is really important as the RPI Pico will run the file saved as “main.py” automatically at boot.
It is also important to note that the new firmware for Raspberry PI Pico W names the on-board LED differently. In this case you must use the following led definition instead of the corresponding one in the previous code:
led = Pin("LED", Pin.OUT)Prepare the wiring
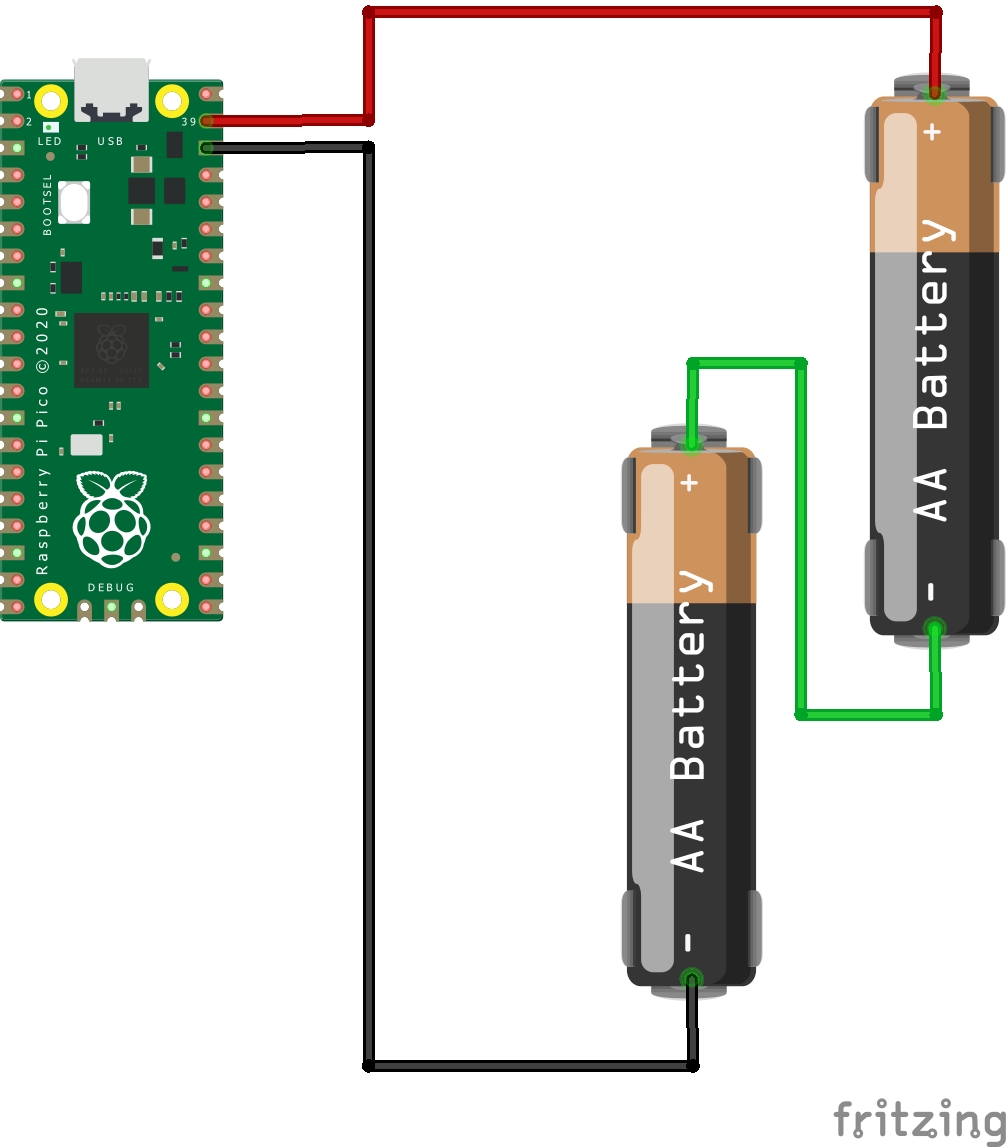
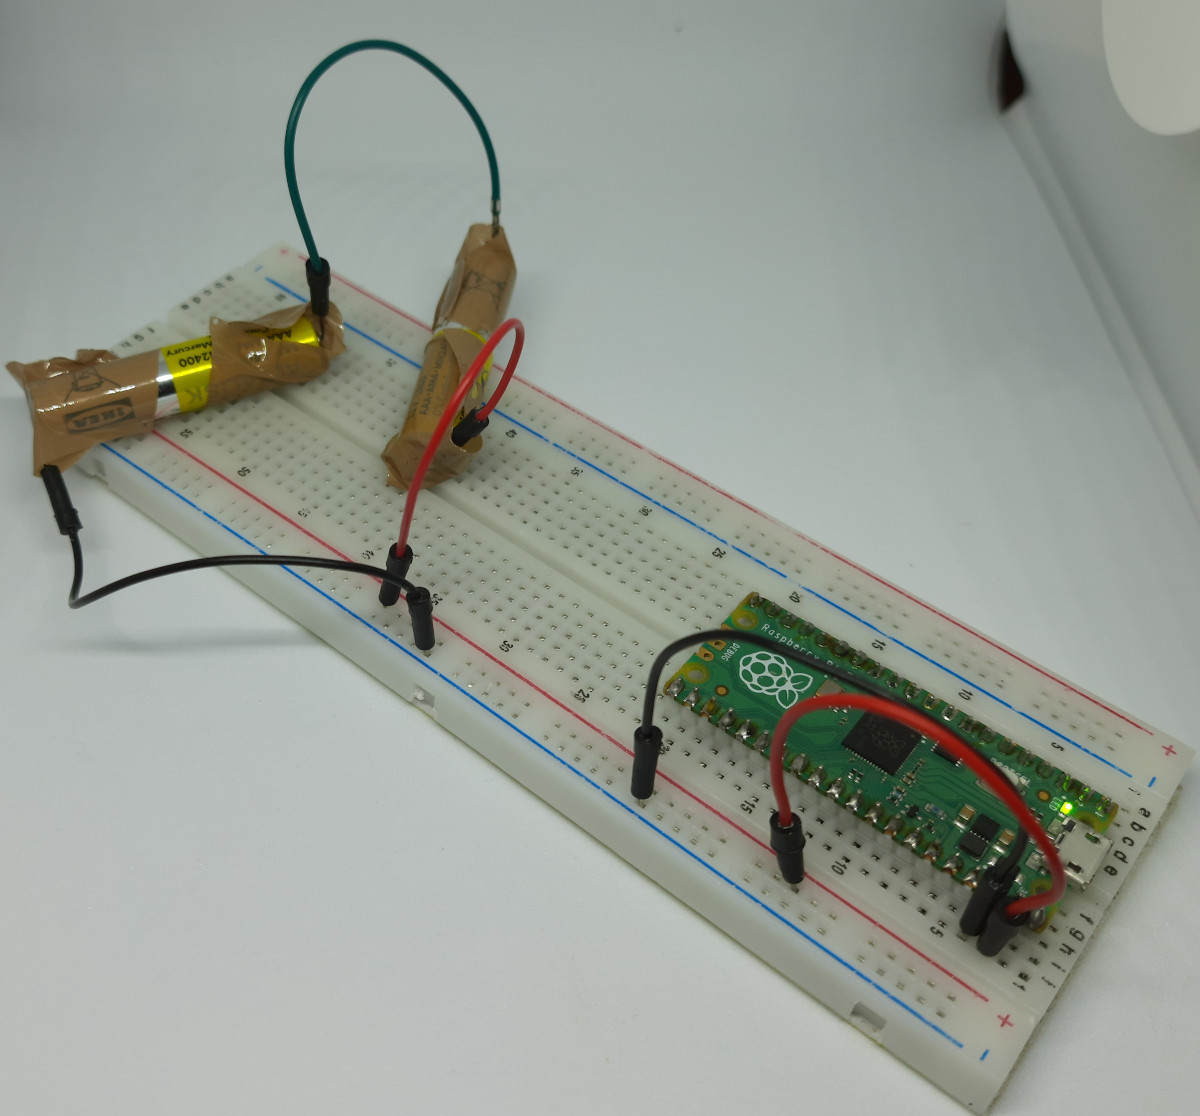
For my test (a simple LED blink program), 2 batteries providing 3,0V (1.5V + 1.5V) will be enough. generally, I suggest to use at least 3 batteries (connected in series) as they will provide a more reliable power to Raspberry PI Pico, able also to power the external devices without activating the RT6150 boost.
You can now arrange the wiring according to the following diagram:
Please find below some pictures from my lab (PS: sorry for the Scotch tape, it’s really temporary…):
Run the test
In this case, no action should be required as the main.py program should start running automatically and the LED should start blinking. If it doesn’t, please double check the wiring.
The result should be similar to the following:
What’s Next
Interested to do more with your Raspberry PI Pico? Try to look at my Raspberry PI Pico tutorials for useful and funny projects!
Enjoy!

Open source and Raspberry PI lover, writes tutorials for beginners since 2019. He's an ICT expert, with a strong experience in supporting medium to big companies and public administrations to manage their ICT infrastructures. He's supporting the Italian public administration in digital transformation projects.
![]()
![]()
![]()
![]()
![]()
![]()
![]()


Another great article. Am I correct in thinking the Pico doesn’t have a low power sleep mode, of the type seen in other microcontrollers? I’m interested in how feasible running the Pico off batteries might be for anything other than a name badge (e.g. a garden humidity IoT device periodically sending data to a server and then sleeping)
Hi Chorlton, thank you for your appreciation.
From MicroPython Docs, I can see that there is an implementation for deepsleep within the machine module, but it seems to be related to ESP32 (https://docs.micropython.org/en/latest/library/machine.html?highlight=deepsleep#machine.deepsleep). I’ve never tested this state, but it would be interesting looking if it works with the Pico
The Pico supports deep sleep but the micropython port doesn’t support it. However, someone created a library: https://github.com/tomjorquera/pico-micropython-lowpower-workaround
Hi Chorlton,
just to give you an update regarding the deepsleep mode… It is available in MicroPython and it works with Raspberry PI Pico W! I think you could find interesting my latest post:
Raspberry PI Pico W Power Consumption (mA) and How to Reduce It
There are not enough “portable” projects for the Pico so this is useful. However date and time will require added sensor as it defaults to origin.