
Last Updated on 2nd September 2023 by peppe8o
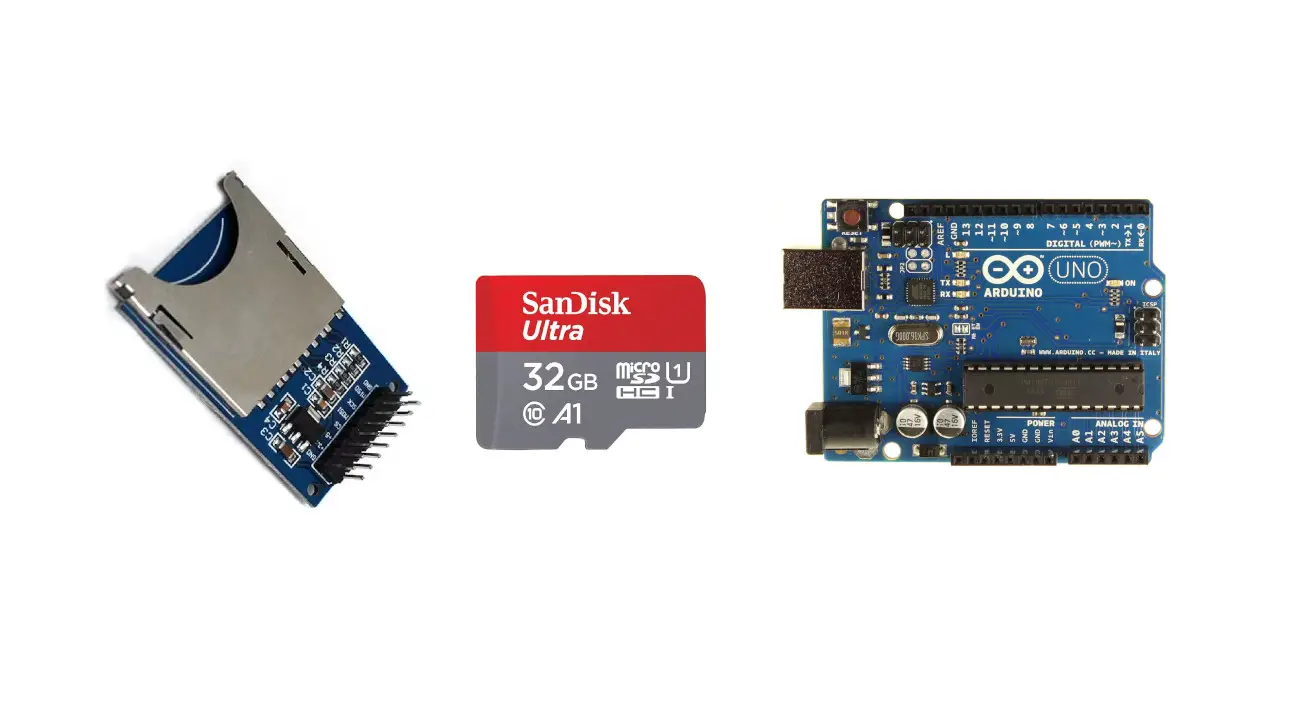
In this tutorial, we will use Arduino, an SD card module and an SD card to store the data. The write and read with the SD are performed. The datalogger memory depends on the SD card memory, considering that the card reader use supports up to 32 GB.
To make a datalogger and keep the text data stored, an SD card is best to use with Arduino Uno. Depending on the SD card size, more data can be stored.
Note: you must format the SD card with FAT32 or FAT16 before using it with the SD card module.
Introduction
The SD card module is used for data storage, which may be text, image or mp3 files. The data that can be stored in the SD card depends on the memory card size: the more the memory size of the SD card, the more data can be stored. In this tutorial, we’ll deal with text data showing how to store and then read them. For storing the data term write and for reading the data term read to use. Data storage has many applications on the whole system, like while sending data to the cloud and connection is lost then data need to store. So that when the connection is restored, data should be shared with the cloud. In that case, the SD card module plays the role of the data logger.
You must correctly reformat the microSD card to FAT16 or FAT32 before placing it in the module and coupling it to the Arduino. Most new SD cards come formatted using the FAT file system Alternatively, an outdated card needs format. In any case, formatting the card before use is a smart idea for avoiding failure.
The SD card module works on the SPI interface which includes the pins: MISO, MOSI, SCK, and a CS signal pin. Using Arduino or other microcontrollers, the data reads from and written to the SD Card by using Arduino programming.
What We Need

As usual, I suggest adding from now to your favourite e-commerce shopping cart all the needed hardware, so that in the end you will be able to evaluate overall costs and decide if continue with the project or remove them from the shopping cart. So, hardware will be only:
Check hardware prices with the following links:


Step-by-Step Procedure
Wiring Diagram of SD card with Arduino
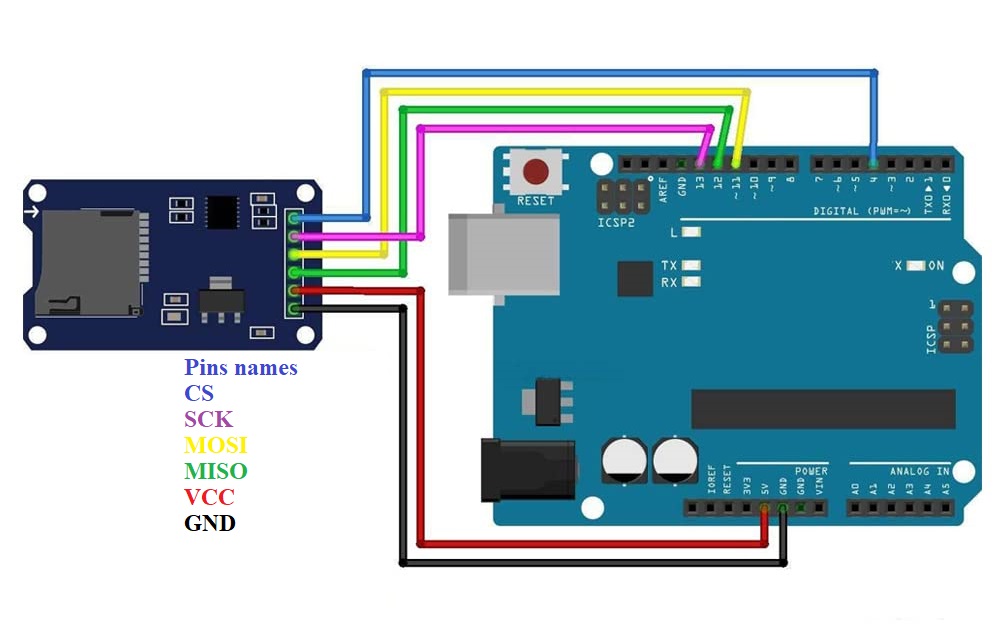
The wiring should be done as given in the diagram. SD card module can work on 5 and 3.3V so any of the power can be used. Here is the text explanation for the wiring:
- VCC: +5V or 3.3V
- GND: GND
- SCK: Pin 13
- CS: Pin 4
- MOSI: Pin 11
- MISO: PIn 12
Get the code and Library for the SD card with Arduino
Connect your PC to Arduino and open Arduino IDE. For the very first steps, you can refer to Connecting Windows PC with Arduino tutorial. You can get the .ino code and libraries from my download area with the following link:
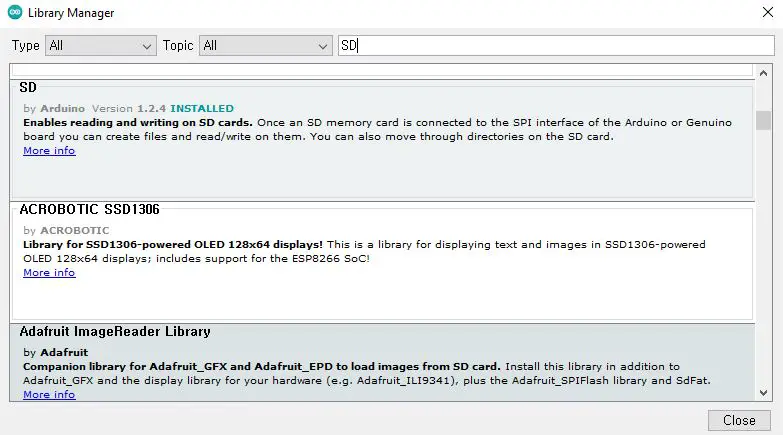
You also need to install the SD library, according to my Install Arduino Libraries: methods to add libraries with Arduino IDE tutorial:
Code Explanation
Section 1: In this section, the SD card library is added, included with the chip select pin then inheritance for the SD card is made with the name of the root.
#include <SD.h>
#define CS_PIN 4
File root;
Section 2: Serial monitor is started at a baud rate of 115200. Then SD card is initialized from pin 4 of the SD card module. If an SD card (memory card) is available and formatted in FAT16 or FAT32 then it starts working. Otherwise, an initialization error raises from the serial monitor:
void setup() {
  Serial.begin(115200);

  Serial.print("Initializing SD card... ");

  if (!SD.begin(CS_PIN)) {
    Serial.println("Card initialization failed!");
    while (true);
  }
  Serial.println("initialization done.");
The file write example creates a new file named “Peppe8o.txt” and stores in it the 2 following text lines: the text “Hello, SD card”, followed by “Card is opened by Peppe80”. Then, file is closed:
  // Example of writing file from the card:
  File myFile = SD.open("Peppe8o.txt", FILE_WRITE);
  myFile.println("Hello, SD Card!");
  myFile.println("Card is opened by Peppe80");
  myFile.close();
With the file reading example, we first check if the file exists. In this case, that is surely true as we created it in our previous lines, the data available in that file is read. This data is displayed on the serial monitor.
  // Example of reading file from the card:
  myFile = SD.open("Peppe8o.txt");
  if (myFile) {
    Serial.print("Peppe8o.txt: ");
    while (myFile.available()) {
      Serial.write(myFile.read());
    }
    myFile.close();
  } else {
    Serial.println("error opening Peppe8o.txt!");
  }
}

void loop() {
  // nothing happens after setup finishes.
}
Result
The result shows that the SD card initializes and then it starts working displaying an initialization done message. Then we write some test data (without a serial monitor message), read it from the SD card and display it on the serial monitor:
Initializing SD card... initialization done.

Peppe8o.txt: Hello, SD Card!
Card is opened by Peppe80
What’s Next
Please find more tutorials on Arduino in peppe8o Arduino archives.
Enjoy!
Umar Jamil
For any queries and help with work, please contact me at:
Whatsapp: +92-346-661-7017/ Link
Email: umarjamil0007@gmail.com

I'm an Electronic Engineer, well-skilled to solve the issues of hardware and software. I do have laboratory which contains unlimited sensors and modules for testing the working. Also, I am experienced in Arduino programming, Android mobile application, microcontroller programming, IOTs and embedded projects. I provide services to control, realize the sensor data in the Mobile Application. For any queries and help for work Contact: Whatsapp:+92-346-661-7017 Email: umarjamil0007@gmail.com
![]()


