
Last Updated on 2nd September 2023 by peppe8o
In this tutorial, I’m going to show you how to install SANE in Raspberry PI and get scanner job results from the terminal.
With more and more people going near programming languages, the requirement to get common external devices running from terminal commands can become useful for your personal apps. A case use can include driving a scanner from the terminal console and getting results with a SANE and Raspberry PI.
About SANE
SANE (Scanner Access Now Easy) project aims to make easy interfacing scanners, digital stills, cameras and, generally speaking, any image acquisition device.
It is an application programming interface (API) which standardizes access to any raster image scanner hardware. The SANE API is open source (under GNU General Public License), anyone willing to contribute can give its help as explained in SANE Contributing page. Its code is written for UNIX, but ports to MacOS X, OS/2 and Microsoft Windows are either already done or in progress.
The main benefit of SANE is that your code will not need to use a different class for each imaging device you could use. SANE works as an intermediate framework between your code and external scanners getting a standard way to call you image acquisition. This broad compatibility will make SANE package size quite big (a few hundred MB to download).
A secondary effect of this package is that you can easily get images from a terminal command, without needing any GUI interface.
For this tutorial, I’m going to use a Raspberry PI 3 model A+, connected to my HP Photosmart C4680 multi-function printer. This guide will apply to any Raspberry PI computer board.
What We Need
As usual, I suggest adding from now to your favourite e-commerce shopping cart all the needed hardware, so that at the end you will be able to evaluate overall costs and decide if to continue with the project or remove them from the shopping cart. So, hardware will be only:
- Raspberry PI 3 Model A+ (including proper power supply or using a smartphone micro USB charger with at least 3A) or any Raspberry PI Computer Board with WiFi module
- high speed micro SD card (at least 16 GB, at least class 10)
- a resistor (optional, for the scan-to-email project)
- breadboard (optional, for the scan-to-email project)
- dupont wirings (optional, for the scan-to-email project)
- a LED (optional, for the scan-to-email project)
- 3x Mini Switch Button (optional, for the scan-to-email project)
Step-by-Step Procedure
Prepare Operating System
Start installing your OS. You can use Raspberry PI OS Lite (for a fast, headless operating system) or Raspberry PI OS Desktop (in this case working from its internal terminal). Please note that older Raspberry PI computer boards (like the Raspberry PI Zero W) may run only the 32-bit OS. This tutorial will work both on 32-bit and 64-bit Operating Systems.
Make your OS updated. From the terminal, use the following command:
sudo apt update -y && sudo apt upgrade -yInstall required packages:
sudo apt install sane sane-utilsConnect your Raspberry PI to the scanner USB cable and power this on.
Test Scanner Connection
I will use my HP Photosmart C4680 printer, so the next steps may produce different results depending on your device.
The very first scanner connection test uses sane-find-scanner tool. From terminal:
sudo sane-find-scanner | grep foundIf this finds your scanner, you are a step ahead:
pi@raspberrypi:~ $ sudo sane-find-scanner | grep found
  # No SCSI scanners found. If you expected something different, make sure that
found USB scanner (vendor=0x03f0 [HP], product=0x7411 [Photosmart C4600 series]) at libusb:001:002
An answer like this will tell us that our Raspberry PI can see a scanner connection. Otherwise, please check the USB cable connection and verify that your scanner is powered on. If nothing of these solves, it becomes really hard and it is really hard that SANE can work with your printer.
More lucky people can go ahead with the second test:
sudo scanimage --list-devicesThis checks if the SANE backend can communicate with your scanner. You will probably see already listed your device. In this case, you can go on to the Scan Test paragraph. Otherwise, you will receive a message like the following one:
pi@raspberrypi:~ $ sudo scanimage --list-devices
No scanners were identified. If you were expecting something different,
check that the scanner is plugged in, turned on and detected by the
sane-find-scanner tool (if appropriate). Please read the documentation
which came with this software (README, FAQ, manpages).
This message means that your backend can’t use your scanner. If you have an HP scanner, you can probably solve this with the following package:
sudo apt install hplipThis will setup all required files for your HP devices to work and will get us a more comfortable list result:
pi@raspberrypi:~ $ sudo scanimage --list-devices
device `hpaio:/usb/Photosmart_C4600_series?serial=CN99ING0JD05BQ' is a Hewlett-Packard Photosmart_C4600_series all-in-one
If you have a different scanner, you will need to find a similar package (like hplip) to make things work.
Scan Test
Finally, you can test your scanner. From terminal:
sudo scanimage --format=jpeg --resolution=300 -p > output.jpgWith the file command, we can verify our output properties:
pi@raspberrypi:~ $ file output.jpg
output.jpg: JPEG image data, JFIF standard 1.01, resolution (DPI), density 300x300, segment length 16, baseline, precision 8, 2549x3506, components 3
This command will scan your image creating a jpeg format (–format=jpeg), with a 300 DPI resolution (–resolution=300), showing progress during the scan (-p) and saving it in a file named “output.jpg”.
More options for the scanimage command can be found in its manual. From terminal:
man scanimageEXTRA: Create a Scan-To-Email Device
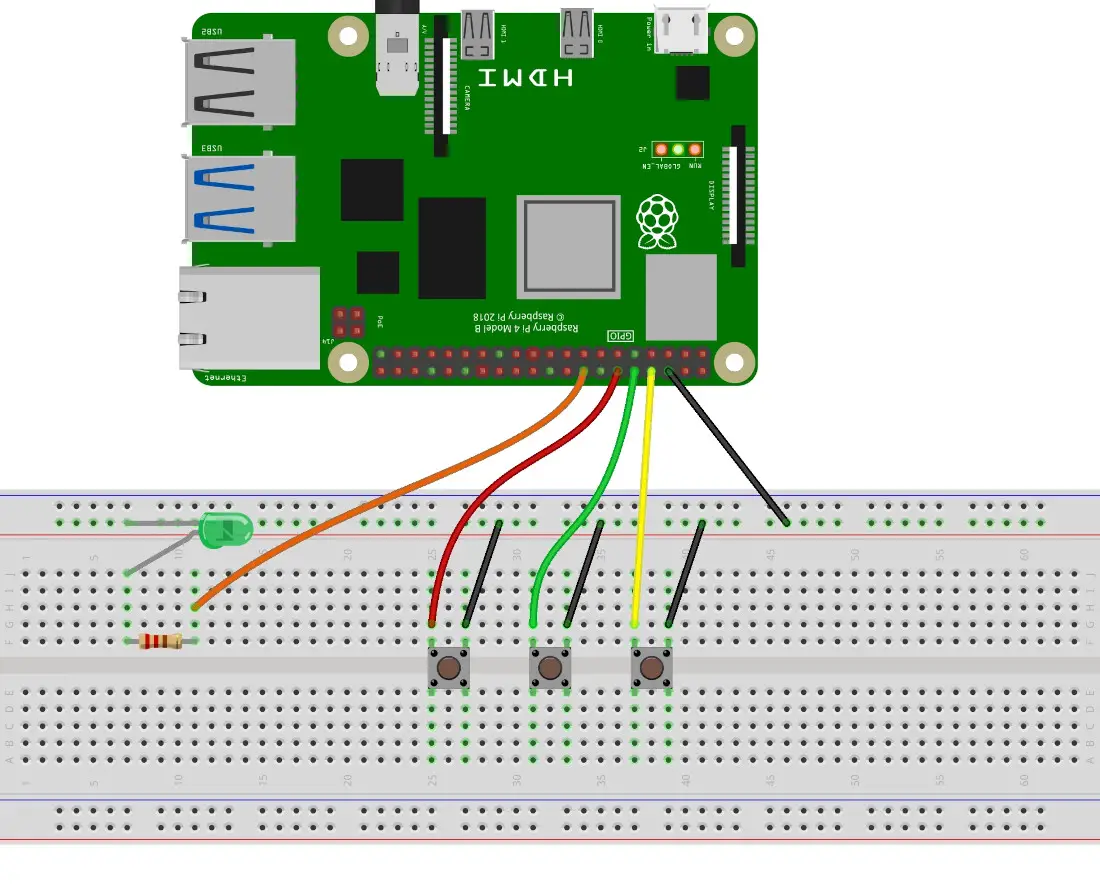
With a brunch of mini switch buttons and a few wires, we can also upgrade our old printer to a fancy Scan-to-email device by using sane and Raspberry PI.
With this example, I’ll show you how to connect the Raspberry PI with 3 buttons, each one controlling one of the following actions:
- Start a scan job (with a long button pressure enabling a pdf scan, while a short pressure will return a jpg scan)
- Send a pre-configured email with scan results
- Shutdown the Raspberry PI
This example makes use of what I’ve already explained in the following Raspberry PI tutorials:
- Send Email from Raspberry PI with Python
- Using mini Switch Button with Raspberry PI and Python
- Shutdown button with Raspberry PI and Python
Of course, also the content already seen in this tutorial is included in the following example, which assumes you have already tested sane and it is working with your scanner.
Wiring diagram for Sane Raspberry PI Scan-to-Email
Please arrange wirings as follows, according to Raspberry PI Pinout (all the newest Raspberry PI models have the same pinout):
Prepare the System
This project will allow you also scanning in pdf. For this purpose, we need to install the img2pdf package:
sudo apt install img2pdf -yPlease create the following 2 folders. Edit the following lines with your user instead of “pi”:
mkdir /home/pi/scan
mkdir /home/pi/oldScan
The “scan” folder will store all the scansions performed. When you will send them as email attachments, the content of this folder will be moved to the “oldScan” folder for archiving. For this folder, you will need to apply your preferred removal actions in order to avoid filling the disk and so resulting in errors (depending on your micro SD card storage.
We also need to allow our user to run the “sudo systemctl poweroff” and “sudo scanimage” commands without the need to manually provide the sudo password from the terminal. We need to know the current user and hostname. You should already know it, otherwise, you can get them with the following 2 commands:
whoami # tells you the current user
hostname # tells you the hostname
Please open the sudoers file:
sudo nano /etc/sudoersAnd append the following two lines at the end, changing the “pi” and “raspberrypi” parts with your user and hostname:
pi raspberrypi =NOPASSWD: /usr/bin/systemctl poweroff
pi raspberrypi =NOPASSWD: /usr/bin/scanimage
Close and save. Now, please reboot the Raspberry PI for these changes to take effect:
sudo reboot nowGet my Python Scripts
Get these scripts in your Raspberry PI with the wget command:
wget https://peppe8o.com/download/python/sane/sane-control.py
wget https://peppe8o.com/download/python/sendemail/sendemail.py
Please, remember to set the sendemail.py variables according to your email credentials and provider, according to the Send Email from Raspberry PI with Python tutorial.
Both Python scripts must stay in the same folder.
Please find below the “sane-control.py” script explanation.
In the beginning, we import the required modules. The RPI.GPIO allows us to use our Raspberry PI PINs from Python. The time and os modules allow us to perform operations like knowing how long a button is pressed and managing files. The subprocess library helps us to use shell commands (like sane scanimage command) from our Python script, waiting for the command to complete its job. The sendemail allows us to send emails with attachments. Finally, the img2pdf allows us to convert a jpg scan into a pdf.
import RPi.GPIO as GPIO
import time, os

from subprocess import Popen, DEVNULL, STDOUT
from sendemail import email_send
import img2pdf
The shutStarted variable tells us if a shutdown process has been started. In this case, this variable allows us to accidentally send repeated shutdown commands to our Raspberry PI, according to what explained in my Shutdown button with Raspberry PI and Python tutorial:
shutStarted = 0We also configure the 2 folders that will store the scanned files and the archive files. Please set them accordingly to the folder previously created:
scanFolder = "/home/pi/scan/"
scanArchive = "/home/pi/oldScan/"
Now, the script configures the hardware PINs connected to the Raspberry PI as in our wiring diagram.
Button PINs are set to input with software pull-up, while the LED PIN is set to output:
shutdownPIN = 18
sendPIN = 15
scanPIN = 14
statusLED = 23

GPIO.setmode(GPIO.BCM)
GPIO.setup(shutdownPIN,GPIO.IN, pull_up_down=GPIO.PUD_UP)
GPIO.setup(sendPIN,GPIO.IN, pull_up_down=GPIO.PUD_UP)
GPIO.setup(scanPIN,GPIO.IN, pull_up_down=GPIO.PUD_UP)
GPIO.setup(statusLED,GPIO.OUT)
The console() custom function simply allows us to execute bash commands from out Python script, waiting for the command to complete before going back to the Python execution:
def console(cmd):
    p = Popen(cmd, shell=True, stdout=DEVNULL, stderr=STDOUT)
    p.wait()
The send() takes care to send the email with attachments (if any) and moving the scan files from their folder to the archive one. It starts setting the LED to notify the user that a job is going to be executed. All the print statements in this script are kept only for debugging purposes.
def send():
  GPIO.output(statusLED, 0)
  print("Sending email")
Then, the function sets the recipient and sender email addresses, together with initializing the variables required to send the email. Please change the recipient address with the email where you want to receive the scanned files and the sender email with the one coming from your service provider:
  recipients = []
  recipients.append("recipient@example.com")
  sender = "PI Scanner <your_email@gmail.com>"
  subject = "Scanned Docs"
  attachments = []
  body=""
Now, we look if there are any scanned files in our folder. If no files are found, then an empty email is set, warning the user that no files were found:
  if len(os.listdir(scanFolder)) == 0:
    print("No files found, sending empty email")
    body="No scans available"
On the other hand, if it finds any files (at least one), it prepares the email body and attaches the files:
  else:
    print("Files found")
    body="Plase find attached the scanned files"
    for root, dirs, files in os.walk(scanFolder):
      for file in files:
        print("Attaching "+file)
        attachments.append(os.path.join(root, file))
The following line performs the email shipment:
  email_send(recipients, subject, body, sender, attachments)
  print("Email sent")
Finally, it moves the files from the scan Folder to the archive folder and sets the LED to the available status:
  if len(os.listdir(scanFolder)) > 0:
    for root, dirs, files in os.walk(scanFolder):
      for file in files:
        print("Archiving "+scanFolder+file+" to "+scanArchive+file)
        os.rename(scanFolder+file,scanArchive+file)
  GPIO.output(statusLED, 1)
The scan() custom function acquires files in “jpg” format (so, as pictures).
It starts by setting the LED off, to notify that the task is running:
def scan():
  GPIO.output(statusLED, 0)
  print("Scanning...")
For each scanned item, we’ll create a unique filename. To make it unique, we’ll use a timestamp (referring to when the scan has been launched). Our filename will also include a “scan-” prefix and will include the “.jpg” extension:
  timestr = time.strftime("%Y%m%d-%H%M%S")
  filename = scanFolder+"scan-"+timestr+".jpg"
The script now uses the console() function previously defined in order to run the scanimage task for getting to work SANE on Raspberry PI. You can customize the scanimage settings in this line if required:
console("sudo scanimage --format=jpeg --resolution=300 -p > "+filename)Finally, the LED status goes back to available and the function returns the filename as output:
  print("Scanned "+filename)
  GPIO.output(statusLED, 1)
  return filename
The scanPdf() custom function will run an alternative scan task but gives back a pdf file instead of the jpg (we’ll see how to run this later). As in the previous function, this starts by warning the user that a task is in progress and calling the scan() function to provide the jpg file. The function call will return the jpg filename that we save in our jpg_file variable:
def scanPdf():
  GPIO.output(statusLED, 0)
  jpg_file = scan()
At this point, we have the jpg saved in our scan folder and the filename with the full path. Before converting it to pdf, we’ll set the pdf layout to A4 size:
  print("Converting to pdf...")
  a4inpt = (img2pdf.mm_to_pt(210),img2pdf.mm_to_pt(297))
  layout_fun = img2pdf.get_layout_fun(a4inpt)
The new pdf file will keep the same name as the jpg one, except for the file extension that we’ll change from “jpg” to “pdf”:
  pdf_file=jpg_file.replace(".jpg", ".pdf" )
  print(pdf_file)
At this point, we can run the jpg to pdf task by opening the file, converting it and closing the file. Our old “jpg” file is also removed, as we have now the pdf version:
  f = open(pdf_file,"wb")
  f.write(img2pdf.convert(jpg_file,layout_fun=layout_fun))
  f.close()

  os.remove(jpg_file)

  print("Scanned "+pdf_file)
Finally, our LED releases the availability to the user and returns the pdf filename:
  GPIO.output(statusLED, 1)
  return pdf_file
The last custom function, shutdown(), will exactly perform a safe shutdown for our Raspberry PI.
As in previous functions, the LED power off will advise the user that a task is in progress:
def shutdown():
  GPIO.output(statusLED, 0)
  print("Shutting down")
The shutStarted variable will be managed as global, because it gets its value from the main program (outside the custom function):
global shutStartedThe following IF statement will check if a shutdown has been already launched. If not, this will set the shutStarted value to avoid repeated poweroff commands and launches the sudo systemctl poweroff:
  if not(shutStarted):
      shutStarted = 1
      os.system("sudo systemctl poweroff")
We arrive now at the main loop.
The TRY statement will manage, with the final EXCEPT, the exception handling. the WHILE loop repeats all the code lines within it without an end.
The loop starts setting the LED to active so that the user will know when our Sane with Raspberry PI project is ready to get commands without the need to check the terminal output.
try:
  while True:
    GPIO.output(statusLED, 1)
Then we have 3 possible cases, managed from three different IF statements. Please mind that a button pressure connects our reading PIN to the ground, so:
- PIN value = 0 means that the button has been pressed
- PIN value = 1 means that the button is NOT pressed
The first IF statement checks if the scan button has been pressed. This code will manage from a single button 2 different functions:
- if the button stays pressed for less than 1 second, it will perform a jpg scan by using the scan() function previously defined
- if the button stays pressed for more than 1 second, it will perform a pdf scan by using the scanPdf() function previously defined
Counting the time elapsed with the button pressed is just marking the start time, using a “while … pass” that waits until the scan button doesn’t change its state and then marking the end time. The pressure time is just the difference between these 2 timestamps:
    if not(GPIO.input(scanPIN)):
      tStart = time.time()
      while not(GPIO.input(scanPIN)): pass
      tEnd = time.time()
      press_time = tEnd - tStart
      if press_time <= 1:
        scan()
      else:
        scanPdf()
You can use this technique also for the other buttons in order to have 2 functions with a single physical input.
The second IF statement checks if the user pressed the email sending button. As the email sending process has been completely defined with the related function, this goal will be achieved with a single code line now:
    if not(GPIO.input(sendPIN)):
      send()
Similarly, the last IF statement will activate the Raspberry PI shutdown procedure:
    if not(GPIO.input(shutdownPIN)):
      shutdown()
Finally, the user can exit from this program by pressing CTRL+C from the terminal. This interrupt will be handled from the final excerpt lines, which will also manage the PINs status clearing:
except KeyboardInterrupt:
  print("interrupted!")
  GPIO.cleanup()
Running the Sane-Raspberry PI Script
You can run this program to use your SANE and Raspberry PI upgraded scanner from your terminal with the following command:
python3 sane-control.pyI would suggest plugging in the USB and powering on the scanner before running the above command.
If you want to make the program run automatically at boot, you can configure it in your Raspberry PI cron daemon.
Next Steps
Are you interested in more projects with your RPI computer board? Take a look at peppe8o Raspberry PI computer tutorials pages.
Enjoy Sane in your Raspberry PI!

Open source and Raspberry PI lover, writes tutorials for beginners since 2019. He's an ICT expert, with a strong experience in supporting medium to big companies and public administrations to manage their ICT infrastructures. He's supporting the Italian public administration in digital transformation projects.
![]()
![]()
![]()
![]()
![]()
![]()
![]()


Thanks for the great explanation. With the help of ChatGPT, I was able to arrive at the step where a test scan shall be made, using ‘sudo scanimage –format=jpeg –resolution=300 -p > output.jpg’. However, this doesn’t really work out. I own an older i2400 Kodak scanner and do not seem to get any further. The response I am getting is ‘scanimage: sane_start: Error during device I/O’. Whatever I did (also with the help of AI), I couldn’t progress. I have looked up the SANE documentation and didn’t find the i2400 as a supported device. however ‘scanimage -L’ retrieves a result, showing ‘device kodakaio:libusb:001:009′ is a Kodak specified flatbed scanner’. Any further advice?
Hi Artur,
I’m sorry for the late reply. I can’t test your scanner as I don’t have it, but looking on the web it seems that you need to install the Kodak drivers to have your scanner working.
So, the solution should be:
Download the kodak drivers from https://www.kodakalaris.com/en/scanners/i2400-scanner
Extract the driver (e.g., tar -xf *.gz)
Install it (i.e. sudo ./setup)
Also, you may need to link the new driver:
sudo ln -sfr /usr/lib/sane/libsane-kds* /usr/lib/x86_64-linux-gnu/saneSane should work now.
Please let me know if this works