
Last Updated on 2nd September 2023 by peppe8o
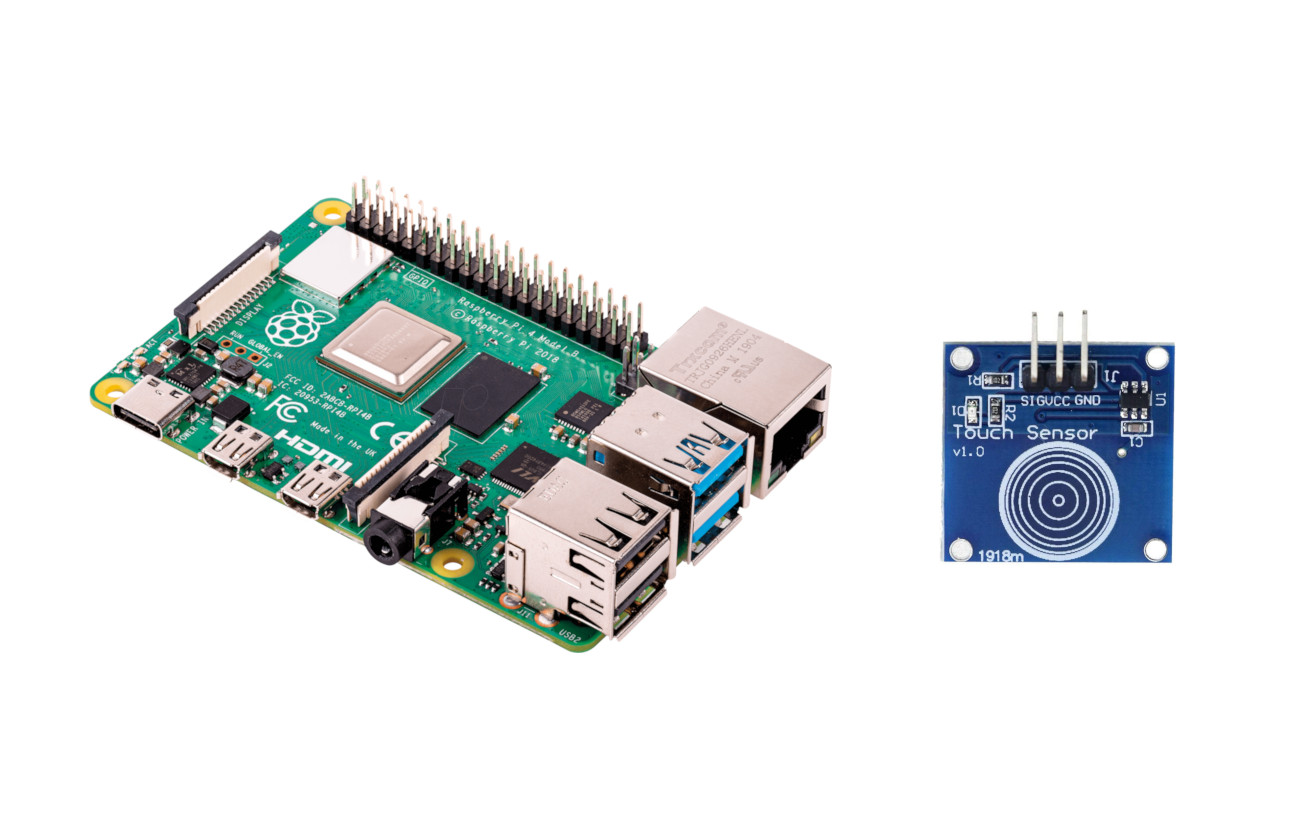
This tutorial will show you how to use a capacitive touch sensor (TTP223) with Raspberry PI and Python.
Capacitive touch sensor (TTP223) and Raspberry PI can keep a touch input in order to make your program run only on user request. Differently from Switch Buttons, they are a bit more expensive, but they assure better reliability and accuracy
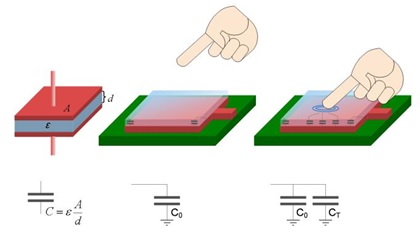
How Capacitive Touch Sensors work
As the touch devices strongly improved from 2000, the first touch screens, that were using resistive technology have been quite completely replaced with capacitive ones. Both touch technologies use a current flowing that is modified by a finger touch, as the finger (like all the parts of the human body, is highly conductive). Please note that the very low amount of current flowing in these devices makes them safe for direct use.
Resistive touch devices use the touching object (the finger) to close a bridge inside its internal circuit. Usually, this happens with mechanical parts moving under pressure. The touch results in an electrical flow that generated a positive result. When it is not pressed, the circuit remains open, so resulting in NO electrical flow:

Capacitive touch devices, on the other hand, don’t include moving parts. They work based on the fact that the human body acts as a capacitor. So, they are still composed of two electrodes: the plates of the capacitor (one of the electrodes) and a second plate represented by two objects, the environment of the sensor electrode (C0) and the other a conductive object like a human finger (CT).
When a conductive object touches the sensor, the circuit will measure will detect a change in the capacitance, converting it into a trigger signal.
A good explanation can be found in this electronicshub.org touch-sensors article.
What We Need
As usual, I suggest adding from now to your favourite e-commerce shopping cart all the needed hardware, so that at the end you will be able to evaluate overall costs and decide if to continue with the project or remove them from the shopping cart. So, hardware will be only:

- Raspberry PI Computer Board (including proper power supply or using a smartphone micro usb charger with at least 3A)
- high speed micro SD card (at least 16 GB, at least class 10)
- TP223 touch sensor
- breadboard (optional)
- dupont wirings
Check hardware prices with the following links:


Step-by-Step Procedure
TTP223 and Raspberry PI Wiring Diagram
Prepare the connections between your Capacitive Touch Sensor (TTP223) and Raspberry PI as shown in the following picture, according to Raspberry PI Pinout (that is the same as Raspberry PI Zero Pinout):
| Raspberry PI PIN | TP223 Touch Sensor PIN |
| GPIO17 | SIG |
| +3,3V (or 5V) | Vcc |
| GND | GND |
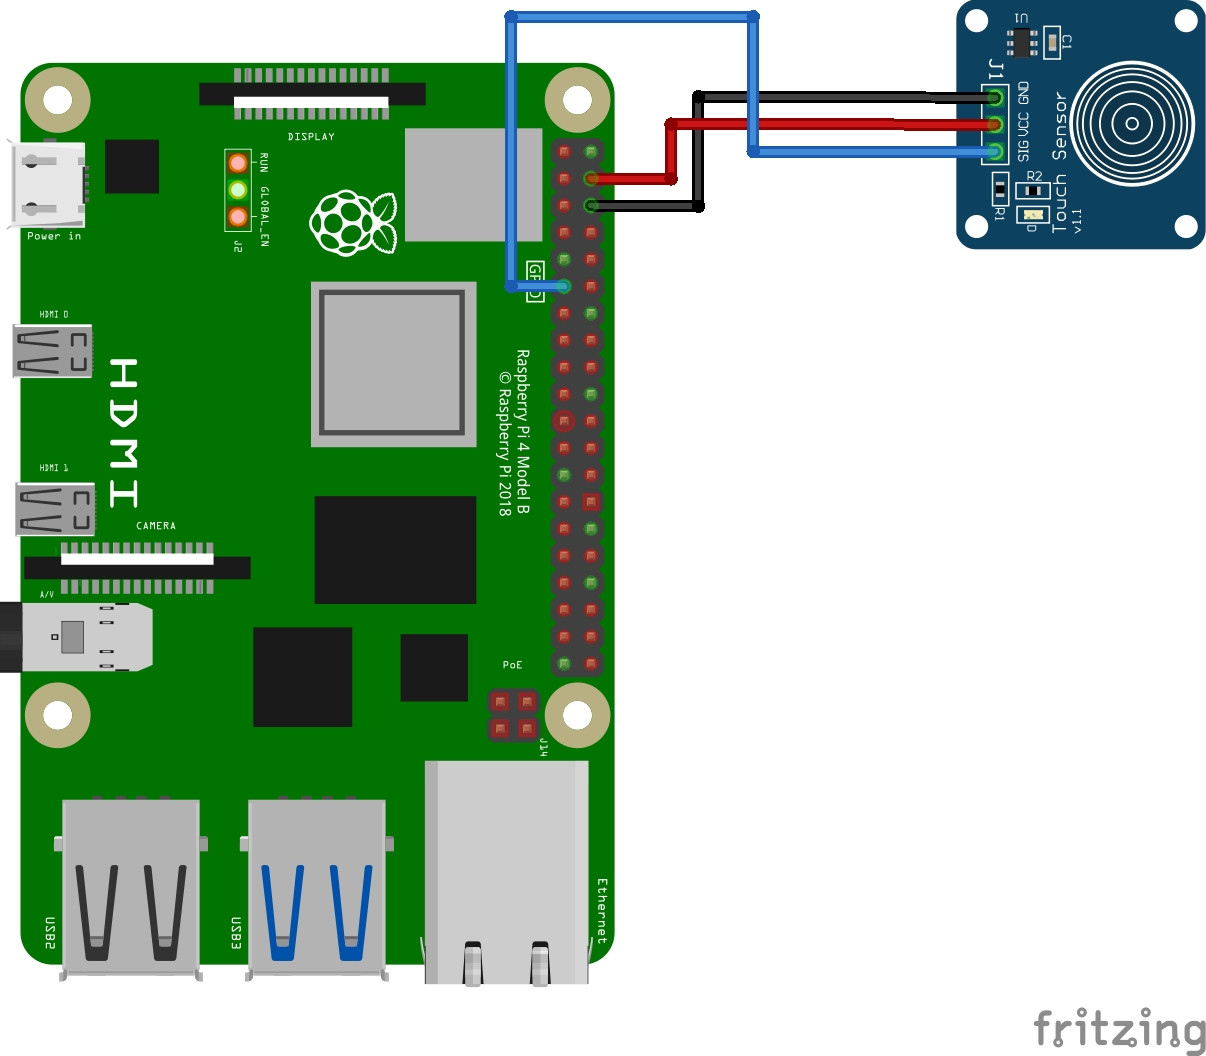
I can’t show “live” pictures of my cabling, as I will use my CrowPi2 board that has built-in wiring, but the wiring process should be simple as only 3 cables are needed.
Prepare Operating System
Start with OS installation. You can install Raspberry PI OS Lite for a headless, fast OS or you can also work with Raspberry PI OS Desktop, in this case using its internal terminal.
Make your OS up-to-date. From the terminal, use the following commands:
sudo apt update -y && sudo apt upgrade -yThe Raspberry PI OS installation should already include the RPI.GPIO package (otherwise, you can install it with the command “sudo apt install python3-rpi.gpio”).
To use the TP223 sensor with Raspberry PI we don’t need specific packages, so we can go on directly with the Python code.
Get my peppe8o-ttp223 Python Script
The Capacitive touch sensor works in a very simple way, as its SIG output will raise to 1 (high) once the sensor detects a touch. On the other hand, it will remain at 0 (low) when not touched,
You can get my test code directly into your Raspberry PI with the following command:
wget https://peppe8o.com/download/python/ttp223/peppe8o-ttp223.pyThe following lines will explain how this code works.
We start, as usual, by importing the required modules
import time
import RPi.GPIO as GPIO
In the following lines, we define the Raspberry PI pin associated with the TP223 SIG and we manage it with a variable. It is a convenient way as in case of the need of changing the RPI pin you will edit it here and all the code will continue to work.
We also set the GPIO mode to BCM (Broadcom naming) and the above mentioned PIN to output:
touch_pin = 17
GPIO.setmode(GPIO.BCM)
GPIO.setup(touch_pin, GPIO.IN, pull_up_down=GPIO.PUD_UP)
Now, I’ll use a custom function. To tell the truth, touch detection is really simple to detect as it matches the GPIO status rising to high. But using a custom function describing what is the status is, in my personal opinion, a stylish way to code as it makes the code really simple to understand.
So, my custom function, named “touch_det()”, uses as input the SIG pin number and returns:
- a high value (“1”, which for python also means “True”) if the sensor detects a touch
- a low value (“0”, which for python also means “False”) if the sensor doesn’t detect a touch
def touch_det(pin):
    touch=GPIO.input(pin)
    return touch
The main loop in this test code will simply check if the sensor detects a touch in the “IF” statement. If this condition is satisfied, it prints on the shell the touch DateTime and a “Touch Detected” warning. A time delay of 0,2 seconds will make the touch warning readable by human eyes, as without it you will read a long number of detection warnings on every touch:
try:
    while True:
        if touch_det(touch_pin): print('['+time.ctime()+'] - '+'Touch Detected')
        time.sleep(0.2)
Finally, the “except” statement will close the script execution on CTRL+C pressing on your keyboard, so that the script ends by cleaning the GPIO status:
except KeyboardInterrupt:
  print('interrupted!')
  GPIO.cleanup()
Run the peppe8o-ttp223.py Python Script
You can execute this script from a terminal with the “python3 peppe8o-ttp223.py” command. It will result in touch warnings only when you will touch the sensor:
pi@raspberrypi:~ $ python3 rpi-pir.py
[Sun Sep  4 11:50:46 2022] - Touch Detected
[Sun Sep  4 11:50:47 2022] - Touch Detected
[Sun Sep  4 11:50:48 2022] - Touch Detected
As said, you can stop the script by pressing CTRL+C.
What’s Next
Interested in more cool projects for your Raspberry PI? Take a look at peppe8o Raspberry PI tutorials.
Enjoy!

Open source and Raspberry PI lover, writes tutorials for beginners since 2019. He's an ICT expert, with a strong experience in supporting medium to big companies and public administrations to manage their ICT infrastructures. He's supporting the Italian public administration in digital transformation projects.
![]()
![]()
![]()
![]()
![]()
![]()
![]()


