
Last Updated on 24th March 2023 by peppe8o
In this tutorial, we will use Force Sensitive Resistor with Arduino Uno to measure pressure and weight. Based on the pressure on the Force Sensitive Resistor, on the serial monitor, we’ll display the pressure values organized for ranges.
Force Sensitive Resistor Introduction
The FSR works on the basis of pressure. When some pressure applies to the sensor, its resistance changes and, based on a resistor voltage divider, we get the voltage across the FSR.
An air gap layer separates two membranes in a force-sensitive resistive. Each membrane has a conducting wire connected to it. One layer contains the conducting ink, while the other one is all metallic.

When no pressure applies, both layers remain separated. On pressing, the conductive path increases, which means that resistance decreases for the current to pass. As we apply pressure to the system, the resistance decreases, resulting in the FSR output being inversely proportional to the pressure coefficient.
Working principle of Force Sensitive Resistor with Arduino
The Force Sensitive Resistor has 2 PINs. We can exchange them without problems as it works as simple resistor with variable values.
The FSR always requires a resistor to create a voltage divider circuit. With the microcontroller, we keep on checking the voltage across the FSR.
Vout= Vin x R res / (Rres + Rfsr)
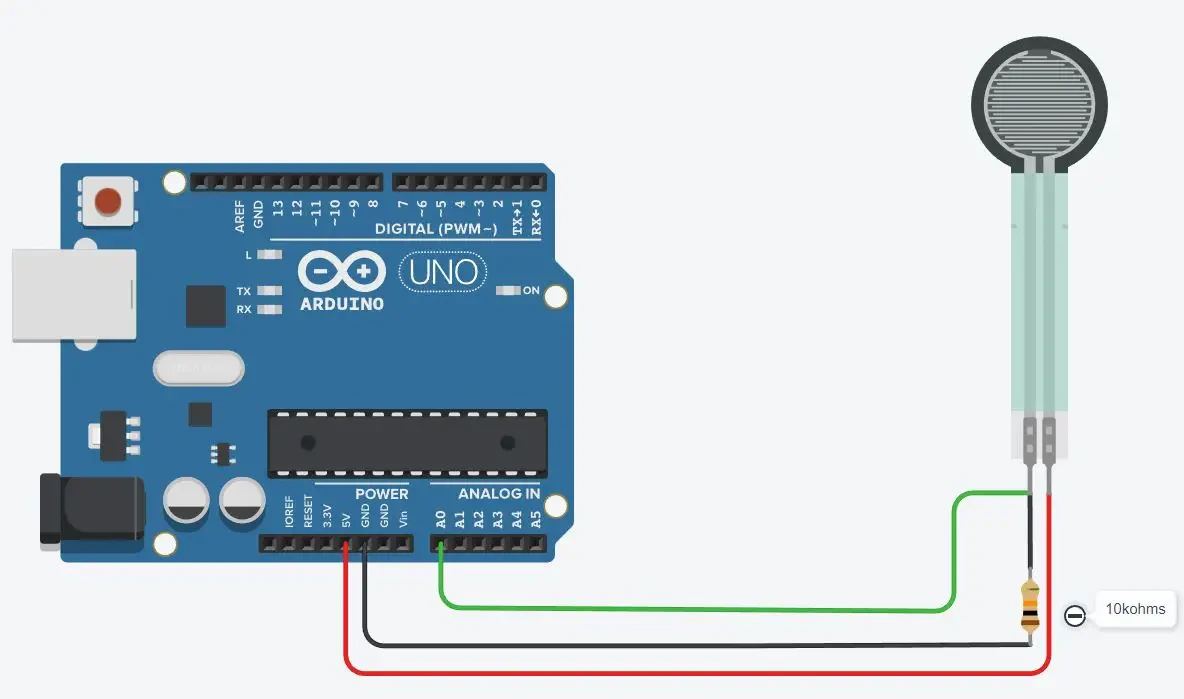
In this tutorial, we are using the Arduino 5V pin for the FSR voltage input, while the resistor is a 10K Ohm.
When a pressure or weight is applied to the FSR, it decreases the resistance, which means that the voltage across the FSR decreases. The analogue pin of the Arduino measures the voltage drop across the FSR.
What We Need

As usual, I suggest adding from now to your favourite e-commerce shopping cart all the needed hardware, so that in the end you will be able to evaluate overall costs and decide if continue with the project or remove them from the shopping cart. So, hardware will be only:
Step-by-Step Procedure
Wiring Diagram of Force Sensitive Resistor with Arduino Uno
Any side of the FSR you take with the red (5V) or black (GND/Analog) wire makes the same.
The FSR contains 2 pins, on which the resistance changes based on the pressure which results in a change in the voltage. The voltage divider circuit is designed to measure the voltage change across the FSR and the resistor.
| Sensor | Arduino |
| Pin 1 | AO |
| Pin 1 | Through resistor 10K-Ohms to the GND |
| Pin 2 | 5V |
Get the code for Force Sensitive Resistor with Arduino
Connect your PC to Arduino and open Arduino IDE. For the very first steps, you can refer to Connecting Windows PC with Arduino tutorial. You can get the .ino code from the download area with the following link:
Code Explanation
Section 1: Variables definition and Setup
In this section, we define the pin for the FSR at pin A0. Then, global variables are defined for the Force Sensitive Resistor reading (fsrVal) and the conversion variable (fsrVoltage) to make it in voltage declaration.
In the setup, the serial monitor sets for a baud rate of 9600.
#define FSR_PIN A0
int fsrVal = 0;
int fsrVoltage = 0;

void setup()
{
  Serial.begin(9600);
}
Section 2: Loop section
This is the section for the loop, in which the Force Sensitive Resistor value is read from the analogue pin A0. We also map the value into a 0-5000 range to have a more precise value:
void loop()
{
  fsrVal = analogRead(FSR_PIN);
  fsrVoltage = map(fsrVal, 0, 1023, 0, 5000);
We start printing on serial monitor the read values and the converted range:
Serial.print("SSR: ");
Serial.print(fsrVal);
Serial.print(", ");
Serial.print(fsrVoltage);
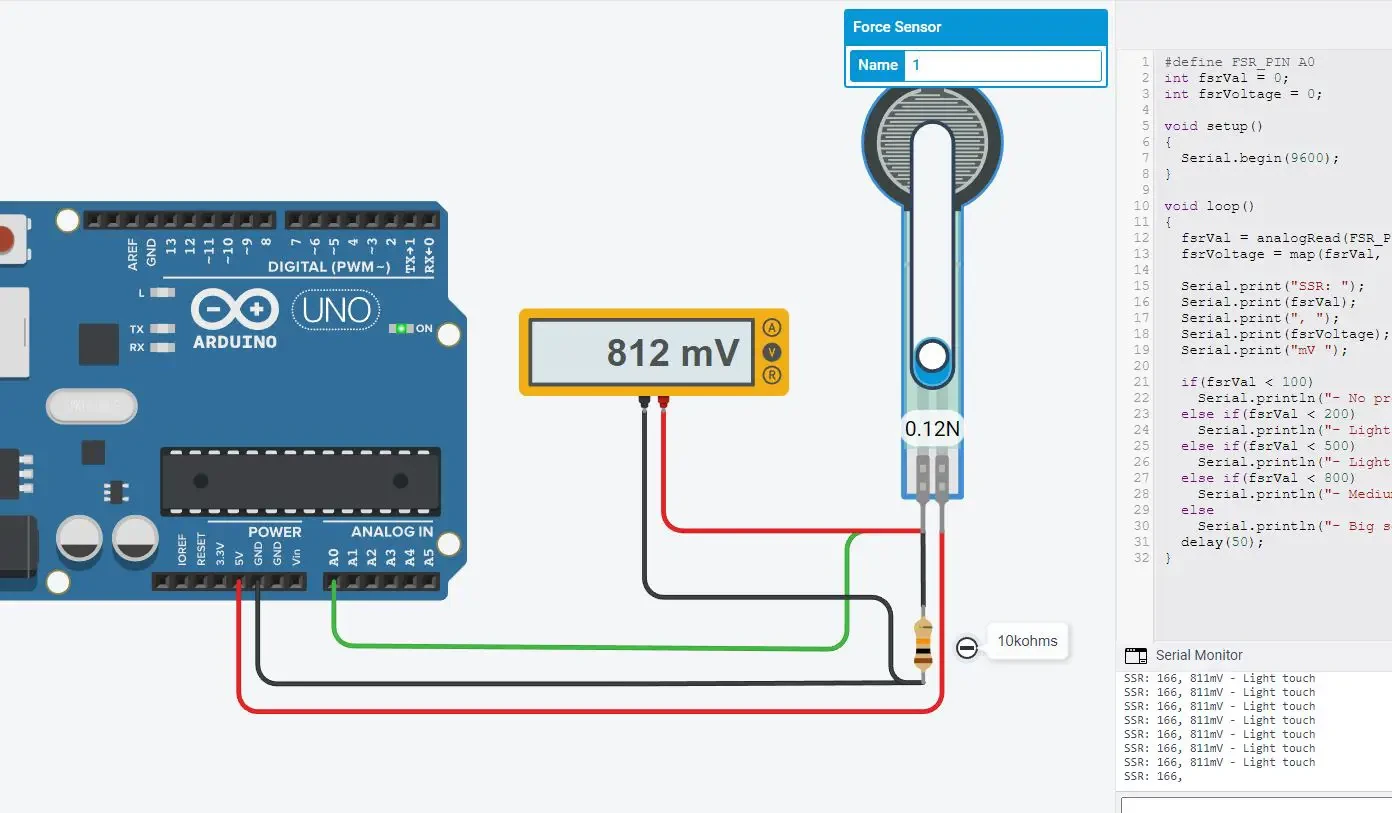
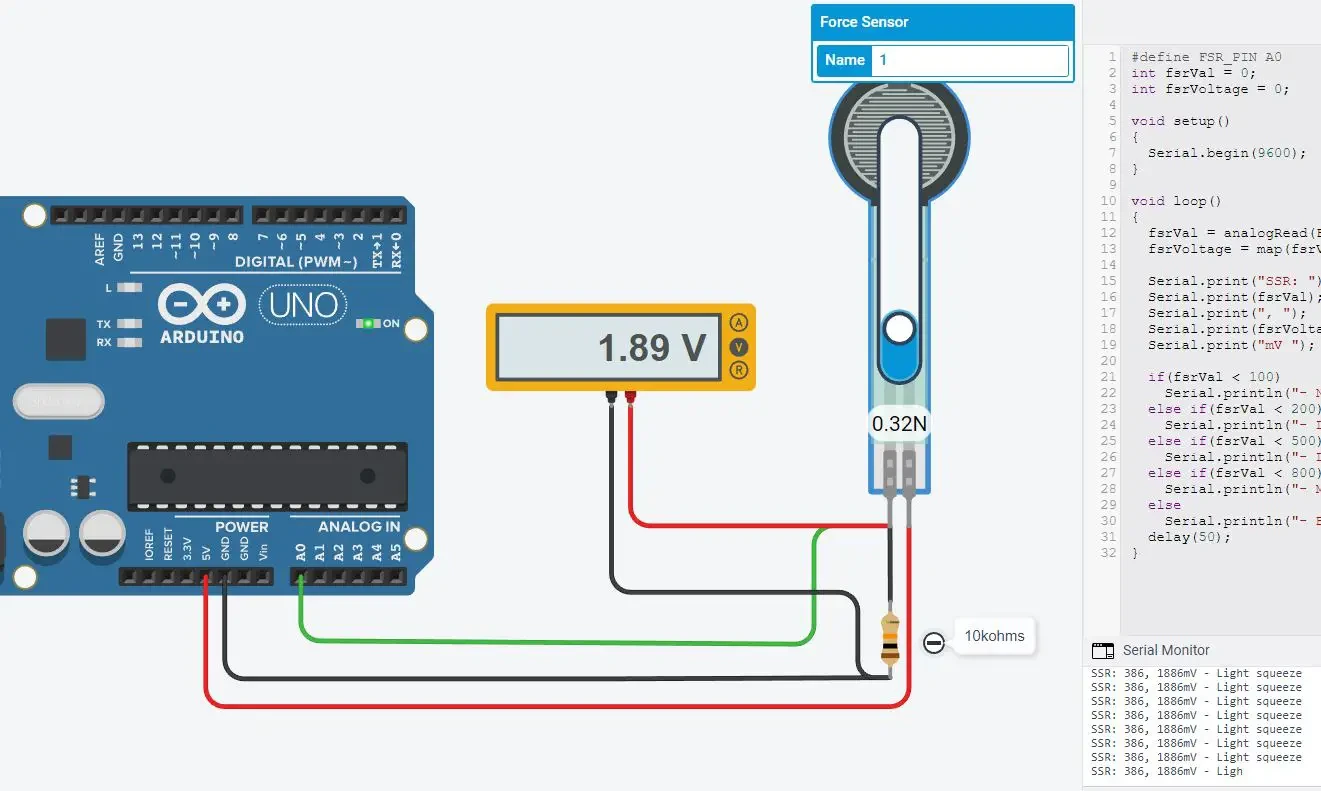
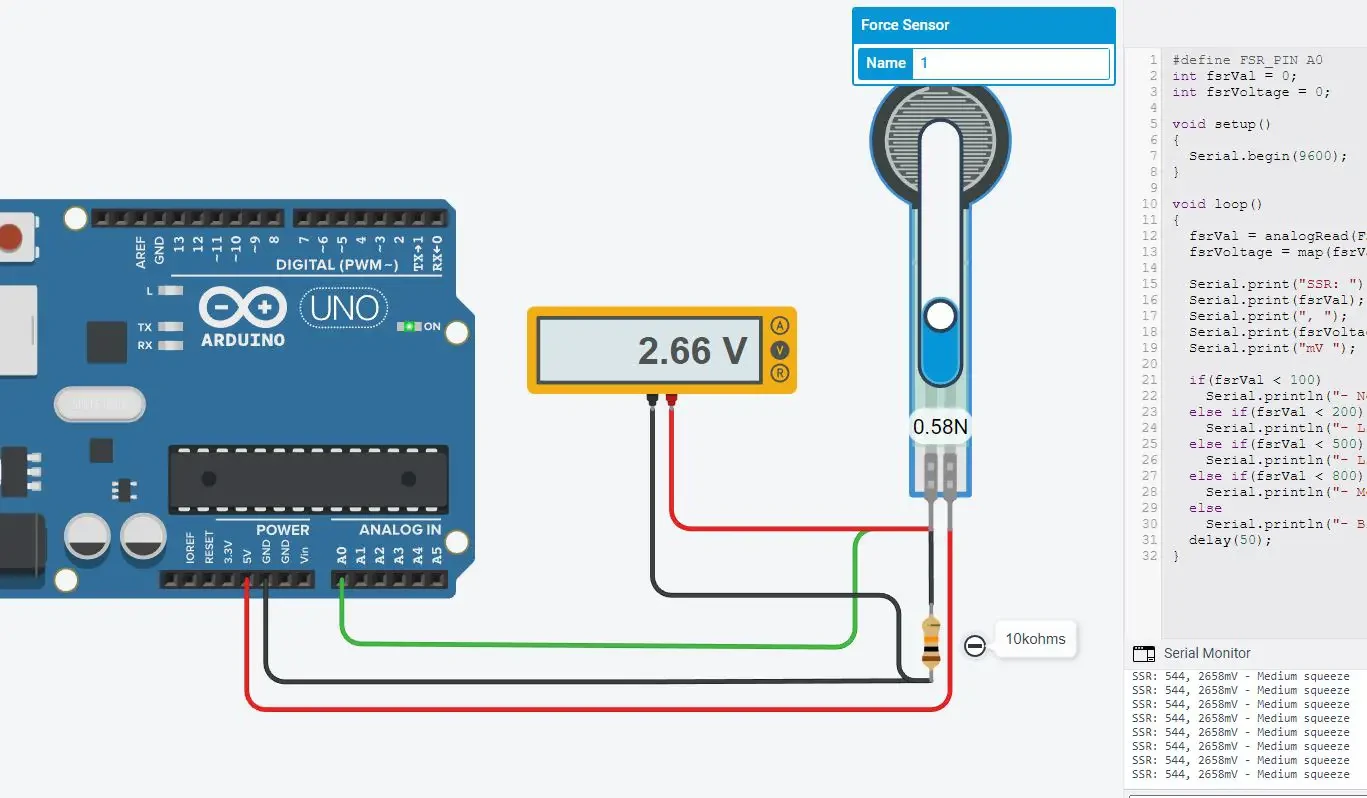
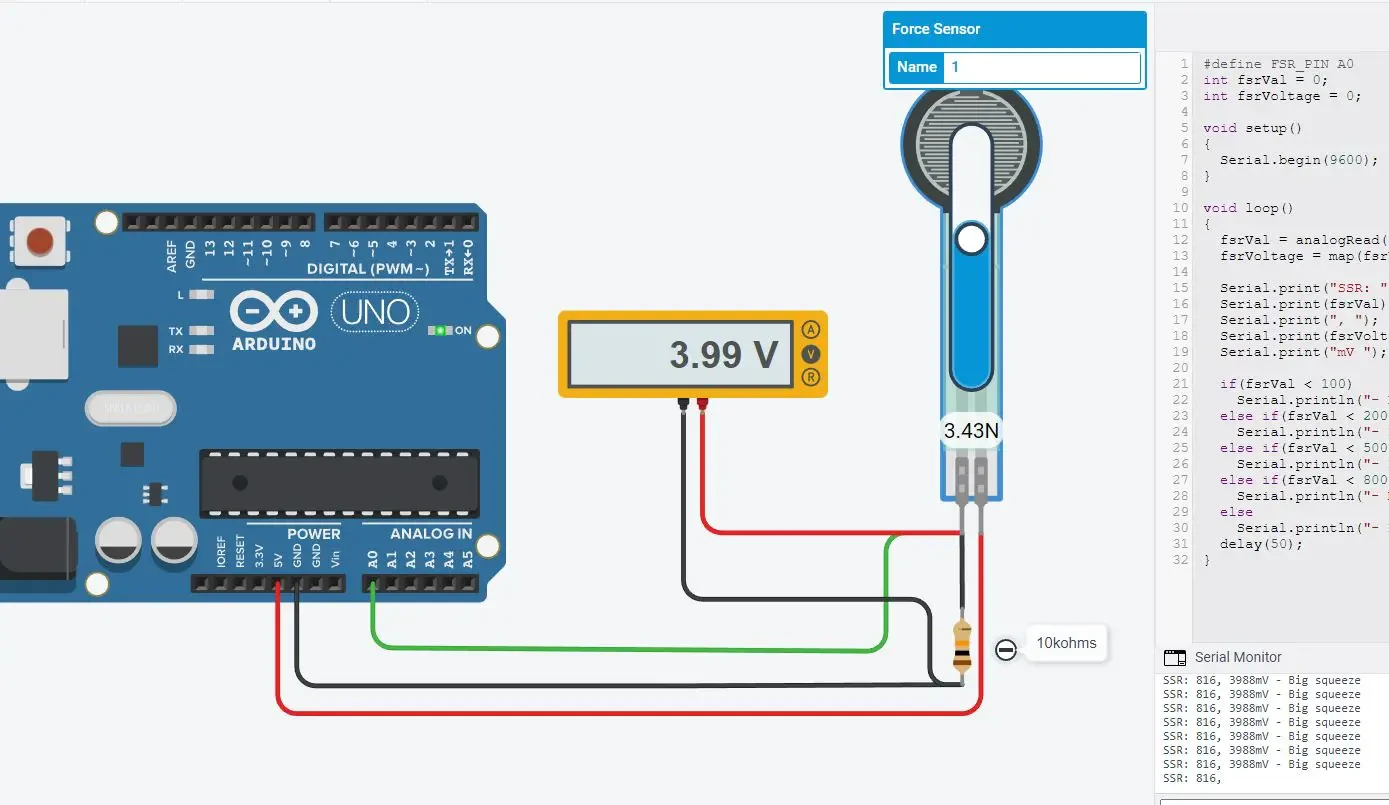
Serial.print("mV ");The exerted pressure compares with the defined values to differentiate it in the form of low, medium and high pressure. A pressure less than 100 is No pressure, a pressure less than 200 and greater than 100 is a light touch, and a pressure between 200 to 500 is considered a light sequence. While 500 to 800 is taken as the Medium squeeze. A pressure of more than 800 is a Big Squeeze.
For each case, we print on serial monitor the pressure get from this ranging:
  if(fsrVal < 100)
    Serial.println("- No pressure");
  else if(fsrVal < 200)
    Serial.println("- Light touch");
  else if(fsrVal < 500)
    Serial.println("- Light squeeze");
  else if(fsrVal < 800)
    Serial.println("- Medium squeeze");
  else
    Serial.println("- Big squeeze");
  delay(50);
}
Results
The simulation to give the demo, as in the picture that the serial monitor shows the serial print for the range of the pressure exerted on the force sensor.
What’s Next
Please find more tutorials on Arduino in peppe8o Arduino archives.
Enjoy!
Umar Jamil
For any queries and help for work, please contact me at:
Whatsapp: +92-346-661-7017/ Link
Email: umarjamil0007@gmail.com

I'm an Electronic Engineer, well-skilled to solve the issues of hardware and software. I do have laboratory which contains unlimited sensors and modules for testing the working. Also, I am experienced in Arduino programming, Android mobile application, microcontroller programming, IOTs and embedded projects. I provide services to control, realize the sensor data in the Mobile Application. For any queries and help for work Contact: Whatsapp:+92-346-661-7017 Email: umarjamil0007@gmail.com
![]()


