
Last Updated on 2nd September 2023 by peppe8o
In this tutorial I’m going to show you how to use PWM with Raspberry PI, include an example with a “breathing” LED.
Pulse Width Modulation (PWM) is an electronic technique of reducing the (average) power provided to a circuit by providing regular discrete pulses. As Raspberry PI hasn’t analogic PINs, this can provide an effective way to simulate an analog output
PWM signals
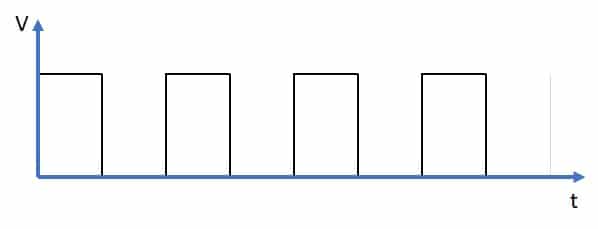
PWM technique uses digital signals, sent at a specified frequency, to compose square waves. This means that output high and low levels are alternated to form a squared signal:
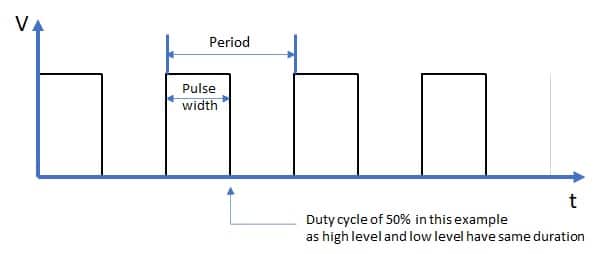
With square waves, following are common definitions:
- Period: time between same points of 2 cycles (for example the time between the rising edge of a wave and the rising edge of the following one). The higher the period, the larger the cycle.
- Frequency: usually defined as the inverse of period. You can think the frequency as the number of cycles for a specified period unit (if you use seconds for period, frequency becomes in hertz)
- Pulse Width: time of high level in each cycle period
- Duty cycle: percentage given from pulse width divided by total period time
Changing frequency and duty cycles, PWM can simulate an “analog like” signal, where output level can be calculated as high-level voltage (about 3.3 V for Raspberry PI programmable GPIOs) multiplied by duty cycle percentage. For example, still with Raspberry PI programmable GPIOs, a duty cycle of 50% will give:
3.3V x 50% = 1,65V
In Raspcberry PI, only GPIO 18 has a direct ability to act in PWM mode with an accuracy of 10-bit, which means that the 0%-100% duty cycle range is divided into 1024 (210) equal parts.
In this turial I will use the PWM modulation to drive a LED connected to Raspberry PI. The LED intensity is proportional to its input voltage, so configuring properly the duty cycle we’ll have different light effects. Moreover, by changing frequency during a loop, we’ll obtain a coll “breathing led” effect.
I will use a Raspberry PI Zero W, but same procedure a commands will work also with newer Raspberry PI computer boards.
What We Need
As usual, I suggest adding from now to your favourite e-commerce shopping cart all the needed hardware, so that at the end you will be able to evaluate overall costs and decide if to continue with the project or remove them from the shopping cart. So, hardware will be only:

- Raspberry PI Zero W (including proper power supply or using a smartphone micro usb charger with at least 3A) or newer Raspberry PI Board
- high speed micro SD card (at least 16 GB, at least class 10)
- LED
- resistor
- dupont wiring
- (optional) breadboard
Check hardware prices with following links:


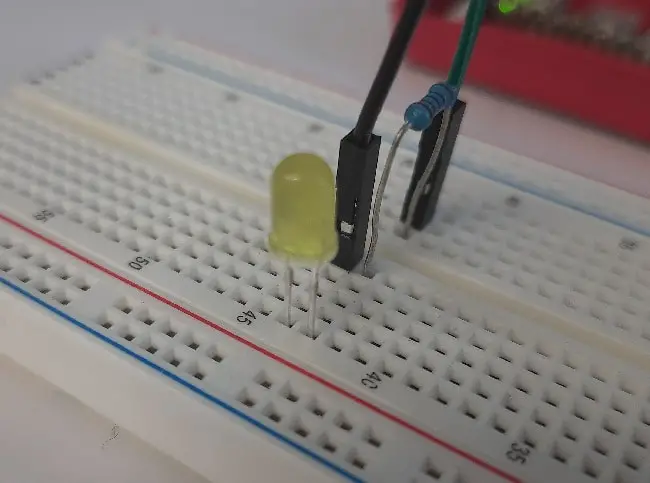
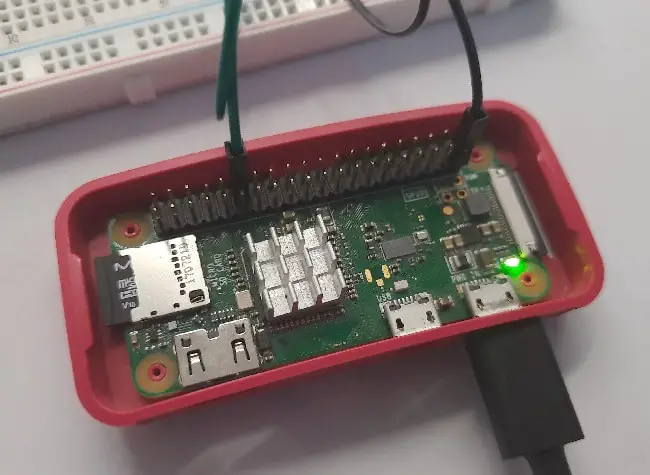
Wiring diagram
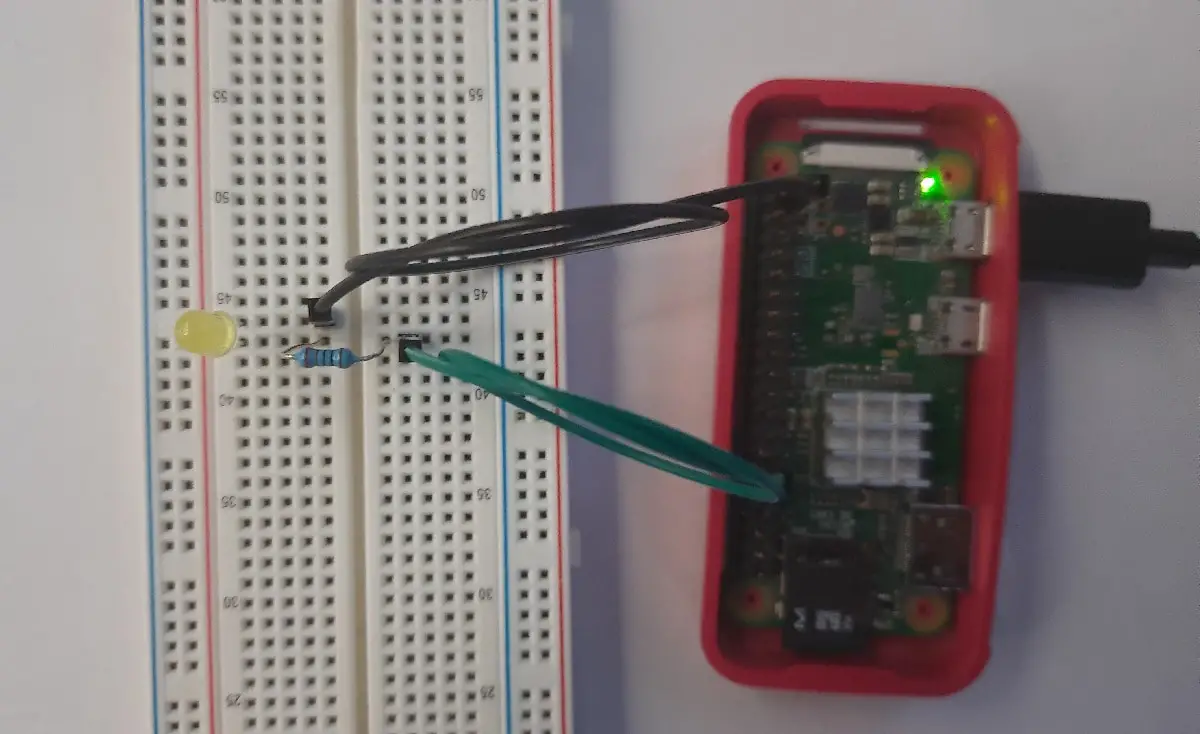
Please find below a picture describing cabling:

Please note that shorted PIN from LED is connected t Ground.
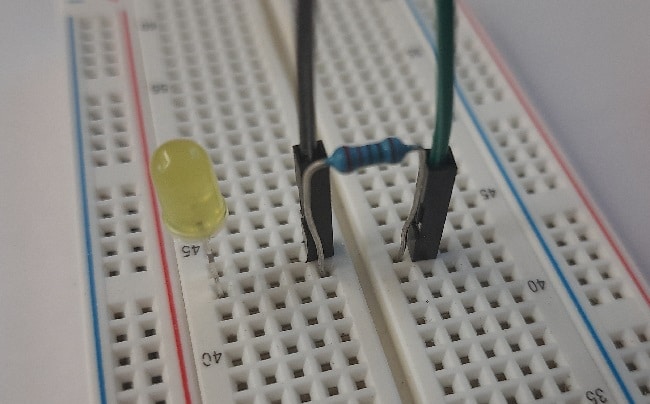
Following pictures are showing more details from my cabling:
Step-by-Step Procedure
Prepare Raspberry PI Operating System
Start preparing your OS. You can install Raspberry PI OS Lite (for a fast, headless OS) or Raspberry PI OS Desktop (using its internal terminal).
Make your OS up to date. From terminal, use the following command:
sudo apt update -y && sudo apt upgrade -yRPI.GPIO should be already installed (otherwise, you can get it installed with the command “sudo apt install python3-rpi.gpio”).
Prepare Python Script
You can get my script directly in your RPI with the following command:
wget https://peppe8o.com/download/python/breathingLed.pyFollowing paragraphs will describe code lines.
Our breathing led script starts importing required python modules:
import RPi.GPIO as GPIO
import sys
import time
Then the number corresponding to PWM led is associated to a variable for better code management. After this, broadcom (BCM) naming is set to be used, according to Raspberry PI pinout. We also set PWM led to output:
PWMLed = 18

GPIO.setmode(GPIO.BCM)
GPIO.setup(PWMLed,GPIO.OUT)
A “breath” variable will manage PWM mode, setting frequency to 1000 (1kHz). PWM output is also started:
breath = GPIO.PWM(PWMLed, 1000)
breath.start(0)
Here pwm function comes. This is a simple function composed by 2 “for” loops, each one using a “dc” variable associated to duty cycle. The first loop changes duty cycle from 1(%) to 100(%), as the last value from a range used inside a loop is not run. A small delay (0.02 ms) will make slower the led light move from low to high. With same logic, following “for” loop make the same effect but in the reverse direction (from high light to low). With ranges starting and ending to “1”, you won’t experience the led completely shutting down.
def pwm():
 while True:
  for dc in range(1, 101, 1):
   breath.ChangeDutyCycle(dc)
   time.sleep(0.02)
  for dc in range(100, 0, -1):
   breath.ChangeDutyCycle(dc)
   time.sleep(0.02)
The main program will run an infinite loop where the pwm effect will restart at the end of every run:
while True:
 try:
  pwm()
The final except statement will manage user interruption by stopping pwm mode from GPIO, cleaning GPIO status and exiting:
 except KeyboardInterrupt:
  breath.stop()
  GPIO.cleanup()
  sys.exit()
Run the breathingLed Python Script
To run this script, issue the following command from terminal:
python3 breathingLed.pyYour LED will start its breathing effect.
Enjoy!

Open source and Raspberry PI lover, writes tutorials for beginners since 2019. He's an ICT expert, with a strong experience in supporting medium to big companies and public administrations to manage their ICT infrastructures. He's supporting the Italian public administration in digital transformation projects.
![]()
![]()
![]()
![]()
![]()
![]()
![]()


